Knowledge Base
Comprehensive documentation and answers for the Web3Cart platform.
1. Starter Plan: $299 (One-time). Includes 2.5% commission, $500K transaction limit, 5GB space.
2. Growth Plan: $999 (One-time). Includes 1.5% commission, $5M transaction limit, 200GB space. Best for growing businesses.
3. Scale Plan: $2999 (One-time). Includes 0.5% commission, Unlimited transactions, Unlimited space.
4. Enterprise Plan: $14,999. 0% commission, fully customized solution.
1. Upload the files to your server.
2. Create a MySQL database.
3. Visit your domain to start the installer.
4. Enter your purchase code and database details.
Web3cart is a revolutionary, feature-packed PHP script that empowers you to build a cutting-edge, decentralized online store. Go beyond traditional e-commerce and step into the future by accepting direct cryptocurrency payments for both physical and digital products. Built on a secure and modern technology stack, this platform combines the familiarity of a professional e-commerce experience with the power and trustlessness of blockchain technology.
Are you tired of paying high fees to middlemen, waiting for payouts, and dealing with fraudulent chargebacks? Web3cart solves all of this. By leveraging the power of blockchain, we put you back in control. This isn't just another e-commerce script; it's a declaration of financial independence for online entrepreneurs.
Whether you're looking to launch a next-generation marketplace, attract a crypto-native audience, or simply future-proof your business, Web3cart provides the ultimate turnkey solution.
Minimum Server Requirements
rnTo ensure our script runs smoothly, securely, and with all features enabled, your server must meet the following minimum requirements. The installation wizard will check these for you, but you can use this list as a reference.
rnrn
Core Requirements:
rn- rn
- PHP Version: 8.3 or higher rn
- MySQL Version: 8.0 or higher (or MariaDB 10.4+) rn
- Apache Web Server with the
mod_rewritemodule enabled (for SEO-friendly URLs). rn
Required PHP Extensions:
rnThe following PHP extensions must be enabled on your server:
rn- rn
- BCMath: For high-precision mathematics, crucial for cryptocurrency calculations. rn
- JSON: For processing JSON data, used in API communications. rn
- Mbstring: For handling multi-byte strings (international characters). rn
- OpenSSL: For cryptographic functions and secure connections (HTTPS). rn
- PDO & pdo_mysql: For secure database connections. rn
- Tokenizer: Required by some of the script
Welcome to the Installation Wizard
rnThis is the first step in setting up your new web3 e-commerce platform. Before you begin, please make sure you have the following information ready:
rn- rn
- Your Purchase Code. rn
- Your Database Credentials (Host, Database Name, User, and Password). rn
- Access to a Web3 Wallet (like MetaMask) for the final on-chain registration step. rn
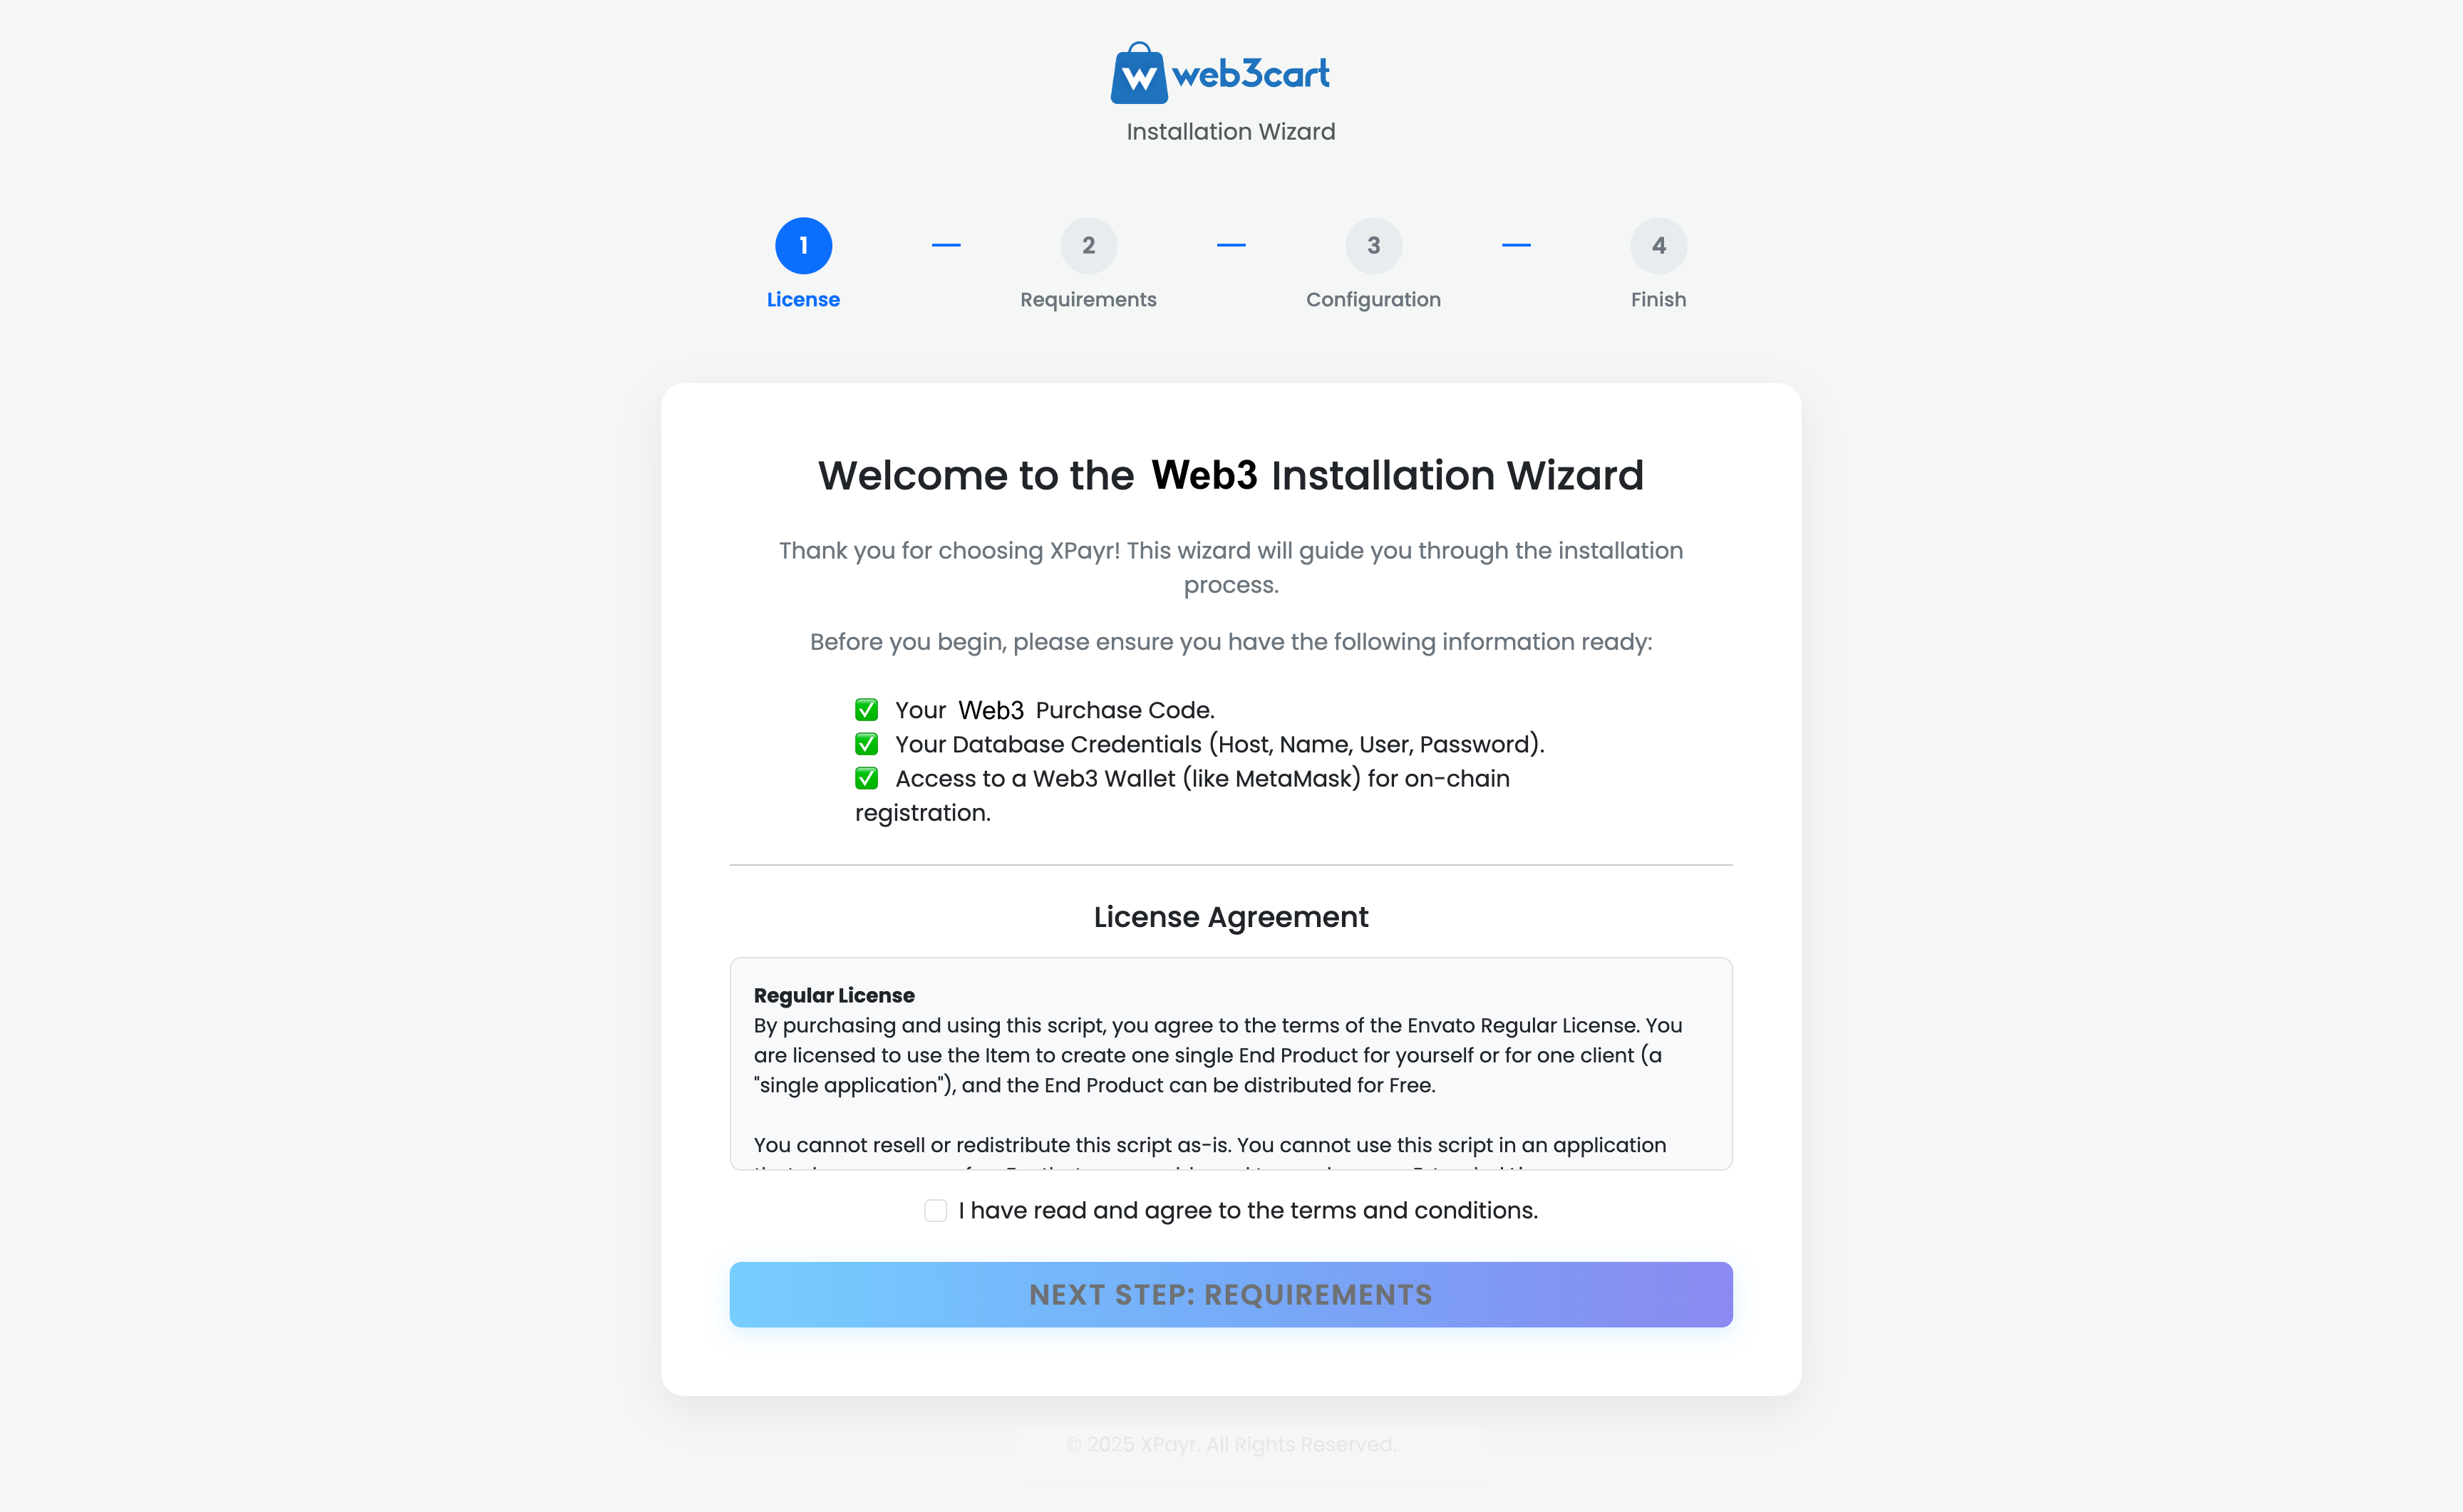
License Agreement
rnPlease read through the Web3 License terms. To proceed, you must enter your valid purchase code and check the box to confirm that you have read and agree to the terms and conditions.
rnOnce you have filled in the required information, click the "NEXT STEP: REQUIREMENTS" button to continue.
Server Requirements Analysis
rnIn this step, the installer automatically checks your server environment to ensure it is compatible with the script. For the application to run smoothly and securely, all requirements must be met.
rnUnderstanding the Results
rn- rn
- A Passed badge indicates that the requirement is met and your server is correctly configured for that item. rn
- A Failed badge indicates a problem that must be resolved before you can proceed. The "Next Step" button will be disabled until all checks pass. rn
Common Issues & Solutions
rnPHP Extension Missing: If an extension (e.g., PDO MySQL, OpenSSL, BCMath) is not found, you need to enable it via your hosting control panel (like cPanel or Plesk) or contact your hosting provider for assistance.
Directory Not Writable: If the Project Root or public/uploads/ directory fails the check, it means the script does not have permission to write files. You must use your File Manager or an FTP client to change the permissions of that directory to 755 or 775.
After making any necessary changes to your server, click the "Re-check Requirements" button to run the validation again. Once all items are marked as "Passed", you can proceed by clicking "Next Step: Database Setup".
rn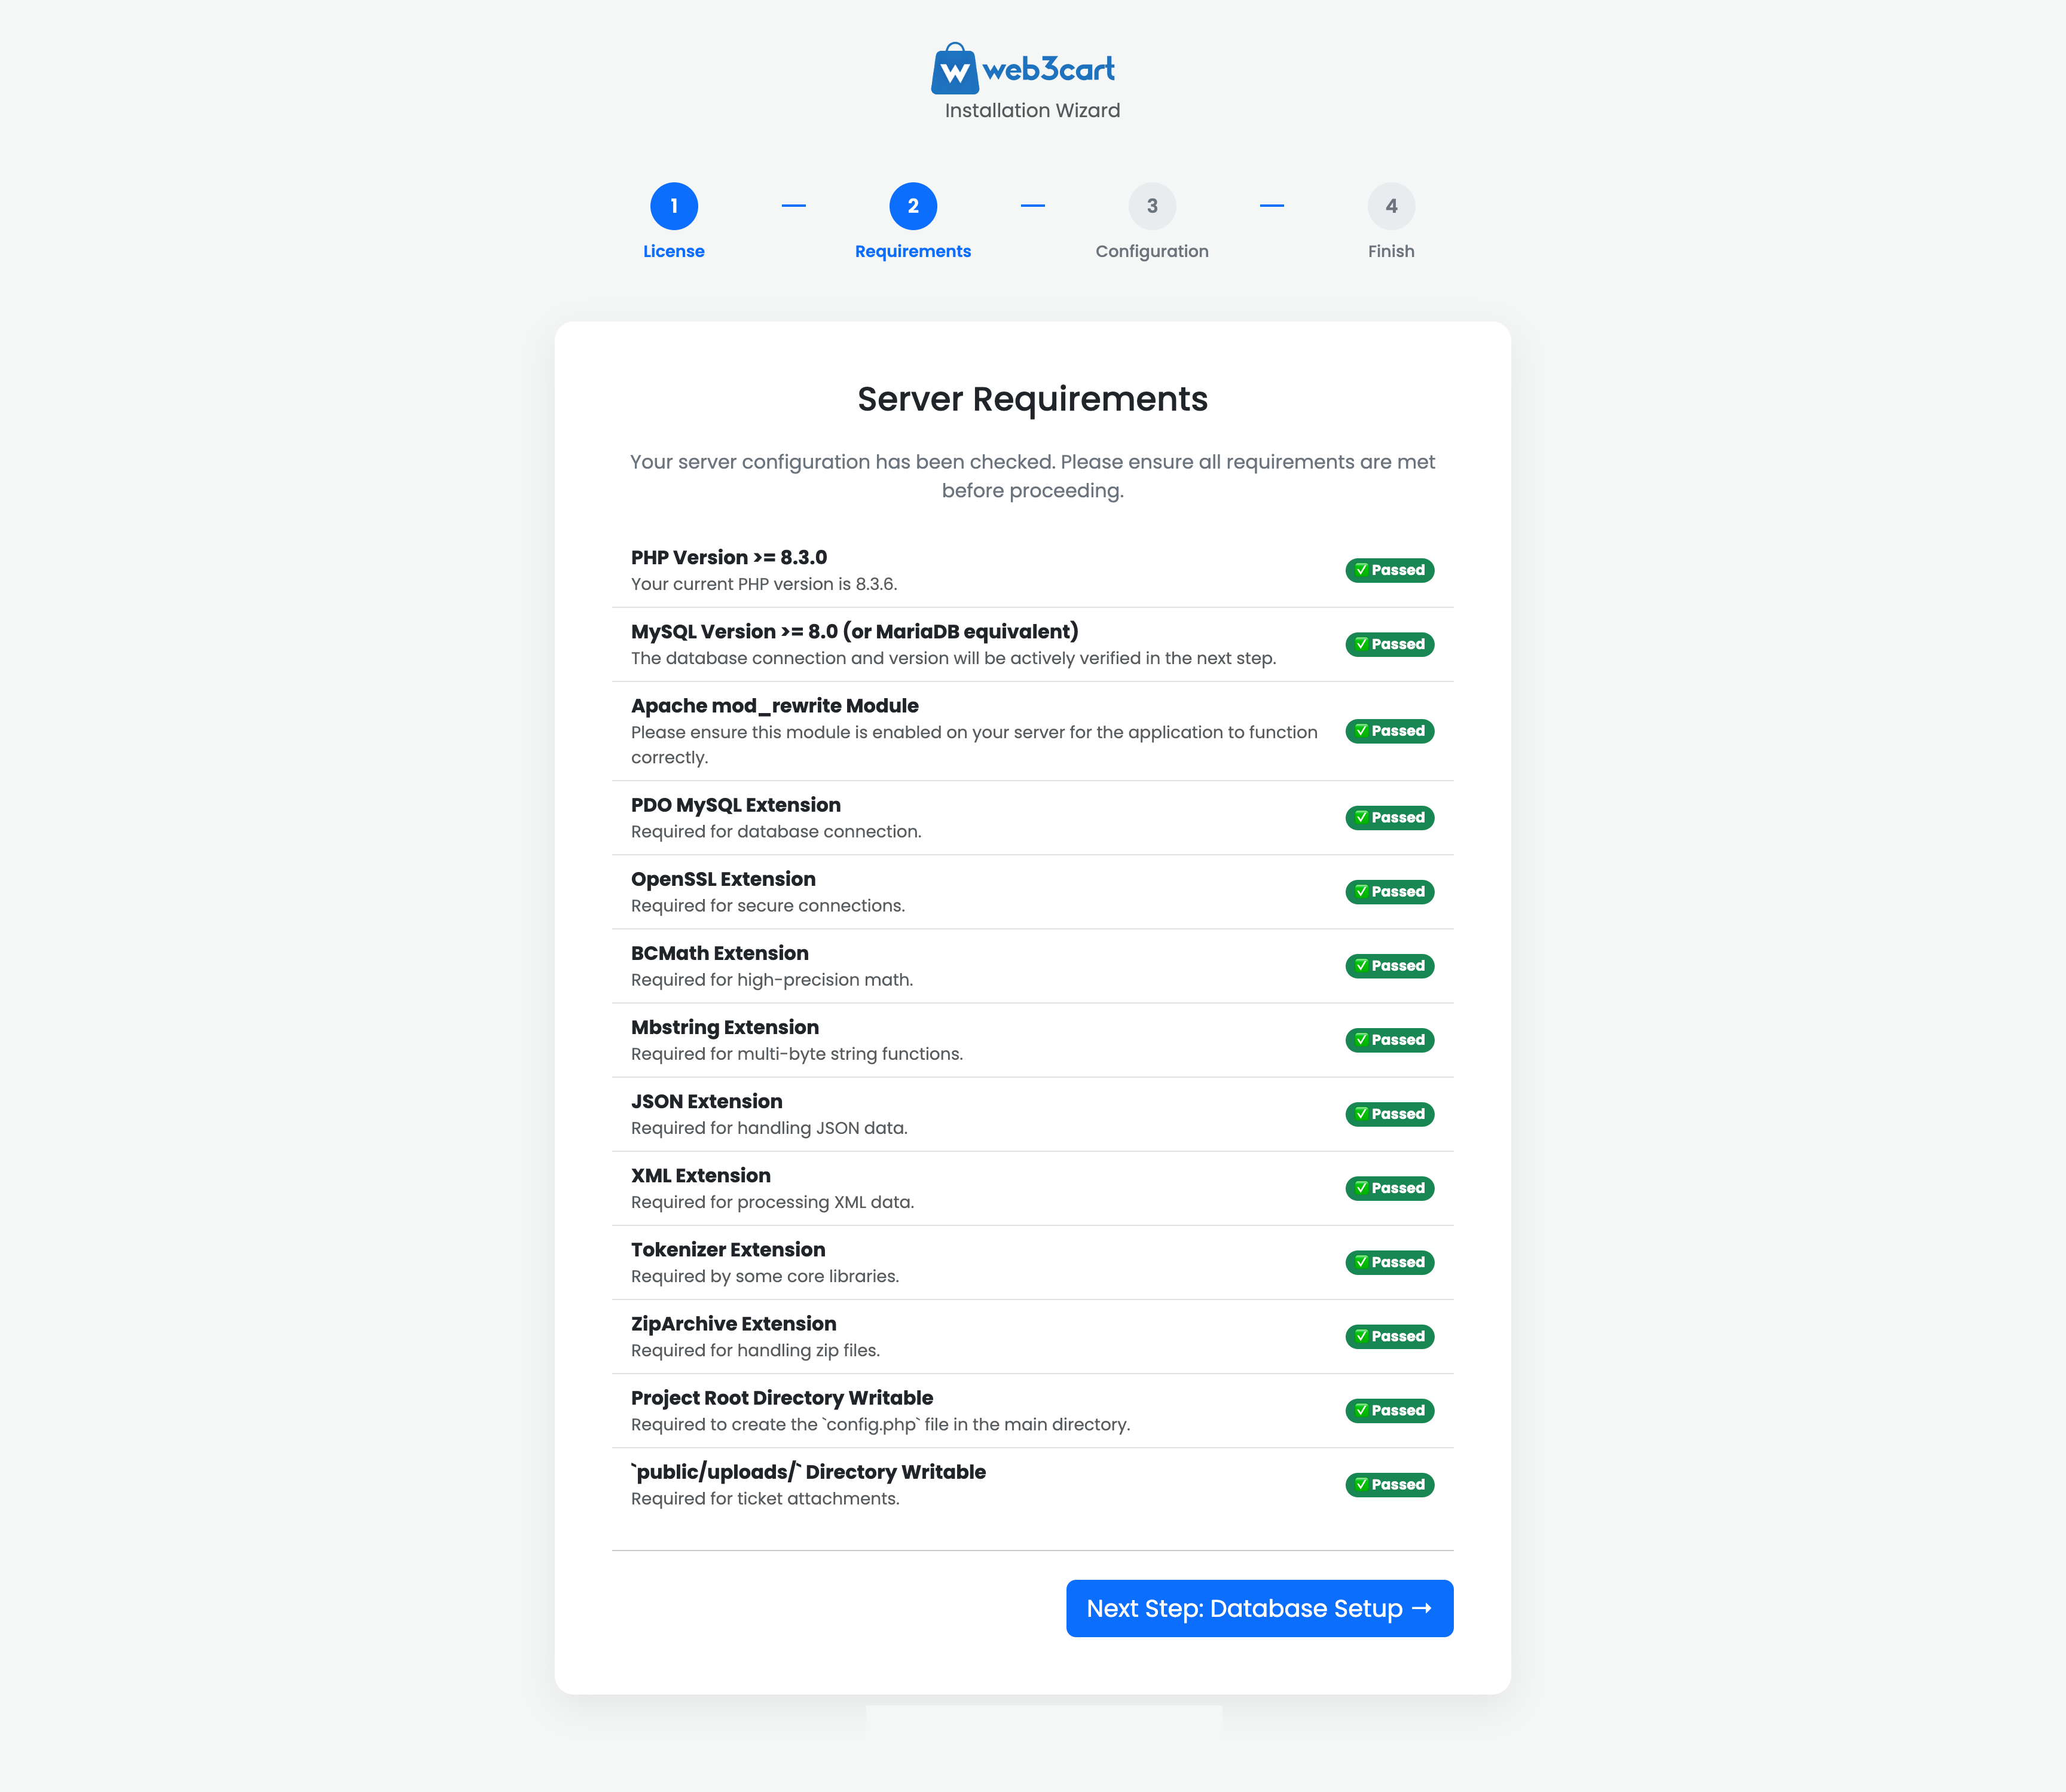
Configuration Details
rnThis is the most important step, where you provide the core details for your application database, website, and administrator account.
rnDatabase Details
rn- rn
- Database Host: This is the server where your database is located. For most hosting providers, this is
localhost. rn - Database Name: The name of the database you created for this application. rn
- Database User: The username with permissions to access the database. rn
- Database Password: The password for the database user. rn
Site & Admin Details
rn- rn
- Site Name: The name of your marketplace (e.g., "My Web3 Store"). rn
- Site URL: The full URL where your script is installed, including
https://. rn - Admin Username, Email, Password: These will be the credentials for your main administrator account. rn
Demo Content
rnIt is highly recommended to check the "Import Demo Content" box. This will populate your site with sample products, categories, and images, making it much easier to get started and see how everything works.
rnAfter filling all the fields correctly, click the "COMPLETE INSTALLATION" button.
rn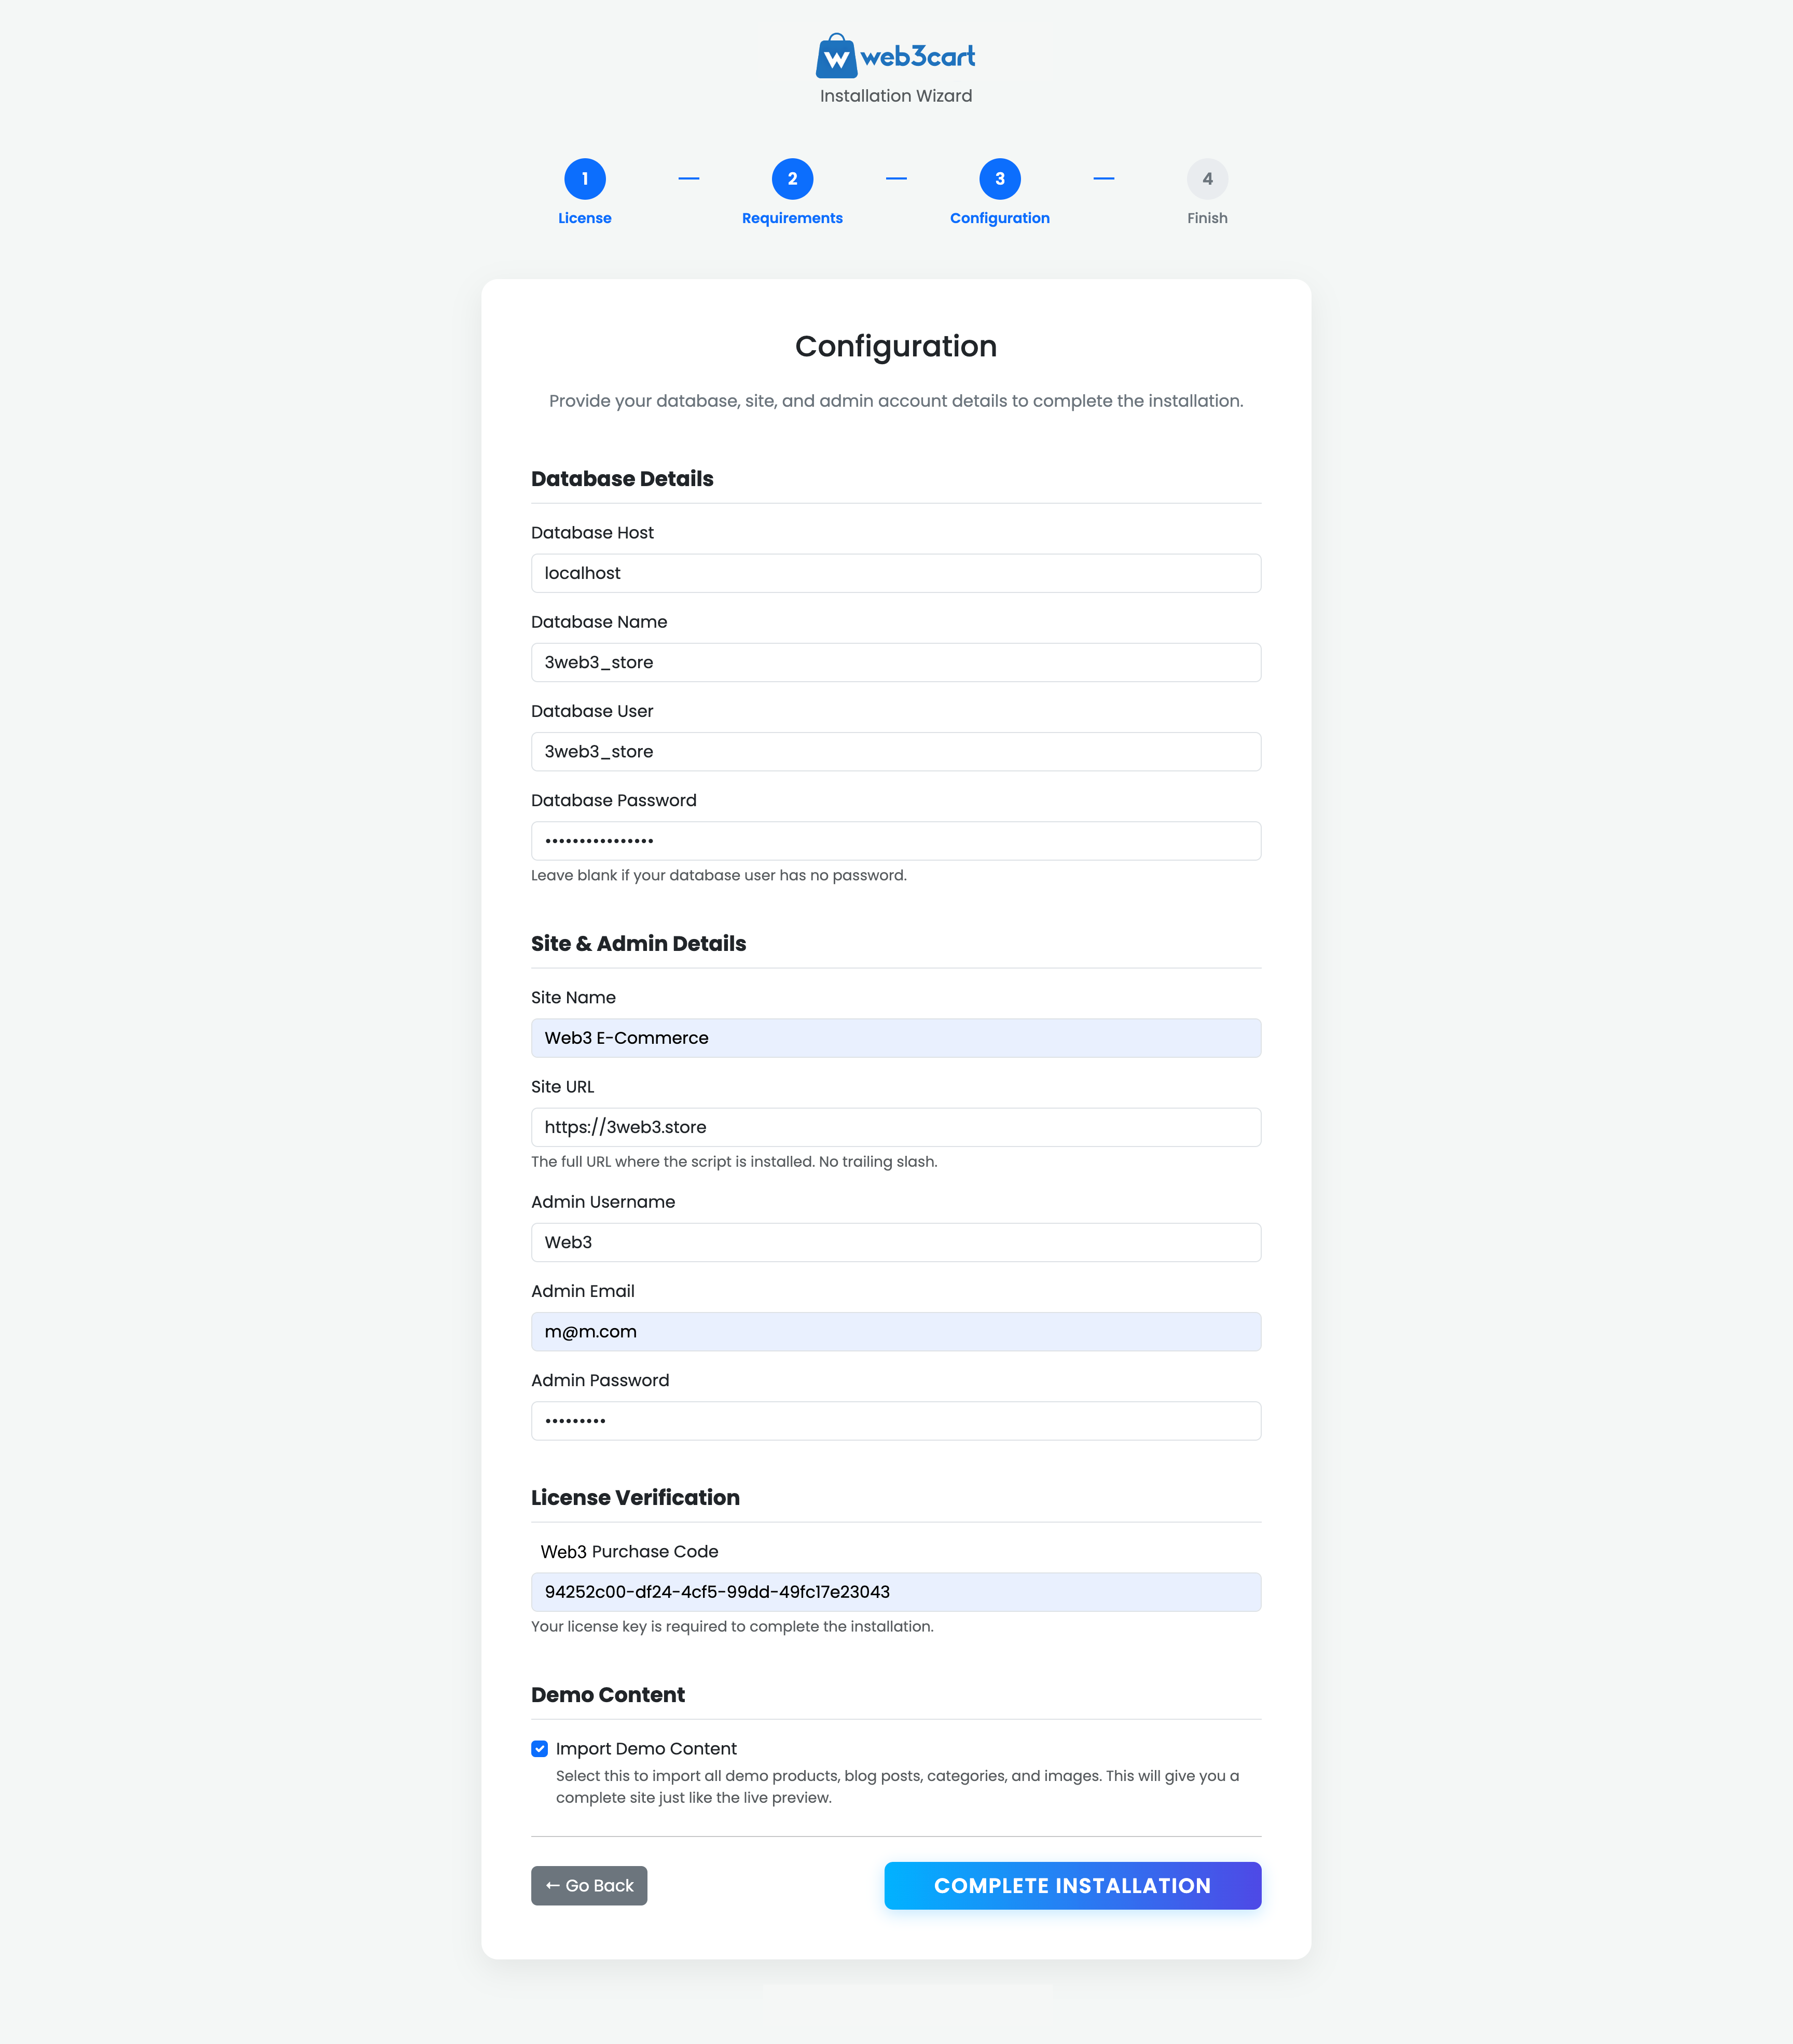
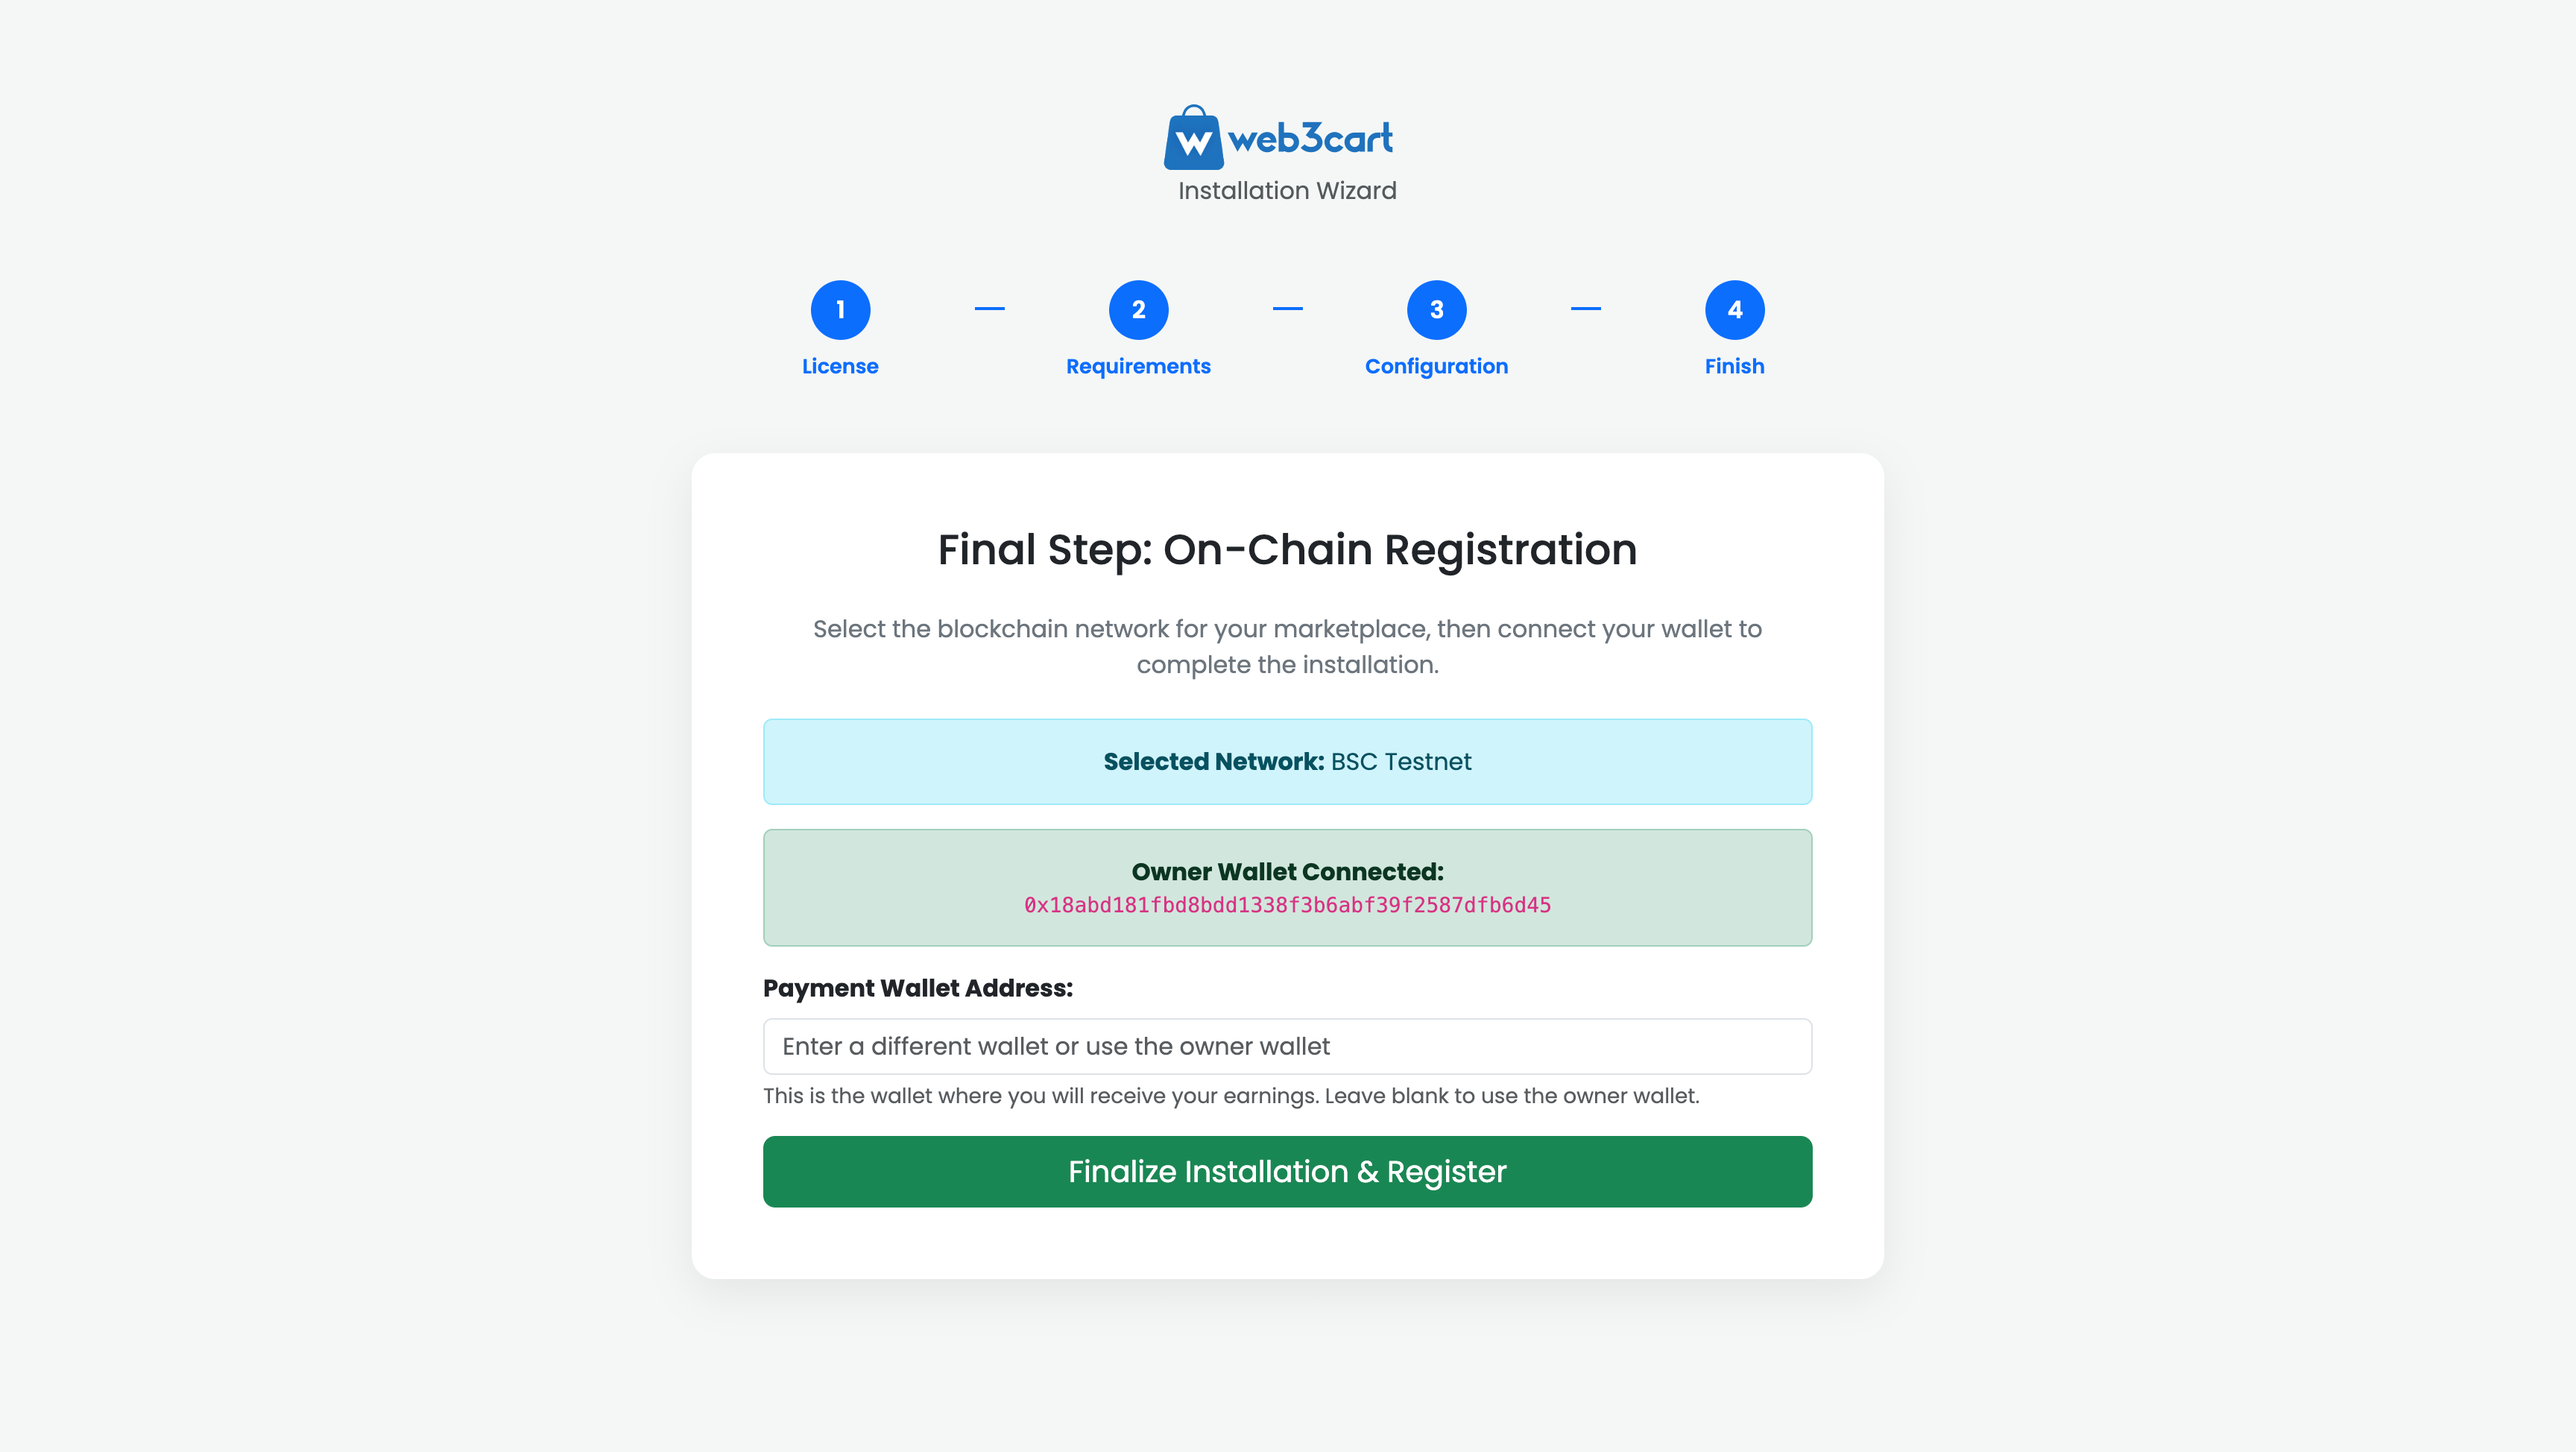
Final Step: On-Chain Registration
rnThis final step connects your marketplace to the blockchain by linking your administrator account to a Web3 wallet. This wallet will be recognized as the owner of the platform.
rnProcess
rn- rn
- Select Network: Choose the blockchain network your marketplace will operate on from the dropdown menu (e.g., BSC Testnet, Ethereum Mainnet). rn
- Connect Wallet: Click the "CONNECT WALLET" button. Your browser wallet (e.g., MetaMask) will prompt you to approve the connection. rn
- Confirm Wallets: Once connected, your primary wallet address (Owner Wallet) will be displayed. You can optionally specify a different Payment Wallet Address where you wish to receive earnings. If left blank, the owner wallet will be used for payments. rn
After confirming the wallet addresses, click "Finalize Installation & Register" to complete the setup.
rn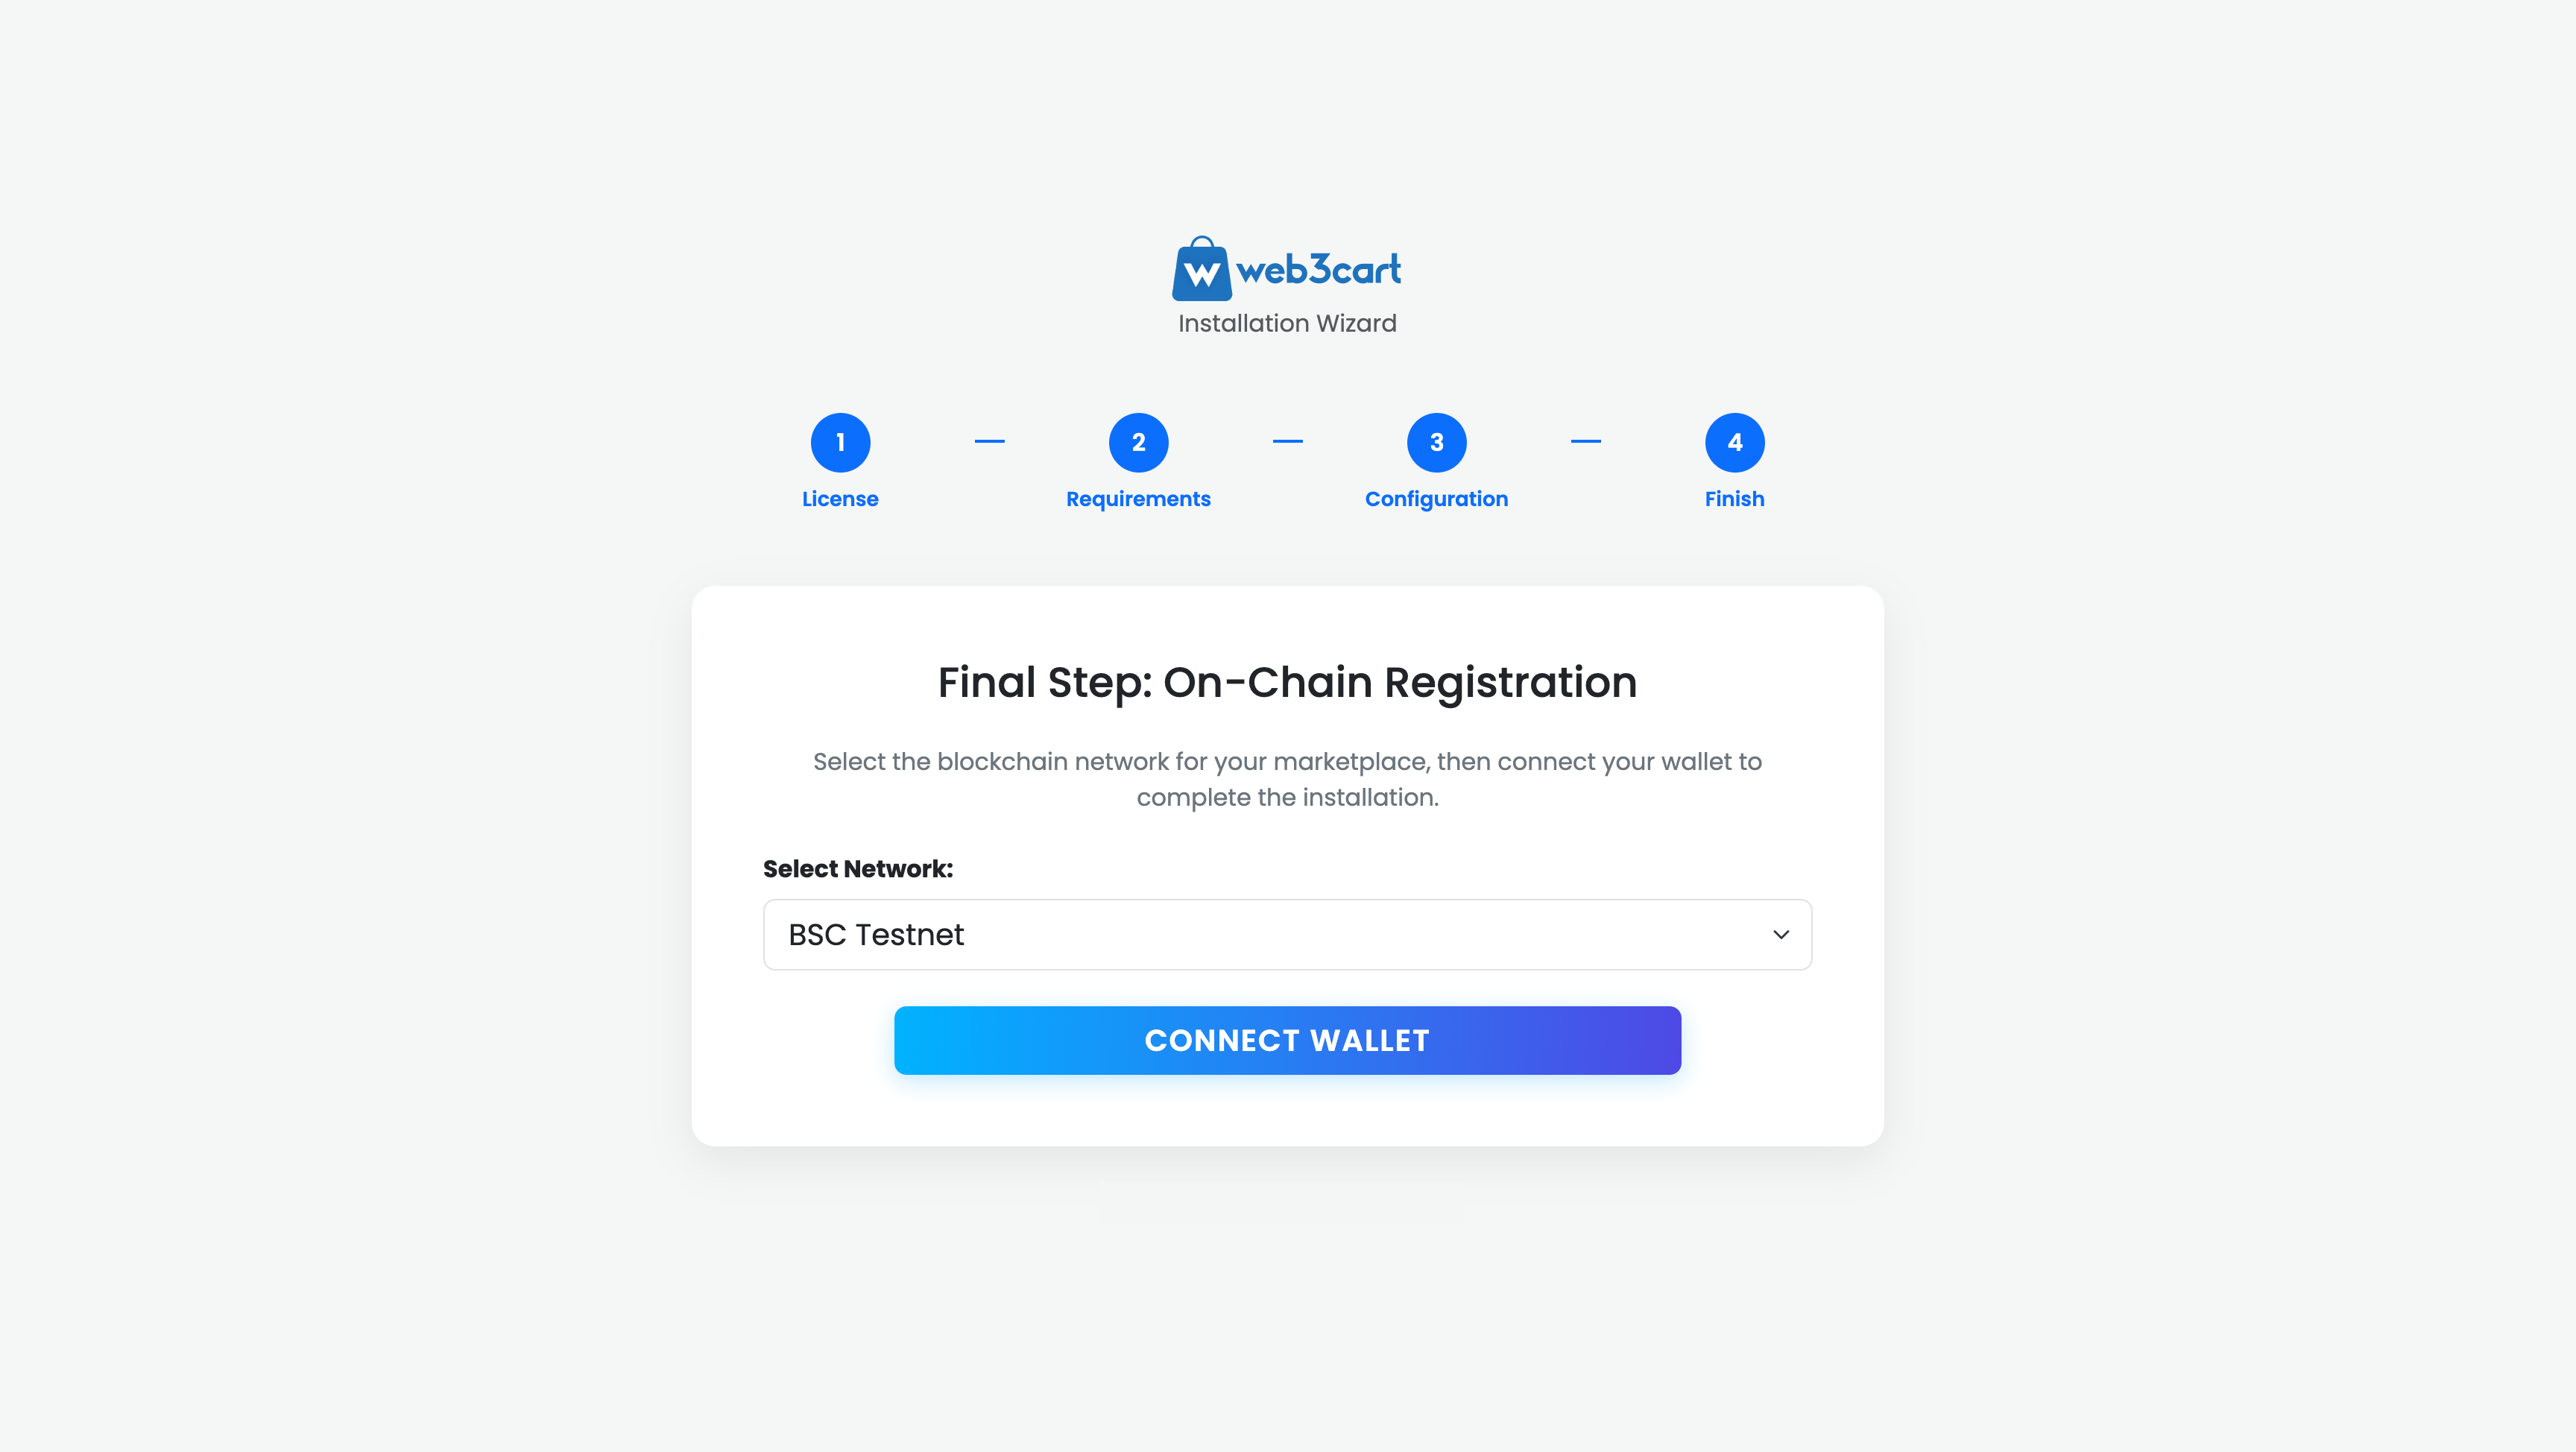
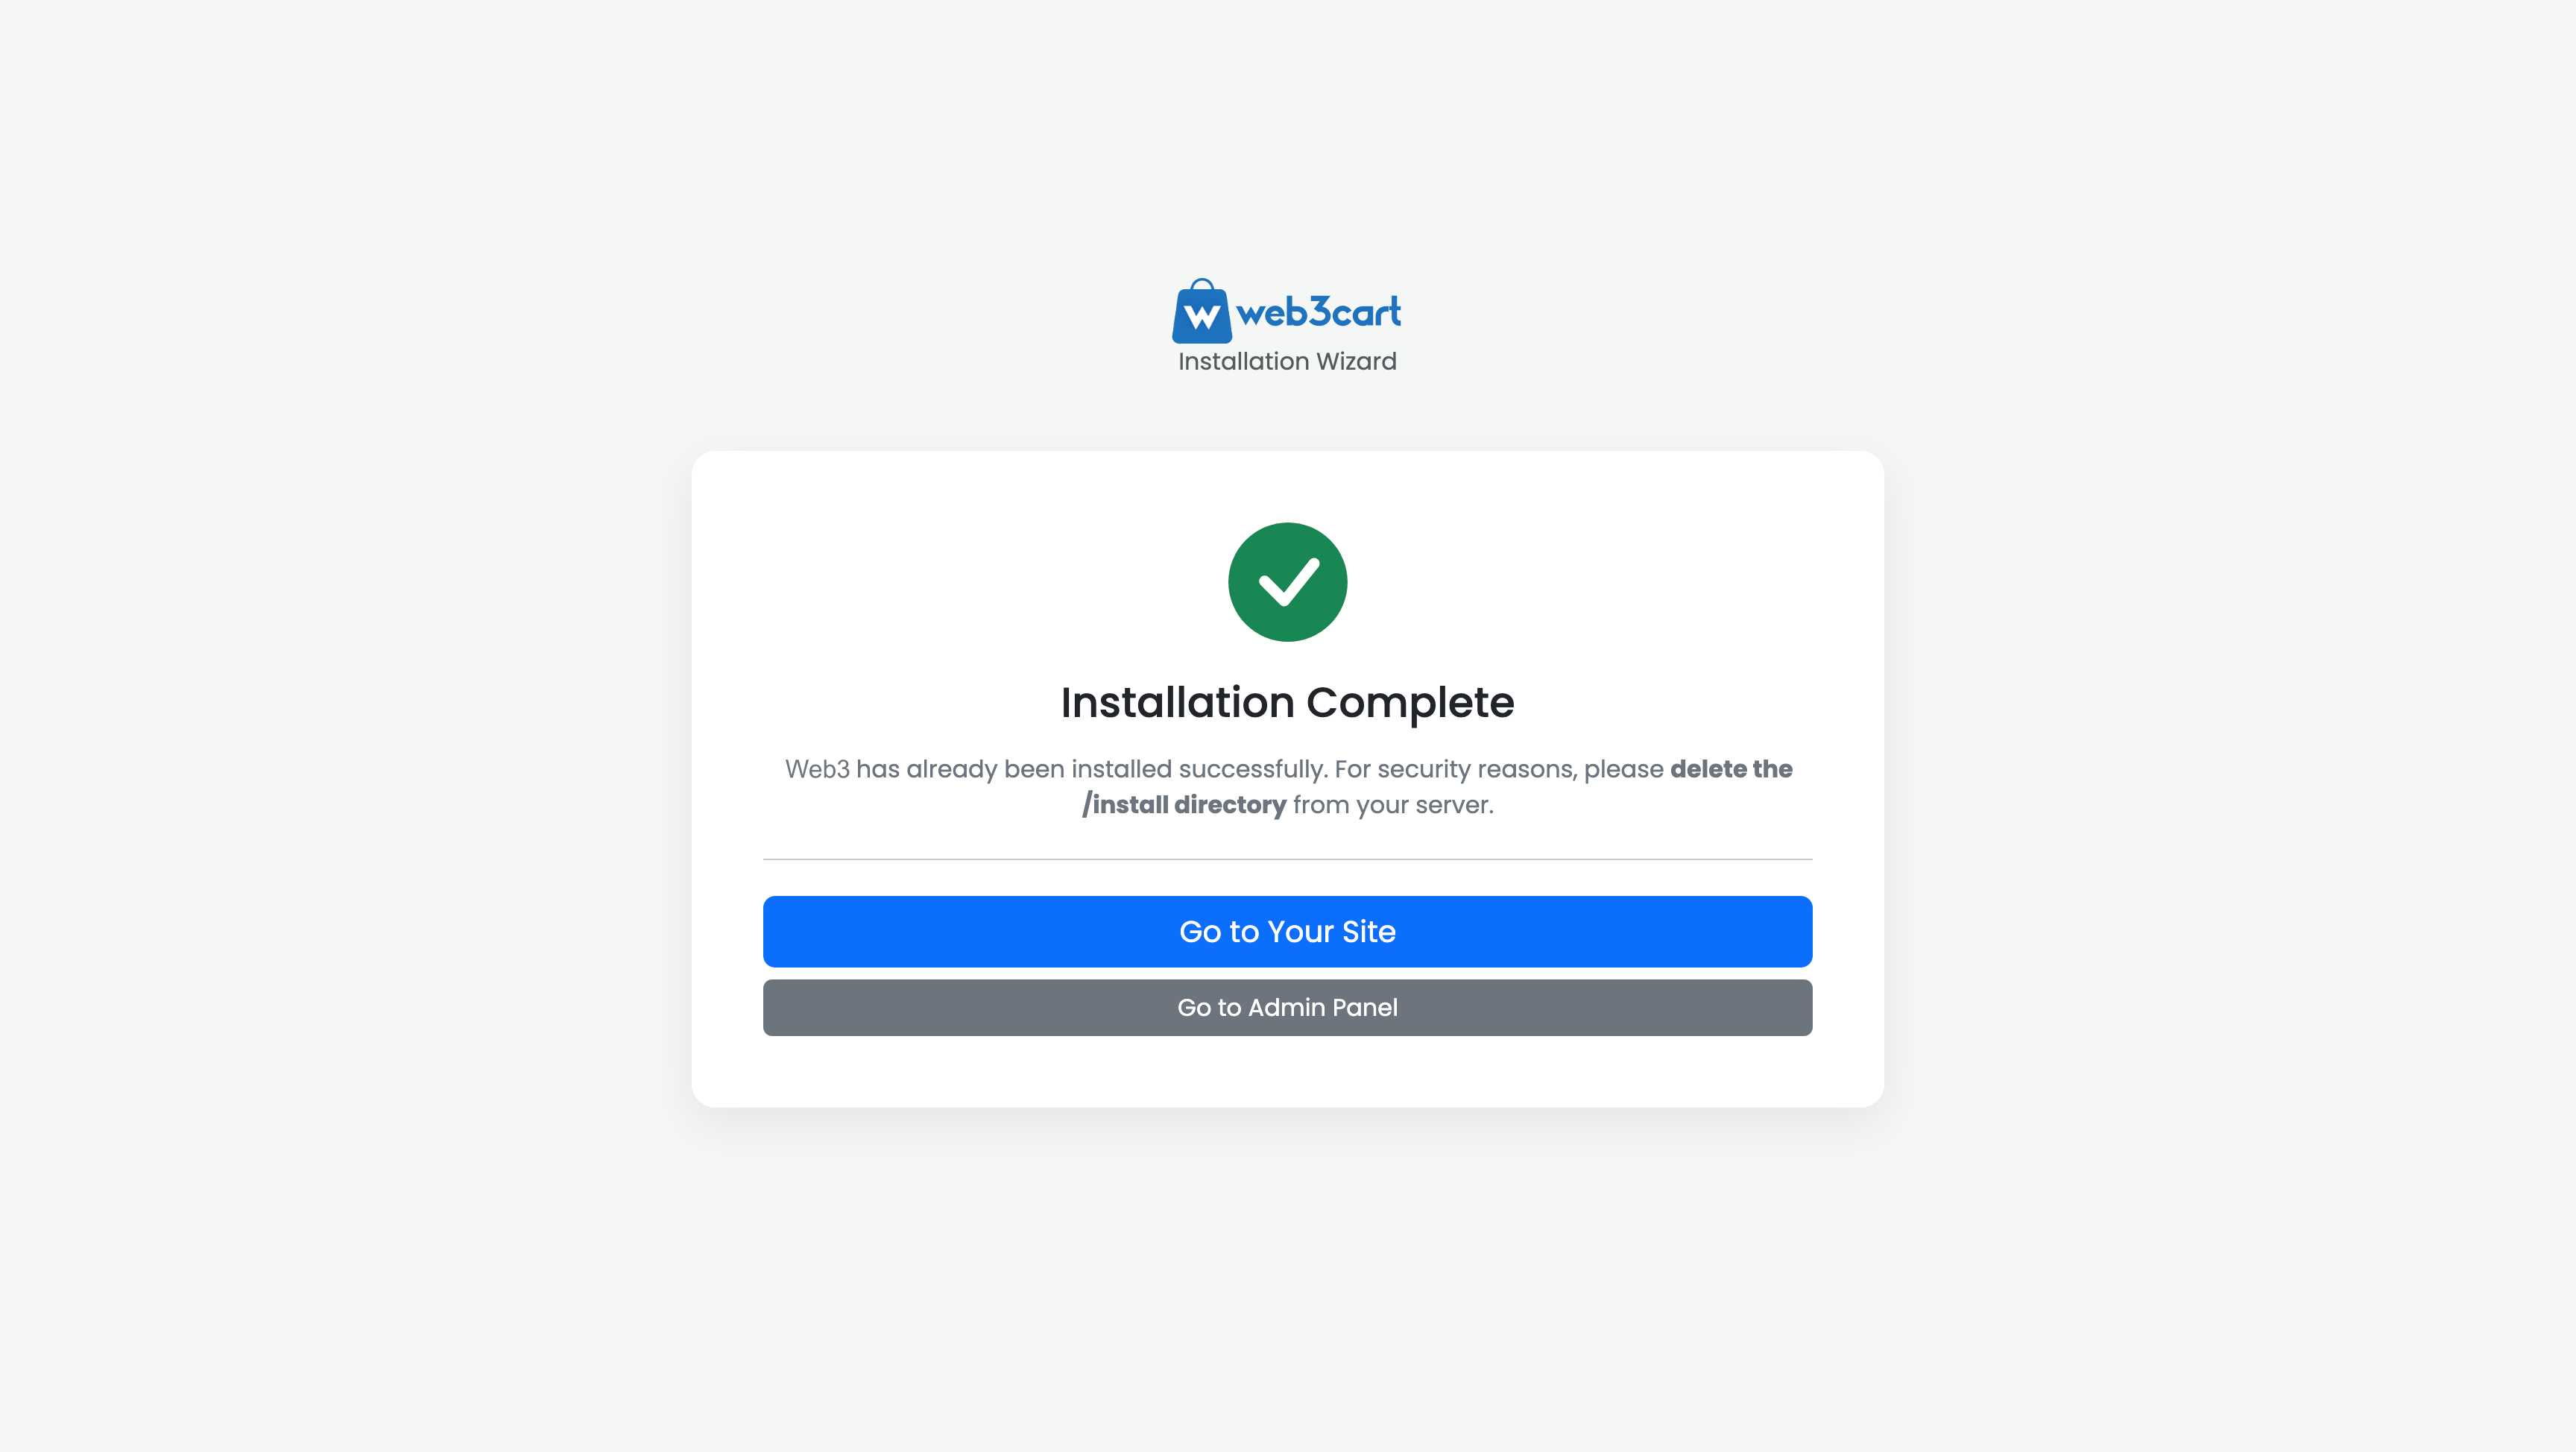
Installation Complete
rnCongratulations! Your web3 e-commerce platform has been successfully installed and configured. You are now ready to start using your site.
rnCRITICAL SECURITY WARNING:rn
For the security of your website, you MUST delete the/installdirectory from your server immediately. Leaving the installer accessible on a live server is a major security risk that could allow someone to re-configure or damage your site.
Next Steps
rn- rn
- Click "Go to Your Site" to view the public-facing homepage of your new marketplace. rn
- Click "Go to Admin Panel" to log in with the administrator credentials you created during Step 3. rn
General Site Settings
rnThis section controls the core identity, branding, and basic SEO settings for your entire website. The information you enter here will appear in browser tabs, search engine results, and various places across your site.
rnrn
Site Identity
rn- rn
- Site Name: The official name of your marketplace (e.g., "Web3cart"). This is often used in the browser tab title and emails. rn
- Welcome Message: A short, welcoming slogan or message that may be displayed on the homepage or other key areas. rn
- Site Description: A brief summary of your platform. This is very important for SEO as it is often used by search engines like Google as the description snippet in search results. rn
Branding & Currency
rn- rn
- Site Logo: Upload your main website logo here. This will typically appear in the site header. (Note: Leave this field blank to keep the current logo.) rn
- Site Favicon: Upload your site
Contact & Social Media Settings
rnThis section allows you to manage your public contact information and link to your social media profiles. This information is typically displayed in the site
Footer Settings
rnThis section gives you granular control over the content and visibility of elements in your website
Maintenance Mode Settings
rnMaintenance mode allows you to display a user-friendly message to your visitors while you perform updates, run tests, or make significant changes to your site. When enabled, only logged-in administrators can access the full website.
rnrn
- rn
- Enable Maintenance Mode: Check this box to activate maintenance mode. Your site will become inaccessible to all non-administrator visitors. rn
- Maintenance Message: The content that will be displayed to visitors on the maintenance page. You can use HTML to format your message. For example:rn
<h2>We
Cookie Alert Banner Settings
rnThis section allows you to enable and customize a cookie consent banner on your website. This is essential for complying with privacy regulations like GDPR.
rnrn
- rn
- Enable Cookie Alert Banner: Check this box to display the cookie consent banner to new visitors. rn
- Cookie Alert Message: The text that will be displayed within the banner. You can use HTML to format the message and, most importantly, to link to your Privacy Policy page.
Example with a link:rn
rnWe use cookies to enhance your experience. To learn more, please read our <a href="/page/privacy-policy">Privacy Policy</a>.rn
When enabled, the banner will typically be shown at the bottom of the screen until the user accepts or dismisses it.
rn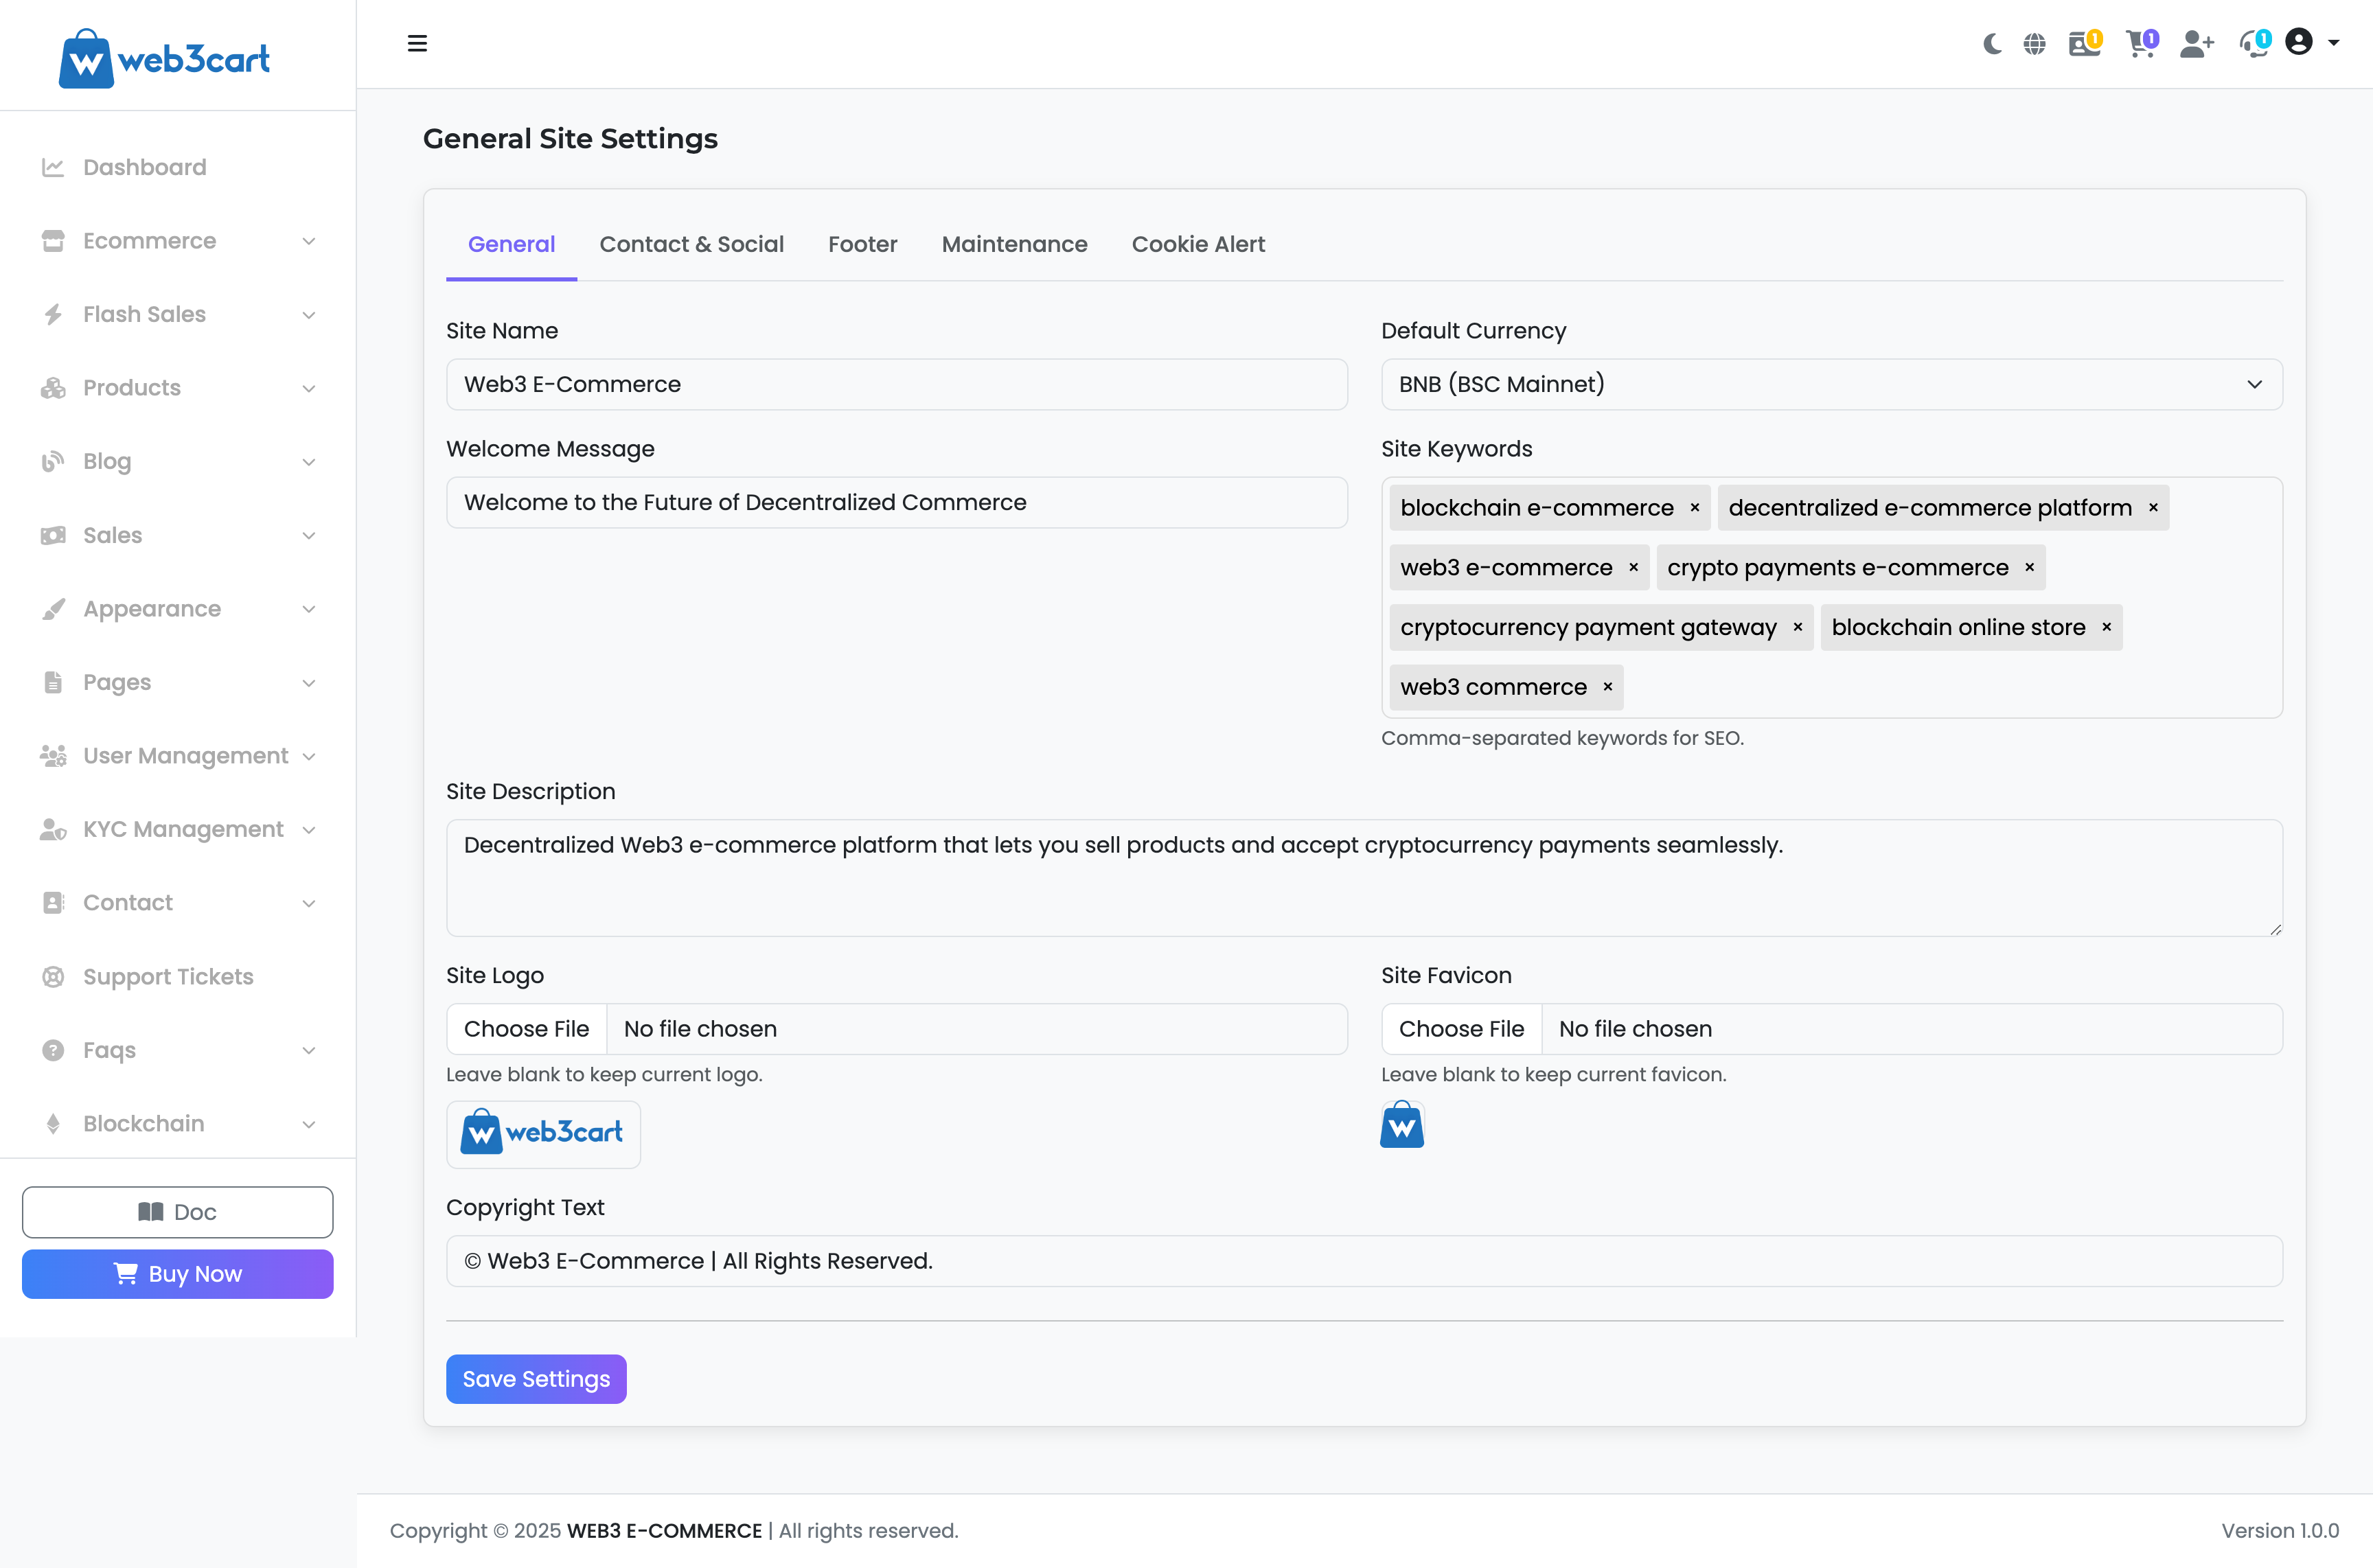
System Settings: E-Commerce Logic
rnThis section controls the core financial and operational rules for your marketplace, such as taxes, shipping, and user permissions.
rnrn
Tax & Pricing
rn- rn
- Default Tax Rate (%): Enter a default tax percentage that will be applied to orders. Set to
0.00if you do not wish to apply a default tax. rn - Price Entry Method: Choose how you will enter product prices in the admin panel.rn
- rn
- Prices Entered Exclude Tax: Choose this if your product prices do not include tax. The tax will be calculated and added at checkout. (e.g., $100 + 10% tax = $110 total). rn
- Prices Entered Include Tax: Choose this if your product prices already have tax factored in. The system will calculate how much of the total price is tax. (e.g., $110 total includes $10 of tax). rn
rn
Shipping
rn- rn
- Default Shipping Type: Select the pre-selected shipping method that will appear in the user
System Settings: Legal Documents & Comments
rnThis section is crucial for managing your site
Managing Languages
rnThis section allows you to add new languages to your site, making your platform truly multilingual. You can also manage existing languages by setting a default, editing translations, or deleting them.
rnrn
How to Add a New Language (Easy Copy Method)
rnOur system is designed to make adding new languages incredibly simple. When you add a new language, the system automatically copies all existing text keys from your default language (English), so you only need to translate the values.
rn- rn
- Language Name: Enter the full name of the language you want to add (e.g.,
German,French,Spanish). rn - Language Code: Enter the official 2-letter language code (e.g.,
defor German,frfor French,esfor Spanish). rn - Click the "Add Language & Copy Keys" button. rn
That
Translating Language Text
rnAfter adding a new language, this is where you perform the actual translation. The system uses a "key-value" pair structure. You only need to change the text (value), not the identifier (key).
rnrn
Understanding the Interface
rn- rn
- Language Tabs: At the top, you
Managing Blockchain Networks
rnThis section is the foundation of your marketplace
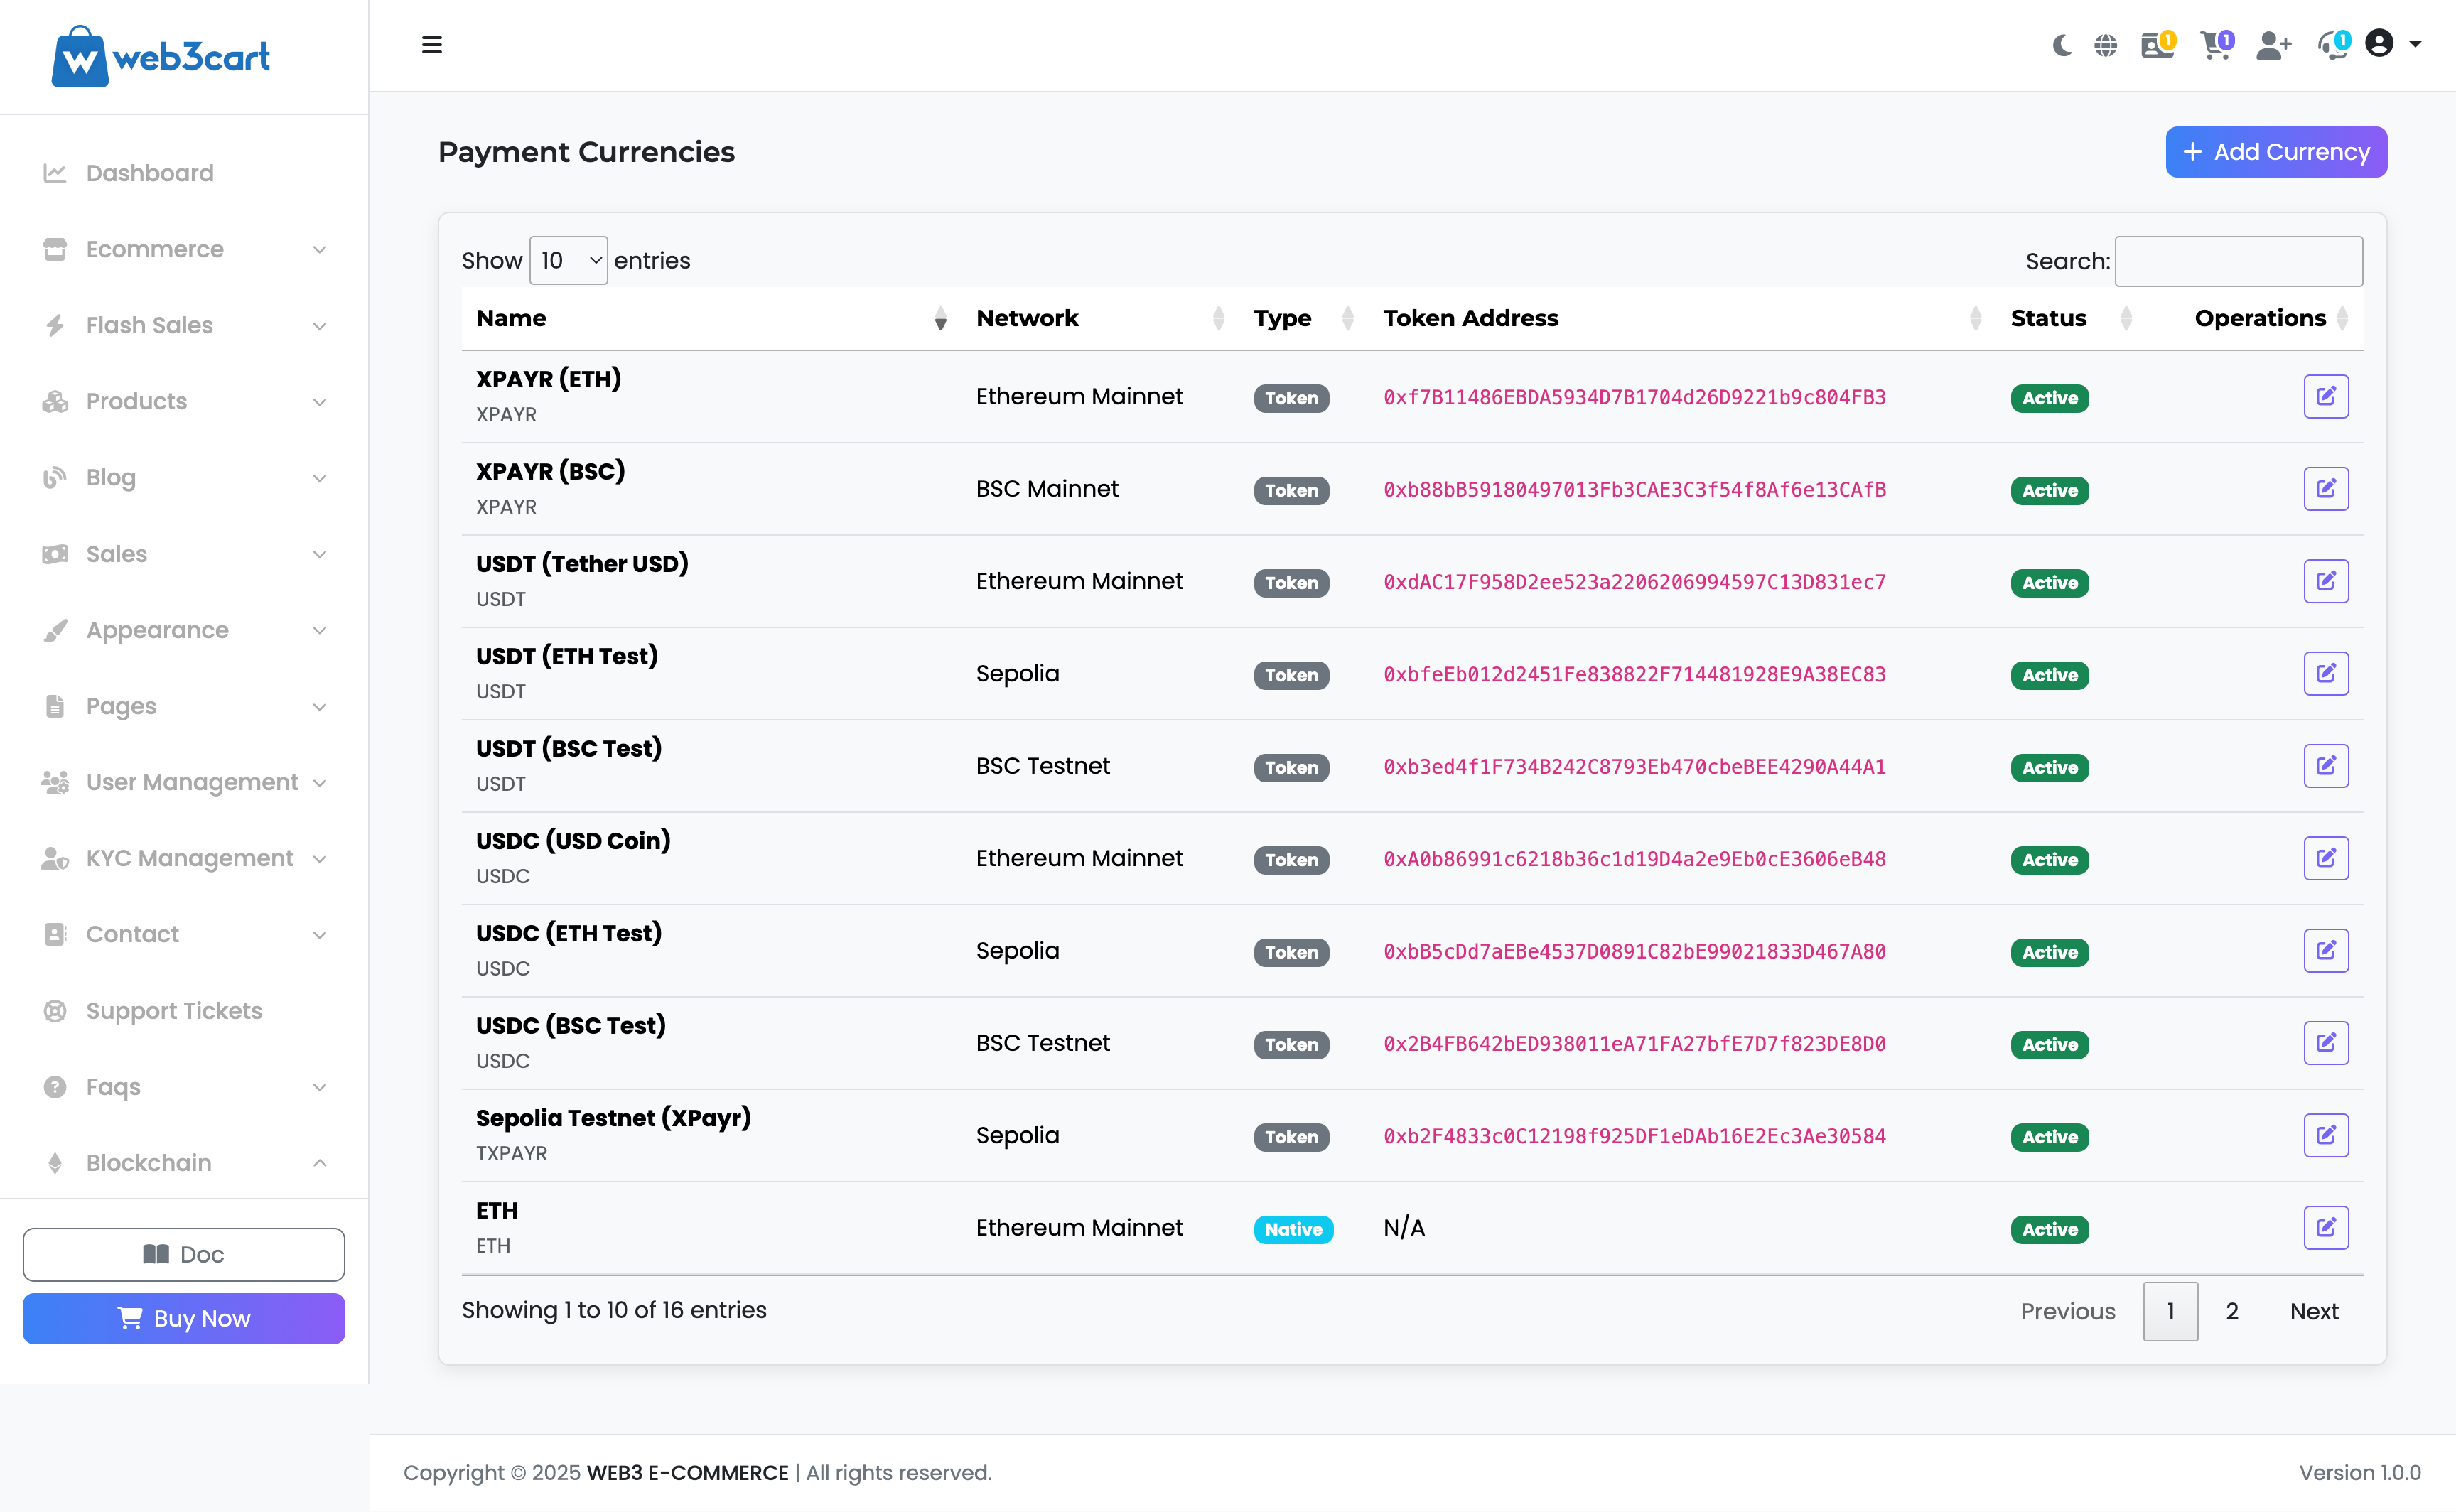
Managing Payment Currencies
rnThis page allows you to specify which cryptocurrencies your customers can use for payments. You can add both native coins (like ETH, BNB) and tokens (like USDT, USDC).
rnrn
rnrnCRITICAL WARNING: DO NOT MODIFY
rnThe contract addresses listed below are fundamental to the operation of your marketplace. They handle payment routing, transaction verification, and fee collection.
rnAltering, editing, or deleting these addresses will cause an immediate and total failure of the payment system. Customers will not be able to make purchases, and you will not receive any funds. These values should only ever be changed if you are explicitly instructed to do so in an official update from our team.
rn
rn
Understanding the Currency List
rn- rn
- Name: The full name and symbol of the currency (e.g., "USDT (Tether USD)"). rn
- Network: The blockchain network on which this currency operates. This must be one of the networks you configured in the "Networks" section. rn
- Type:rn
- rn
- Native: The primary currency of a blockchain used to pay for gas fees (e.g., ETH on Ethereum, BNB on BSC). rn
- Token: A separate smart contract deployed on a blockchain (e.g., USDT, USDC, or your own custom token). rn
rn - Token Address: This is the smart contract address of the token. For "Native" currencies, this is not applicable (N/A). It is critical that you enter the correct token address. You can find the official address on block explorers like Etherscan or BscScan. rn
- Status: "Active" means customers can select this currency for payment. rn
Core Smart Contract Addresses & Payment Logic
rnThis page lists the core smart contract addresses that are integral to the payment processing logic of the platform. These addresses belong to the web3cart crypto payment platform and are essential for the system to function correctly.
rnrnrnCRITICAL WARNING: DO NOT MODIFY
rnThe contract addresses listed below are fundamental to the operation of your marketplace. They handle payment routing, transaction verification, and commission processing.
rnAltering, editing, or deleting these addresses will cause an immediate and total failure of the payment system. Customers will not be able to make purchases, and you will not receive any funds. These values should only ever be changed if you are explicitly instructed to do so in an official script update.
rn
rn
Default XPAyr Contract Addresses
rn- rn
- Ethereum Mainnet:
0x856386E0f4c0A2566C7E95A3D19861f55A339611
View on Etherscan rn - BSC Mainnet:
0x384cD2f5Ce9Aa55d71D60fFb3d4cab33642eBb21
View on BscScan rn - Sepolia Testnet:
0x2b2d9e2F7bD23BE1d62D8C3aaEe3D1cbDEFA37aB
View on Sepolia Etherscan rn - BSC Testnet:
0xA1C35F2Da8531ec051B91542a01C0166275b8036
View on BSC Testnet Scan rn
rn
How Payments Work with web3cart
rnTo process cryptocurrency payments, Web3 e-Commerce uses the smart contracts of web3cart, one of the industry
Reviewing KYC Submissions
rnThis page is your central hub for managing all user identity verification (KYC - Know Your Customer) submissions. Here, you can review, approve, or reject the documents provided by your users to ensure compliance and platform security.
rnrn
Understanding the Submissions Table
rn- rn
- KYC ID: A unique identification number for each submission attempt. rn
- User / Email: The user who submitted the documents. rn
- Document Type: The type of document submitted (e.g., ID Card, Passport). "N/A" means the user has not yet submitted a document. rn
- File: A direct, clickable link to the document file that the user uploaded. rn
- Upload Date: The date and time the document was submitted. rn
- Status: The current state of the verification process.rn
- rn
Awaiting Document: The user has been prompted for KYC but has not uploaded a file yet. rnPending Review: The user has uploaded a document, and it is waiting for your approval. rnApproved: You have successfully verified the user
KYC Settings: Transaction Thresholds
rnThis section allows you to define automated rules for when a user is required to complete the KYC verification process. A threshold is a cumulative transaction limit for a specific cryptocurrency. When a user
AML (Anti-Money Laundering) Rule Settings
rnThis advanced section helps you configure automated rules to detect and flag potentially suspicious activities on your platform, contributing to Anti-Money Laundering (AML) compliance.
rnrn
Block Explorer API Keys
rnTo analyze transactions on the blockchain, the system needs API keys from block explorer services. These keys allow the platform to fetch transaction data automatically. You can obtain free API keys from the official websites linked below:
rn- rn
- Etherscan API Key: For Ethereum Mainnet. Get Key Here. rn
- BscScan API Key: For BSC Mainnet. Get Key Here. rn
- BaseScan API Key: For Base Mainnet. Get Key Here. rn
- PolygonScan API Key: For Polygon Mainnet. Get Key Here. rn
Transaction Rules
rnThese rules define thresholds for flagging transactions based on value and frequency.
rn- rn
- High Value Threshold (USD): Any single transaction exceeding this value (in USD equivalent) will be automatically flagged for review. rn
- Rapid Transfer Count: The number of transactions within a specific time window that will trigger a flag. rn
- Rapid Transfer Window (Hours): The duration (in hours) for the "Rapid Transfer Count" rule. rn
Example: With a Count of 5 and a Window of 24, any user who makes more than 5 transactions in any 24-hour period will be flagged.
New Wallet Rules
rnThese rules apply additional scrutiny to newly created or first-seen wallet addresses, which can be higher risk.
rn- rn
- New Wallet Threshold (Days): A wallet is considered "new" for this many days after its first transaction on your platform. rn
- High Transaction Count Threshold: The maximum number of transactions a "new" wallet can make within the defined period before being flagged. rn
After configuring these rules, click "Save Settings" to apply them system-wide.
rn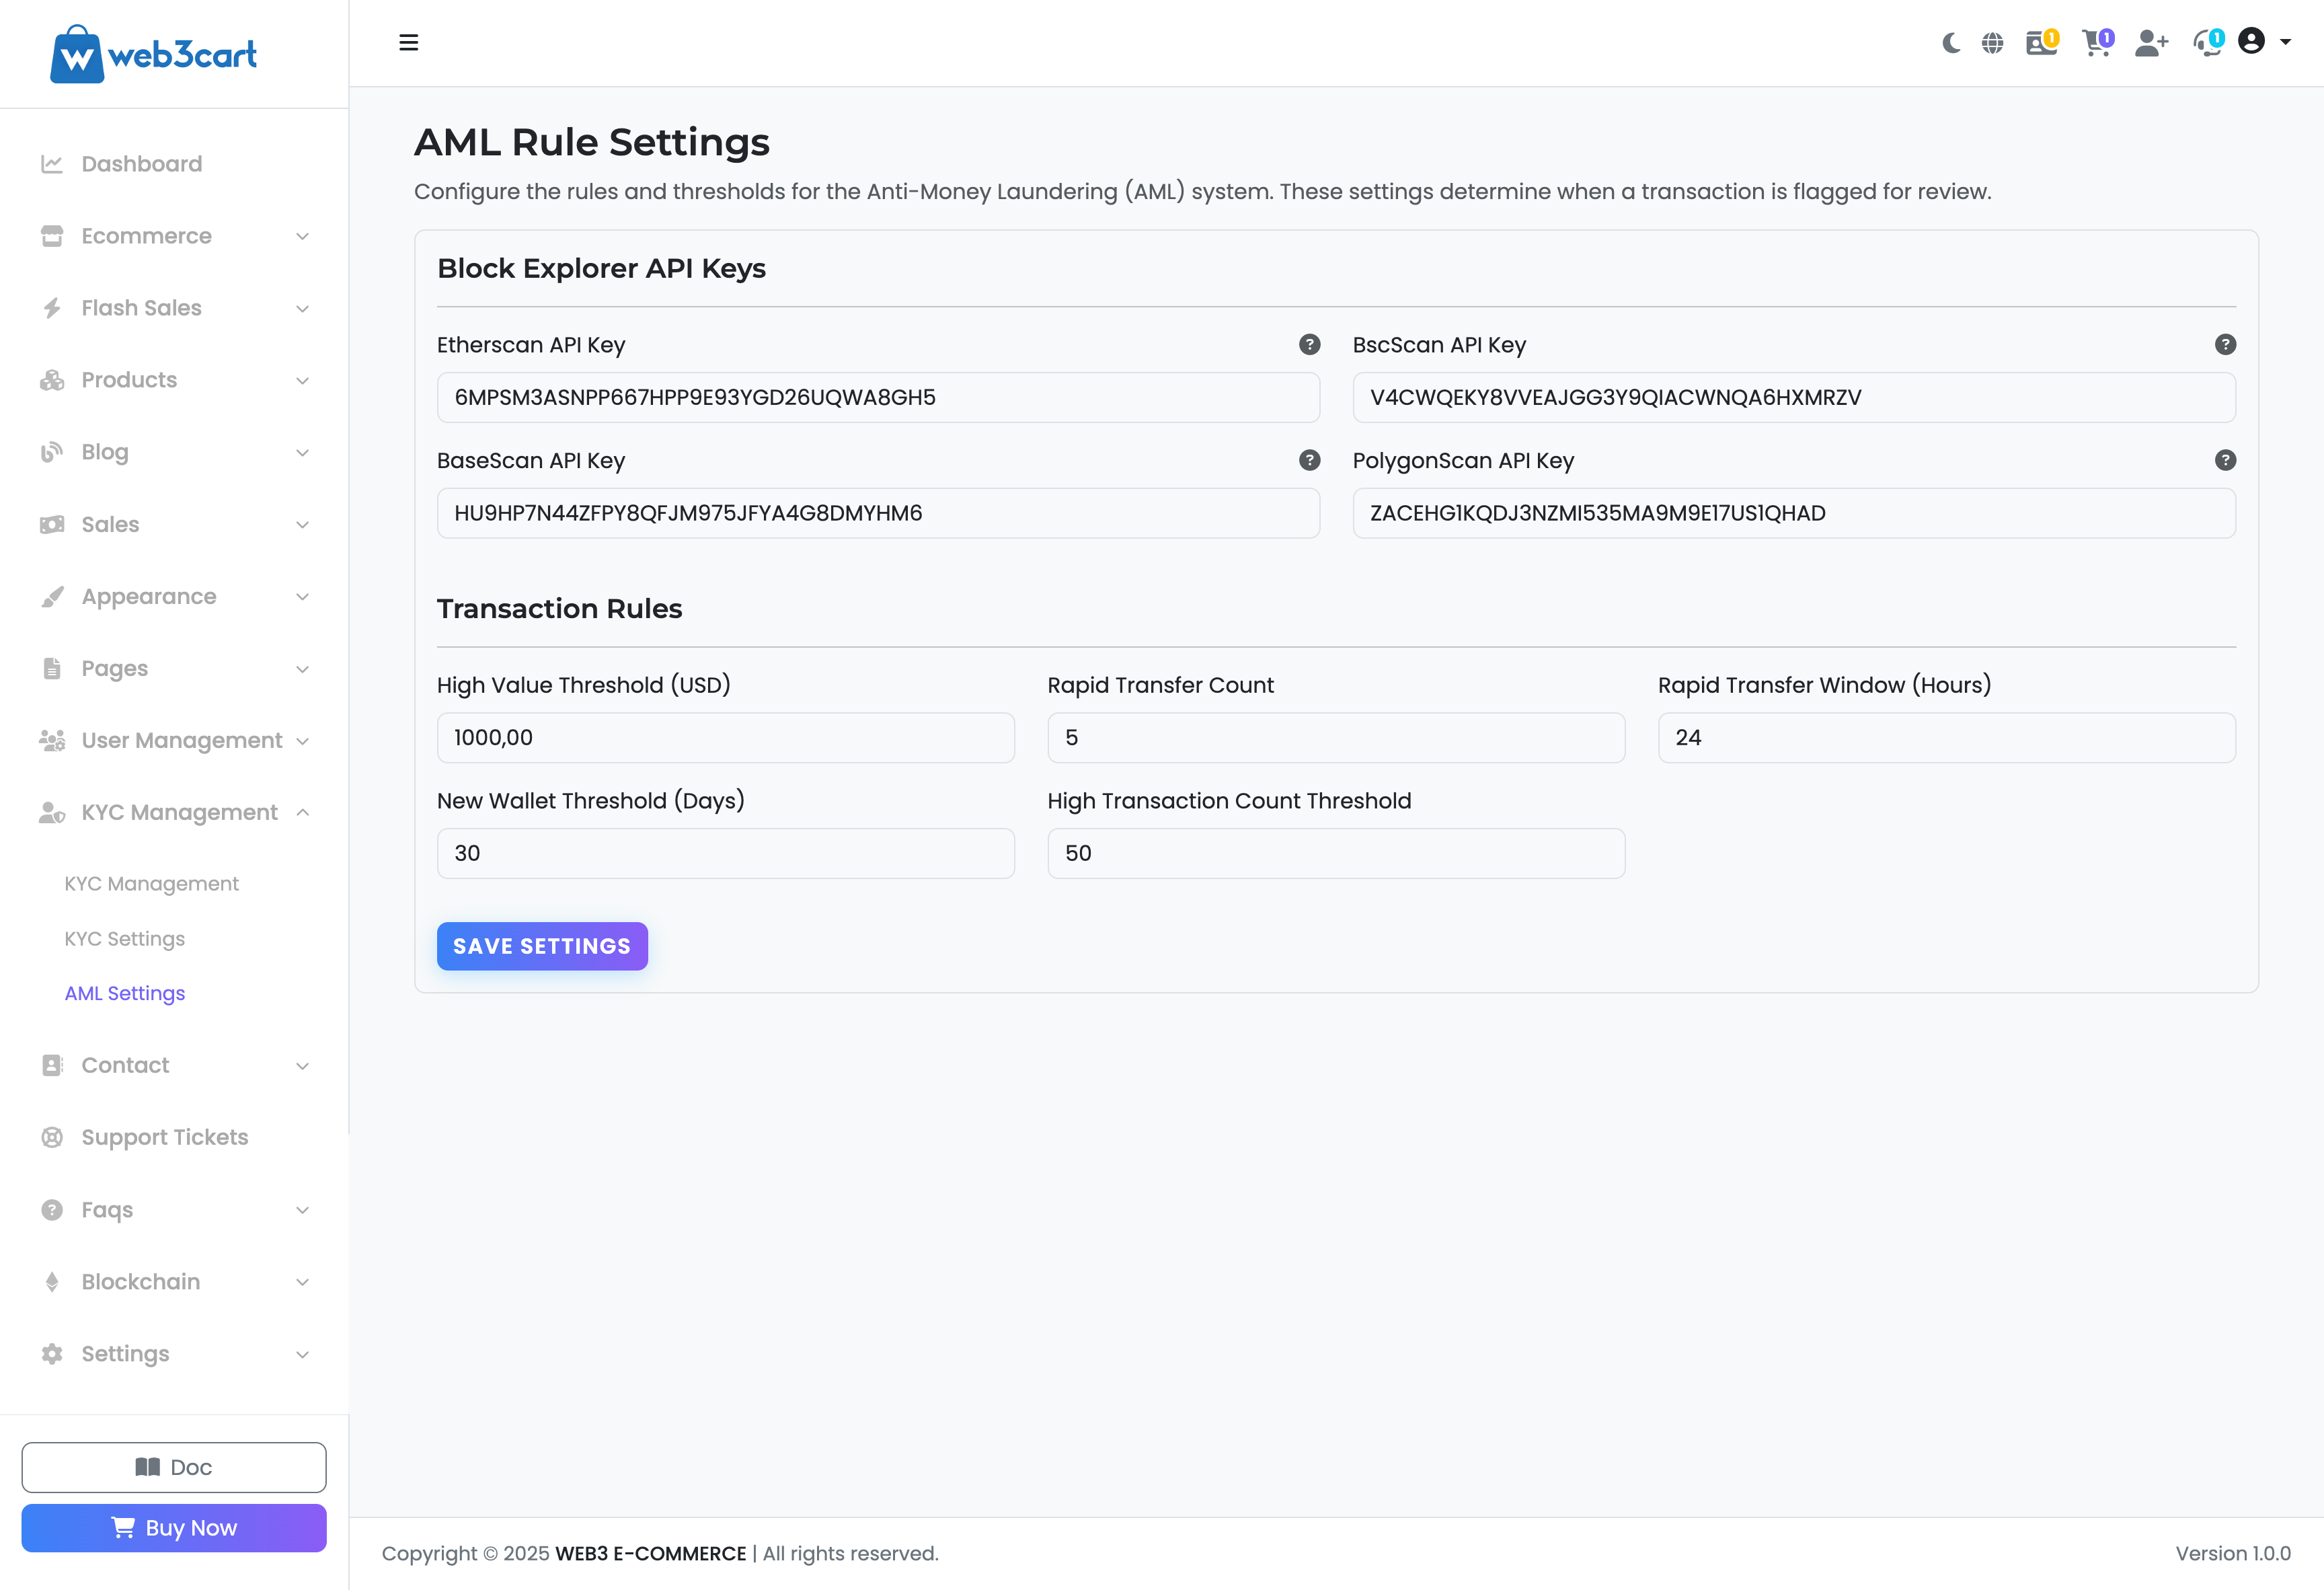
Homepage Modules Management
rnThis powerful page gives you complete visual control over your website
Introduction to Adding Products
rnThe "Create Product" page is your starting point for listing items on the marketplace. Before you can add a product, you must first register your wallet as a seller on the specific blockchain network where you intend to list the item.
rnrnrnIMPORTANT: Seller registration is a one-time process for each blockchain network. This action links your wallet to our smart contract on that network, authorizing you to create products and receive payments.
rn
rn
Step 1: Seller Registration on a Network
rnIf you have not registered as a seller on a specific network yet, you will be prompted to do so.
rn- rn
- Select Your Network: From the dropdown menu, choose the blockchain network where you want to add your product (e.g., BSC Mainnet, Ethereum Mainnet). rn
- Connect Wallet: Click the "Connect Wallet" button. rn
- Choose Your Wallet: A pop-up will appear with a list of compatible wallets (MetaMask, Keplr, etc.). Select the wallet you want to register. rn
- Approve Transaction: Your wallet will ask for confirmation to interact with our smart contract. Approve the transaction to complete the registration. rn
Once confirmed, you will see a "Registration Confirmed!" message. You are now a registered seller on that specific network.
rnNote: If you later wish to add a product on a different network (e.g., you registered on BSC Mainnet but now want to sell on Ethereum), you must return to this page, select the new network, and complete the registration process again for that network.
rn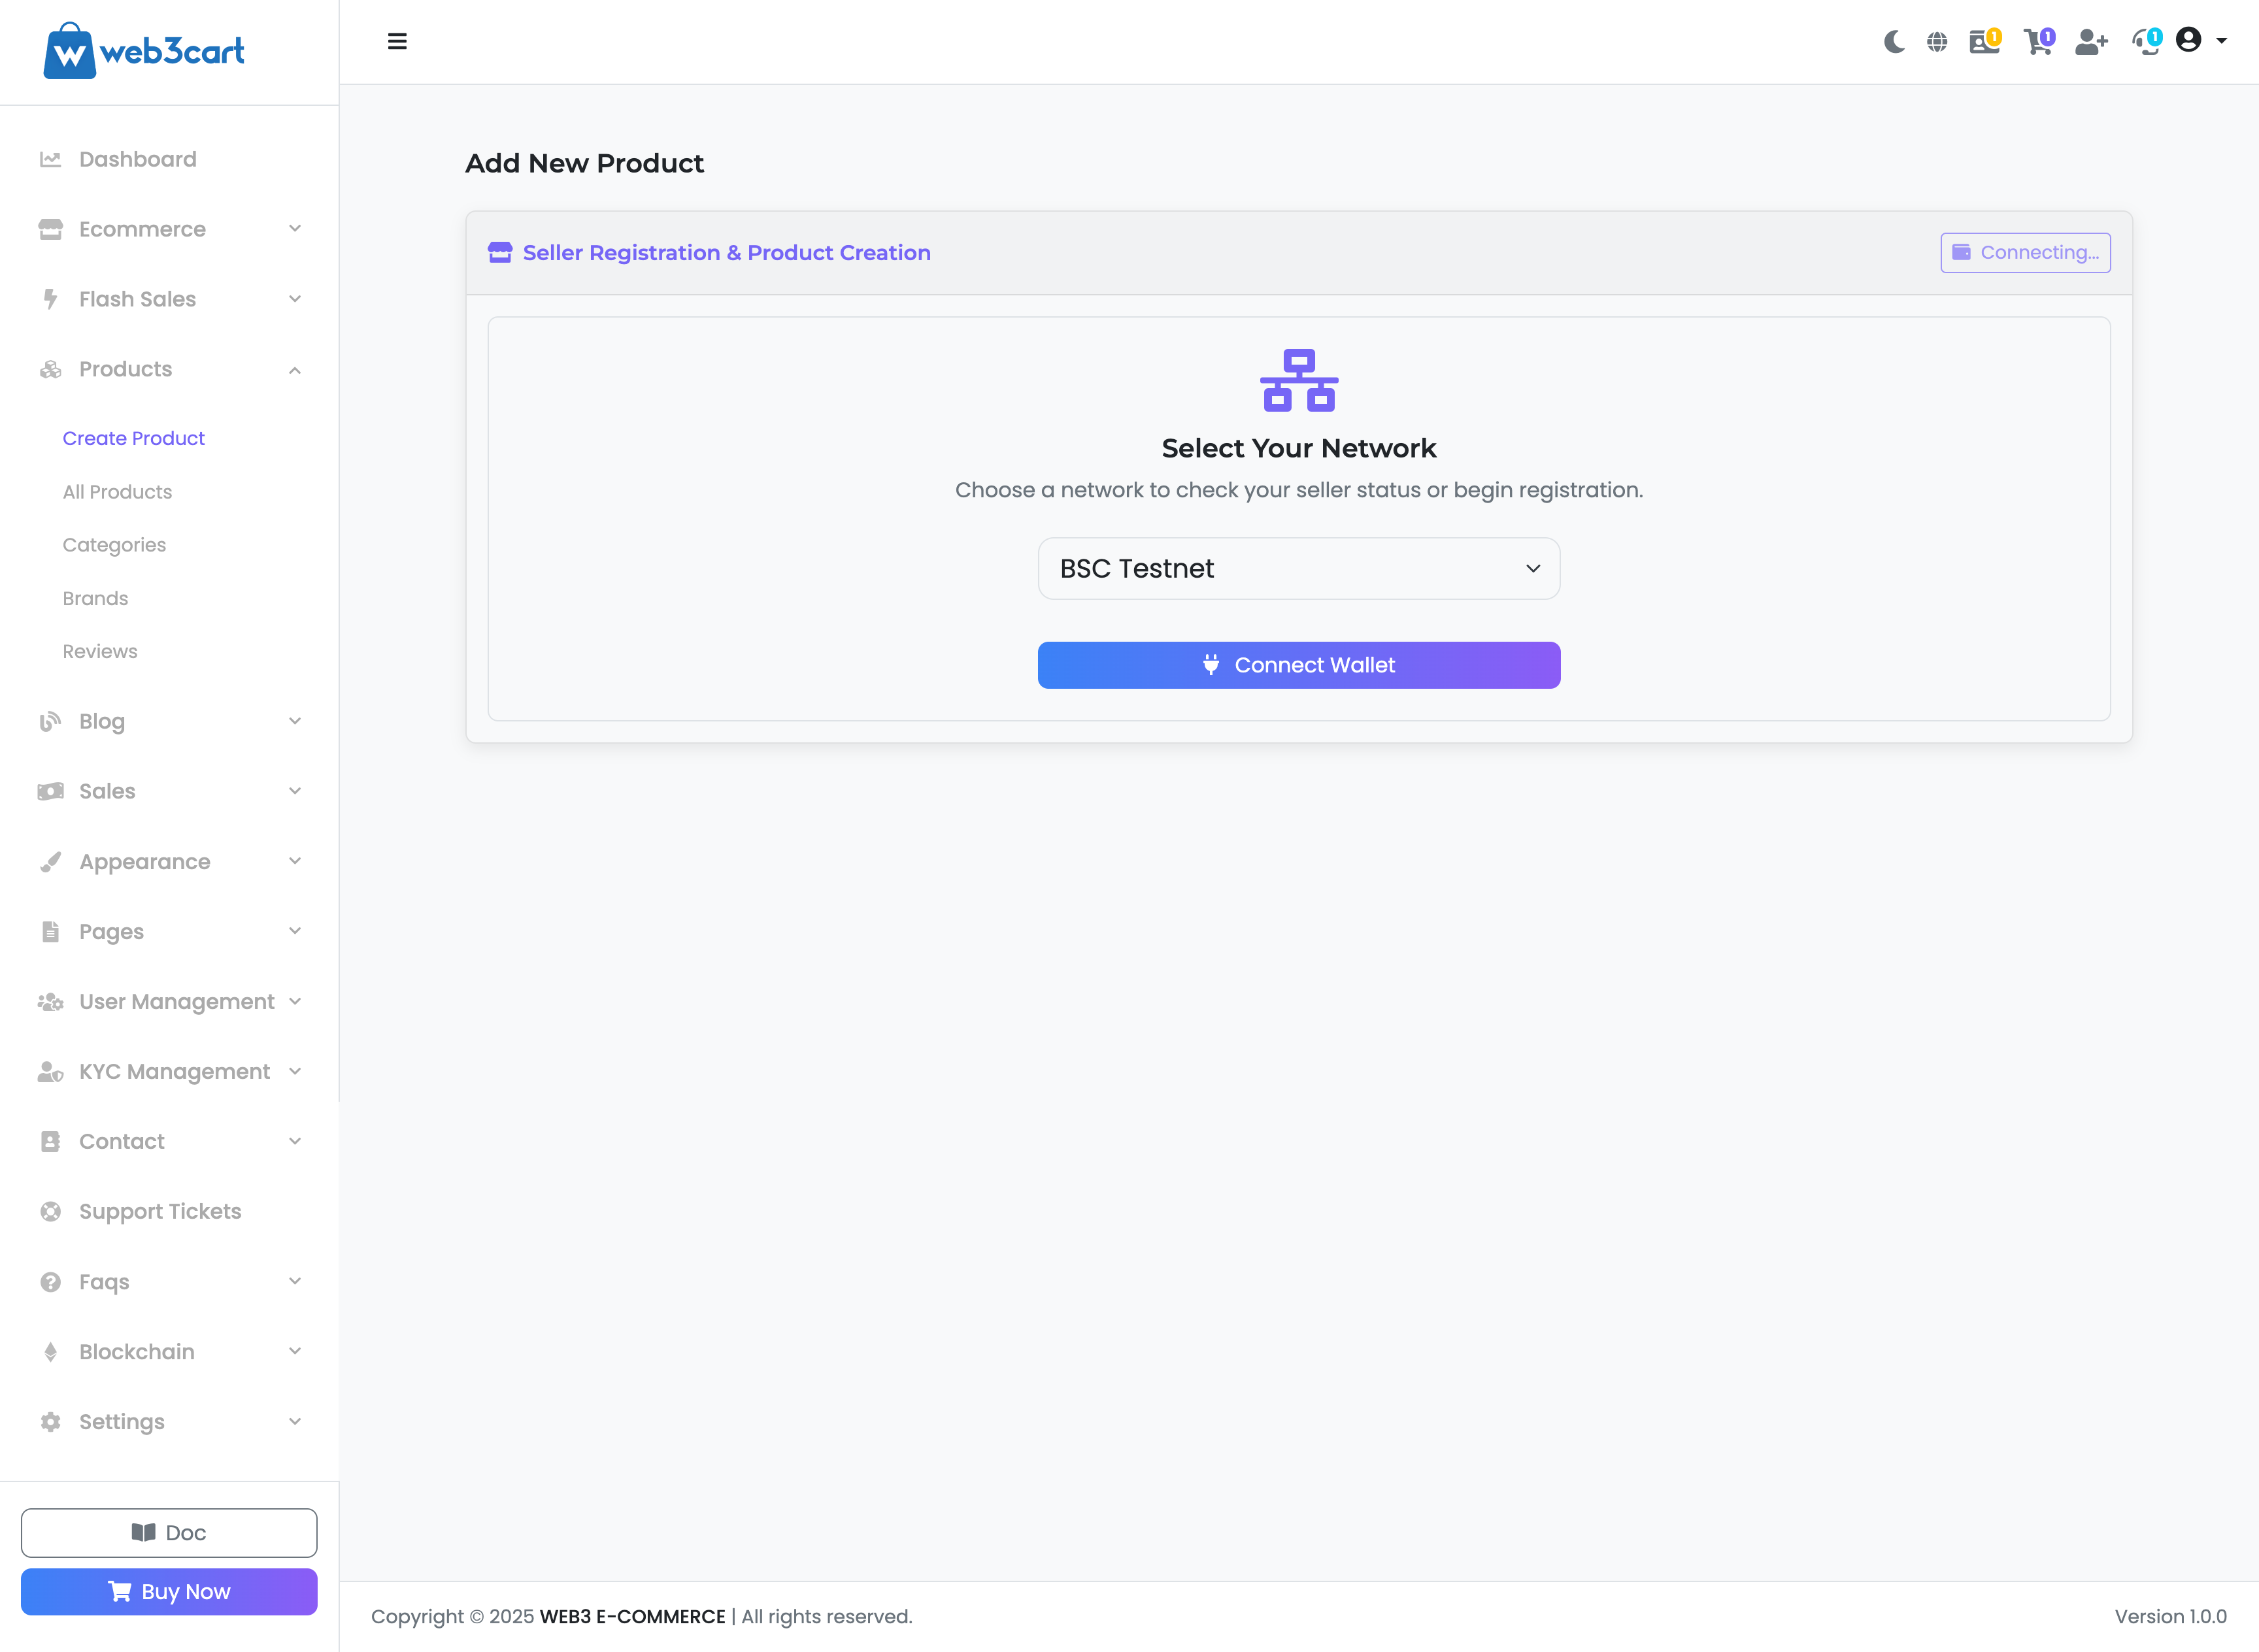
rn
Step 2: Choose Your Product Type
rnAfter successful registration, you will be asked to choose the type of product you want to add:
rn- rn
- Physical Product: Select this for tangible items that require shipping to the customer. This form includes stock management options. rn
- Digital Product: Select this for items that are delivered electronically, such as software, e-books, music, or design files. This form includes options for downloadable files. rn
After selecting a product type, you will be taken to the detailed product creation form. Please refer to our guides on "Creating a Physical Product" or "Creating a Digital Product" for an explanation of all the fields.
rn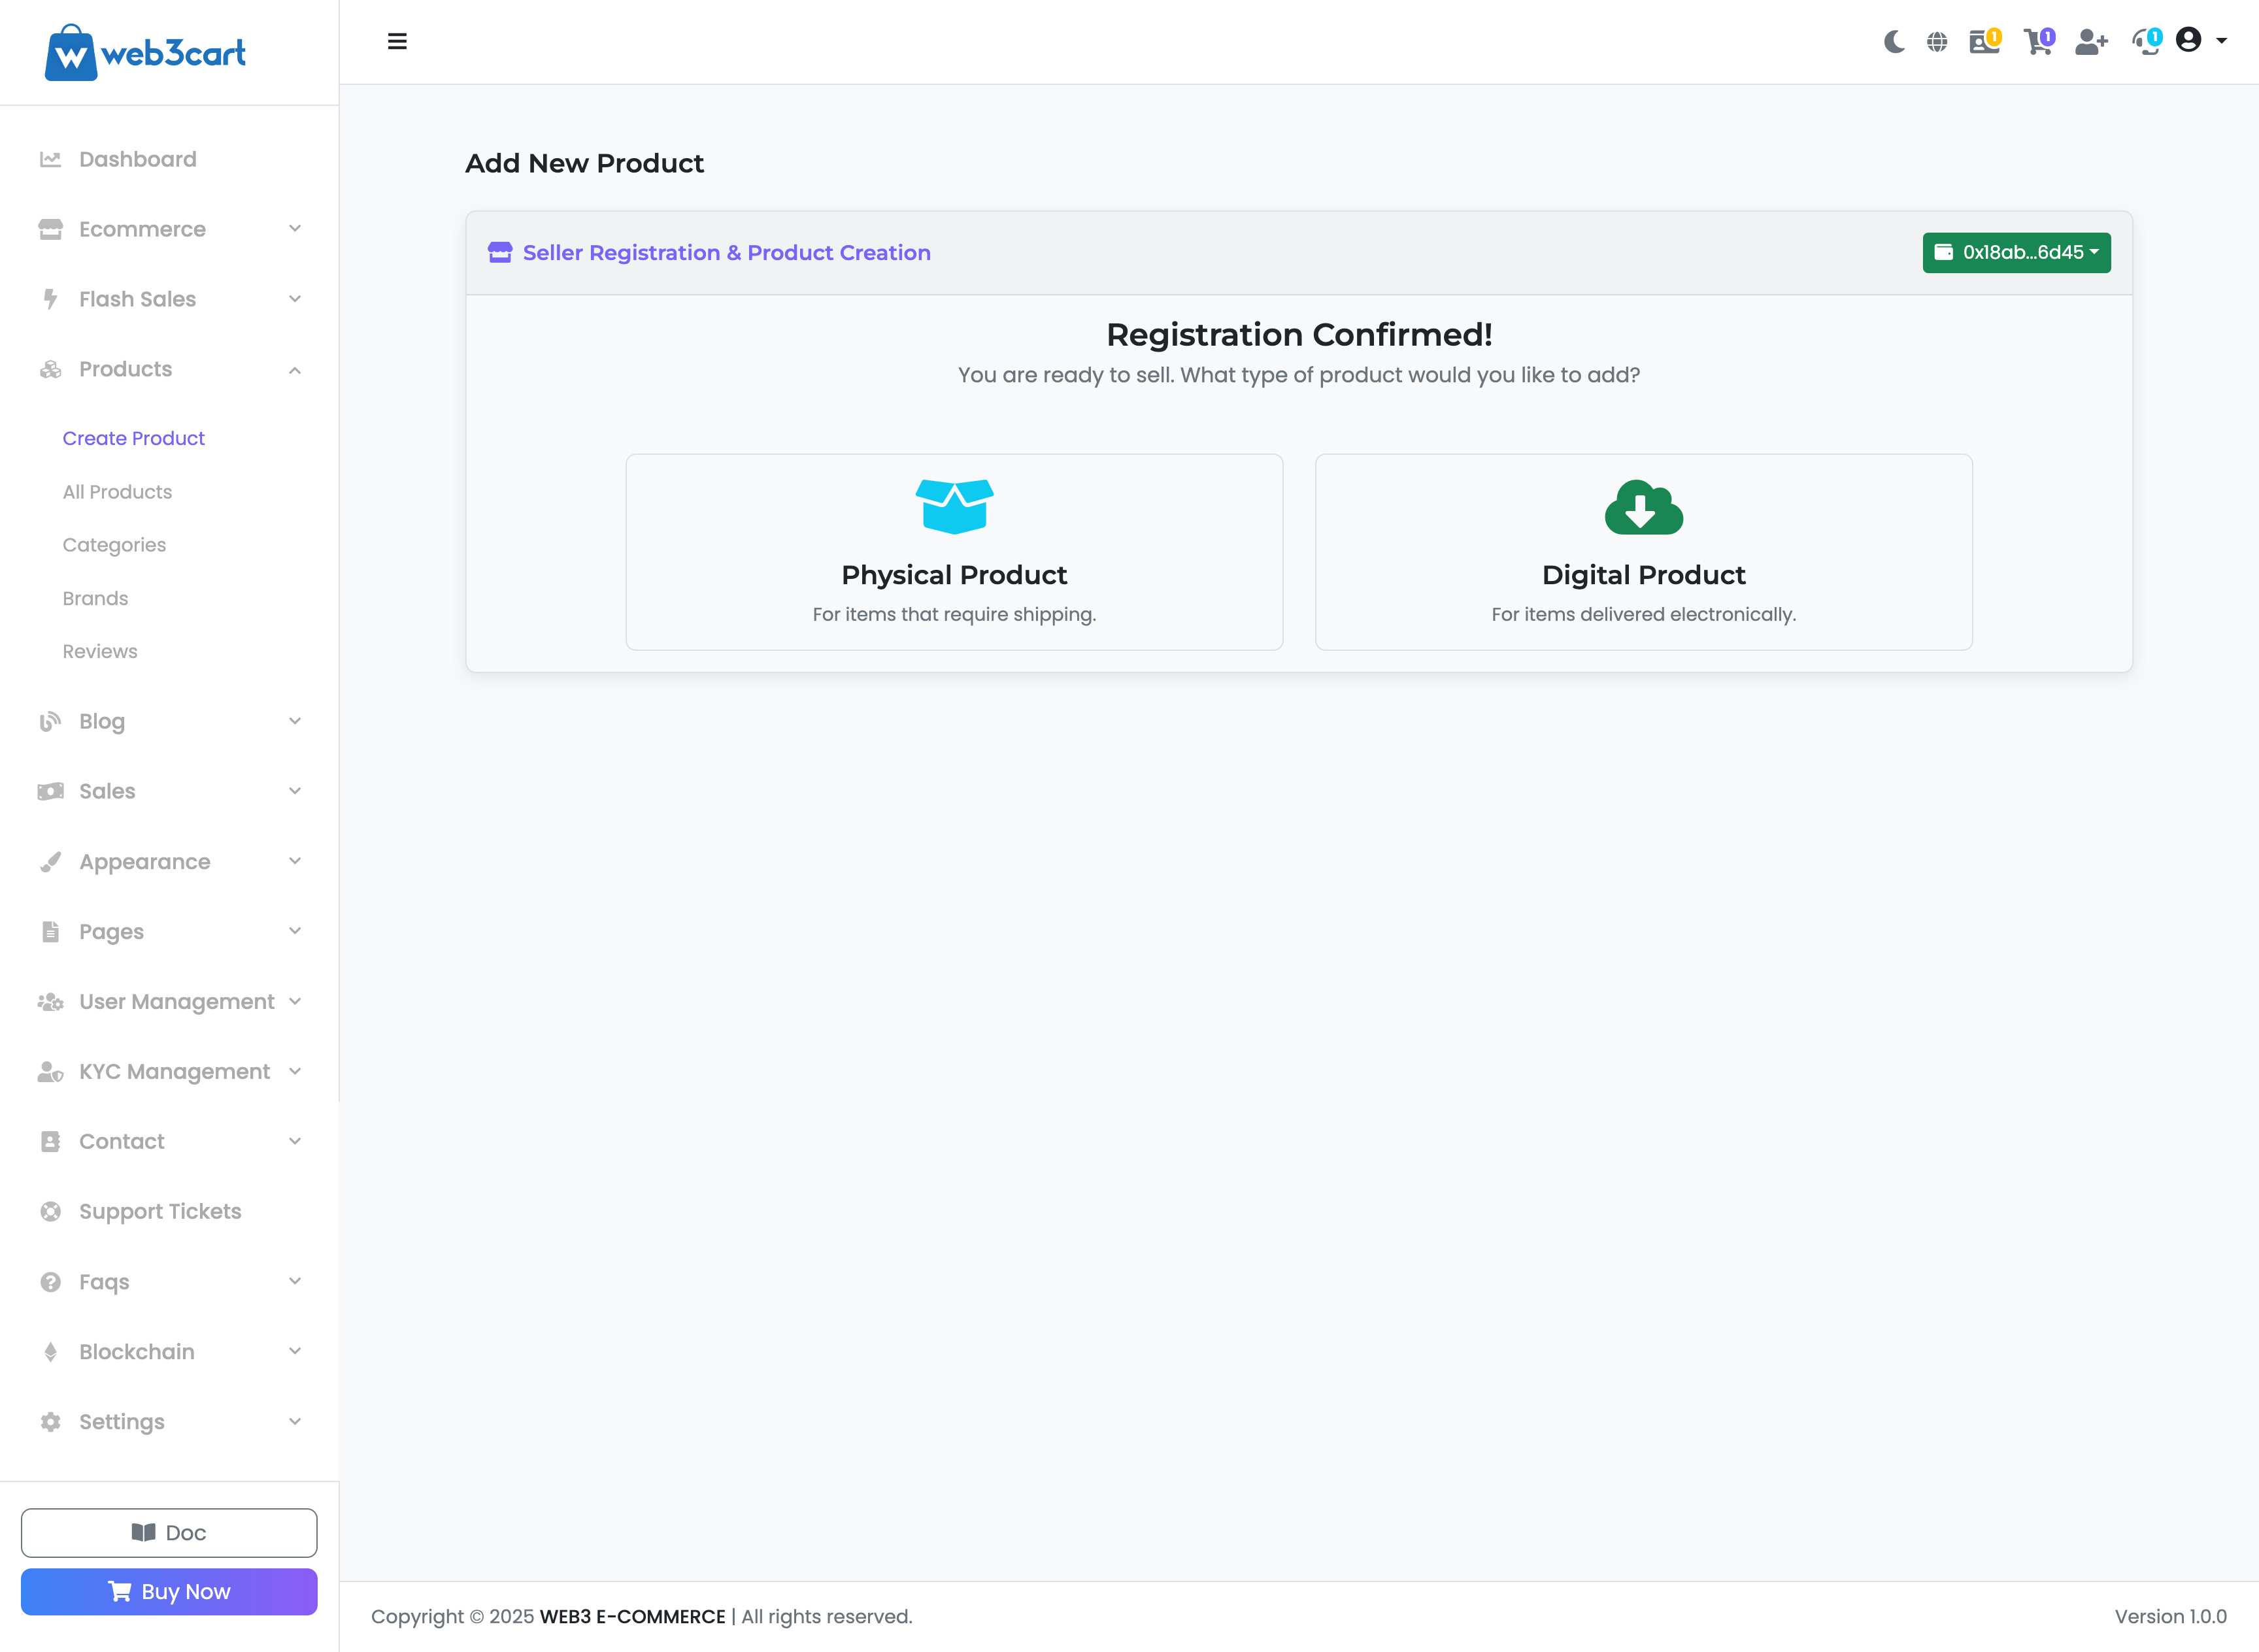
Adding a New Physical Product
rnThis form contains all the necessary fields to create a listing for a physical item that requires shipping.
rnrn
- rn
- Name & Permalink: Enter the product name. The permalink (URL slug) will be generated automatically, but you can edit it for SEO purposes. rn
- Media: Upload a main "Featured Image," multiple "Gallery Images," and optionally add a "Video Link" from a platform like YouTube. rn
- Description: The "Short Description" is a brief summary, while the "Full Description" is for detailed information, specifications, etc. Both fields support rich text formatting. rn
- Pricing:rn
- rn
- Price & Currency: Set the main price and the cryptocurrency it will be sold for. rn
- Previous Price: An optional field to show a "slashed" original price, indicating a discount. rn
- Special Price: An optional discounted price. You can set a start and end date to run a limited-time promotion. rn
rn - Options: Toggle "Is featured?" to display this product in "Featured Products" sections on your homepage. rn
- Organization: Assign the product to a "Brand" and one or more "Categories." rn
- Collections: Add the product to special collections like "Best Sellers" or "Special Offers." rn
- Labels: Add visual labels like "Hot," "New," or "Sale" that will appear on the product card. rn
- Stock Management: Enter the "Total in stock" quantity for this product. The system will track inventory as sales are made. rn
- Tax: Select a tax rate to apply to this product at checkout. rn
- - rn
- SKU: Enter a unique Stock Keeping Unit (SKU) to identify the product internally. rn
- Tags & SEO: Add relevant tags for searching and fill in the "SEO Meta Title" and "SEO Description" to improve your ranking in search engines. rn
Once you have filled in all the details, click "Create Product" to list your item.
rn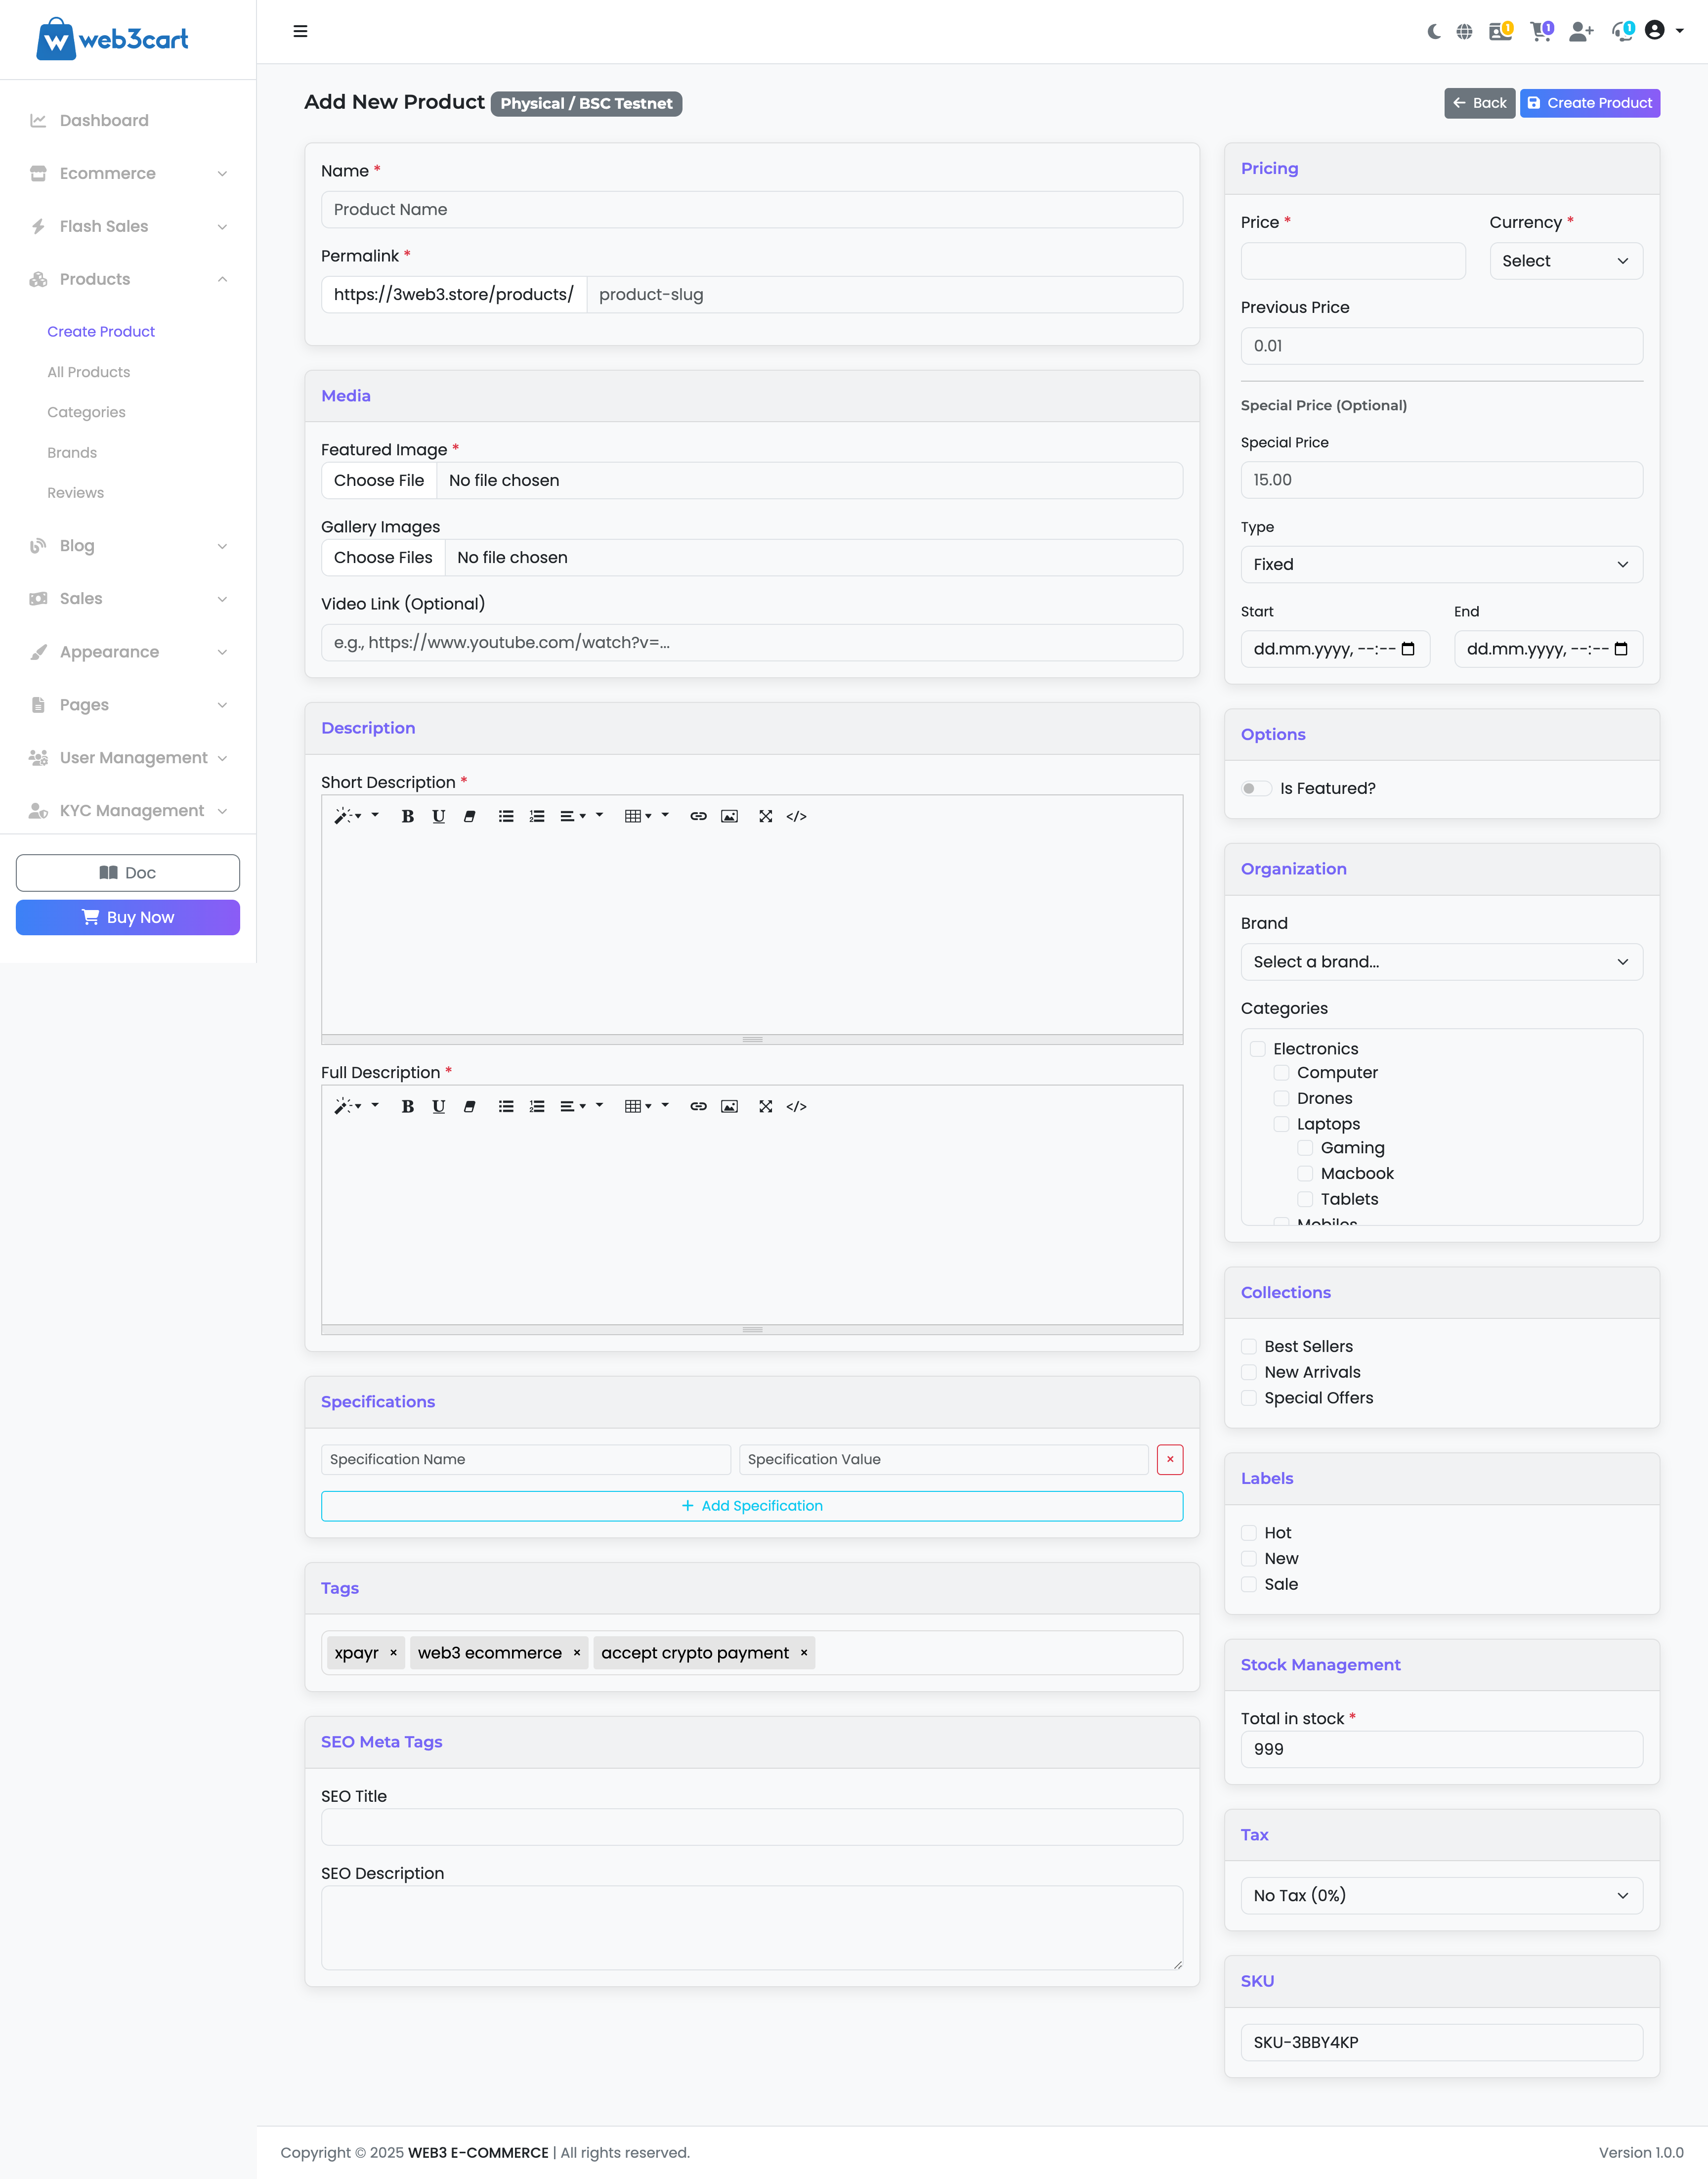
Adding a New Digital Product
rnThe form for adding a digital product shares most of its fields with the physical product form. Please refer to our "Creating a Physical Product" guide for details on the common sections like Name, Media, Description, Pricing, Organization, etc.
rnThis guide will focus on the sections unique to digital products.
rnrn
The "Downloadable Product" Section
rnThis is the most important section for a digital item. It controls how your customer receives the file after purchase.
rn- rn
- Download Type:rn
- rn
- File Upload: Choose this to upload the file directly to your server. The file will be stored securely. rn
- URL: Choose this if your file is hosted on an external service (like Amazon S3, Google Drive, or Dropbox). You will then provide a direct download link. rn
rn - Choose File / File URL: Based on your selection above, either upload the file from your computer or paste the direct download link. Note the maximum file size limit (e.g., 50MB). rn
- Download Limit: Specify the maximum number of times a customer can download the file after purchase. Leave this field blank for unlimited downloads. rn
Missing Sections
rnCompared to a physical product, a digital product form does not include the "Stock Management" section, as digital items typically have unlimited inventory.
rnOnce you have filled in all the details, click "Create Product" to list your item.
rn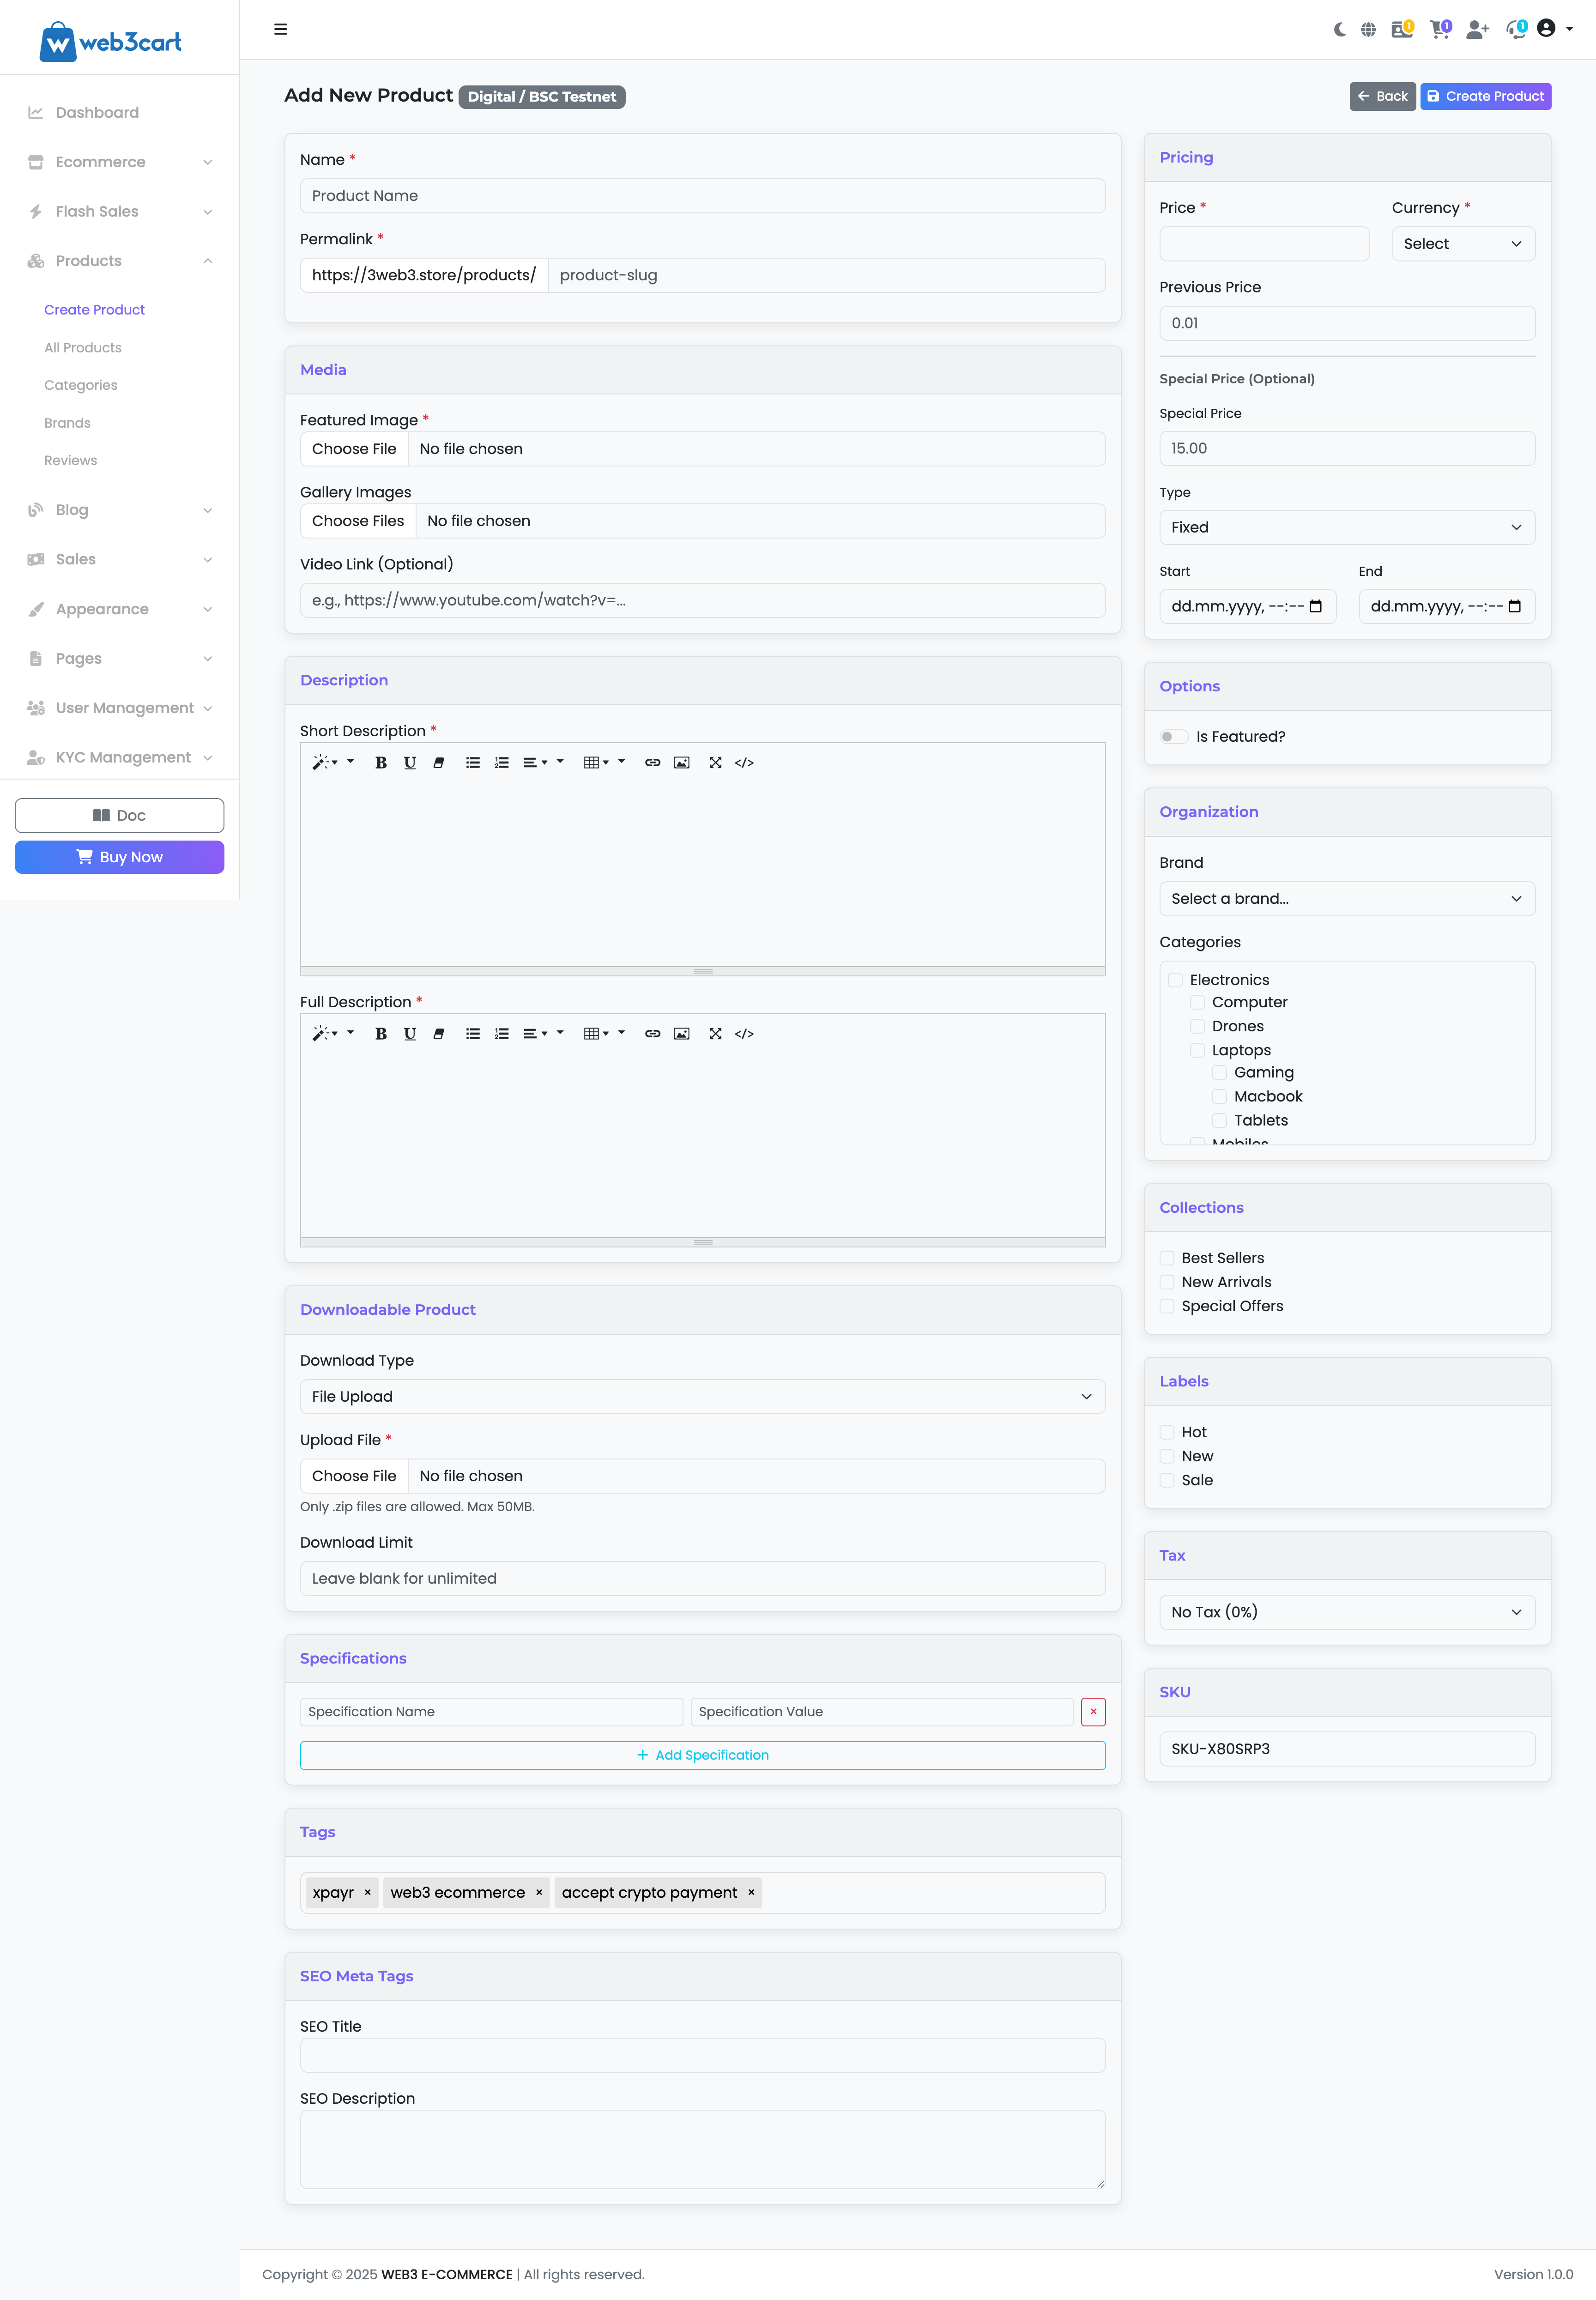
Managing Product Categories
rnThis is your central hub for organizing all products in your marketplace. A well-structured category tree is essential for helping customers find the items they are looking for. This page allows you to create, edit, re-organize, and delete product categories and subcategories.
rnrn
Category Structure
rnThe left panel displays your entire category hierarchy in a nested tree format. You can manage this structure using the following tools:
rn- rn
- Add Root Category: Click this to create a new top-level category (e.g., "Electronics", "Clothing"). A form will appear on the right to enter the details for this new category. rn
- Add Subcategory: First, select a parent category from the tree structure on the left by clicking on its name. Then, click this button to create a new category nested under the one you selected (e.g., creating "Laptops" under "Electronics"). rn
- Expand All / Collapse All: Use these links to quickly show or hide all subcategories in the tree, making it easier to navigate large structures. rn
- Re-ordering Categories: You can change the order of categories at the same level by simply clicking and dragging a category to a new position within its parent. rn
rn
Editing a Category
rnWhen you click on a category from the structure on the left, its details will appear in the "Edit Category" panel on the right. This panel is organized into three tabs:
rn1. General Tab
rn- rn
- ID: A unique, non-editable number that identifies the category in the database. rn
- Full Name: The public-facing name of the category (e.g., "Computer"). rn
- Slug (URL-friendly-name): The version of the name used in the website
Flash Sale Campaigns
rnFlash sales are a powerful marketing tool to create urgency and boost sales for a limited time. This section allows you to create, manage, and add products to your flash sale campaigns.
rnrn
Step 1: Creating a New Campaign
rnThe main "Flash Sale Campaigns" page lists all your current and past campaigns.
rn- rn
- To start, click the "+ Create" button in the top right corner. rn
- A "Create New Campaign" pop-up will appear. rn
- Campaign Name: Give your sale a descriptive name (e.g., "Summer Sale", "Black Friday Deals"). rn
- End Date: Select a date and time when the campaign will automatically end. All product prices will revert to their original values after this time. rn
- Publish: Use this toggle to set the campaign
Managing Coupons
rnThe Coupons section allows you to create and manage discount codes that customers can apply at checkout to receive a promotional discount. You can create percentage-based, fixed-amount, time-limited, and usage-limited coupons.
rnrn
Step 1: Creating a New Coupon
rnTo begin, click the "+ Add" button in the top right corner. The "Add New Coupon" window will appear with the following fields:
rn- rn
- Coupon Title: A user-friendly name for your reference (e.g., "Summer Sale 10% Off"). This is not visible to the customer. rn
- Coupon Code: The actual code that customers will enter at checkout (e.g.,
SUMMER10). Keep it simple and easy to remember. rn - Discount Type: Choose the type of discount.rn
- rn
- Percentage: A percentage of the order total will be discounted (e.g., 10%). rn
- Fixed Amount: A specific, fixed amount will be discounted from the order total (e.g., $30). rn
rn - Discount Value: The numerical value of the discount (e.g., enter
10for a 10% discount, or30for a $30 discount). rn - Usage Limit (per user): The maximum number of times a single customer can use this coupon. Leave this field blank for unlimited uses per customer. rn
- Start Date & End Date: Set the period during which the coupon is valid. The coupon will not work outside of these dates. rn
After filling in the details, click "Save" to create the coupon.
rn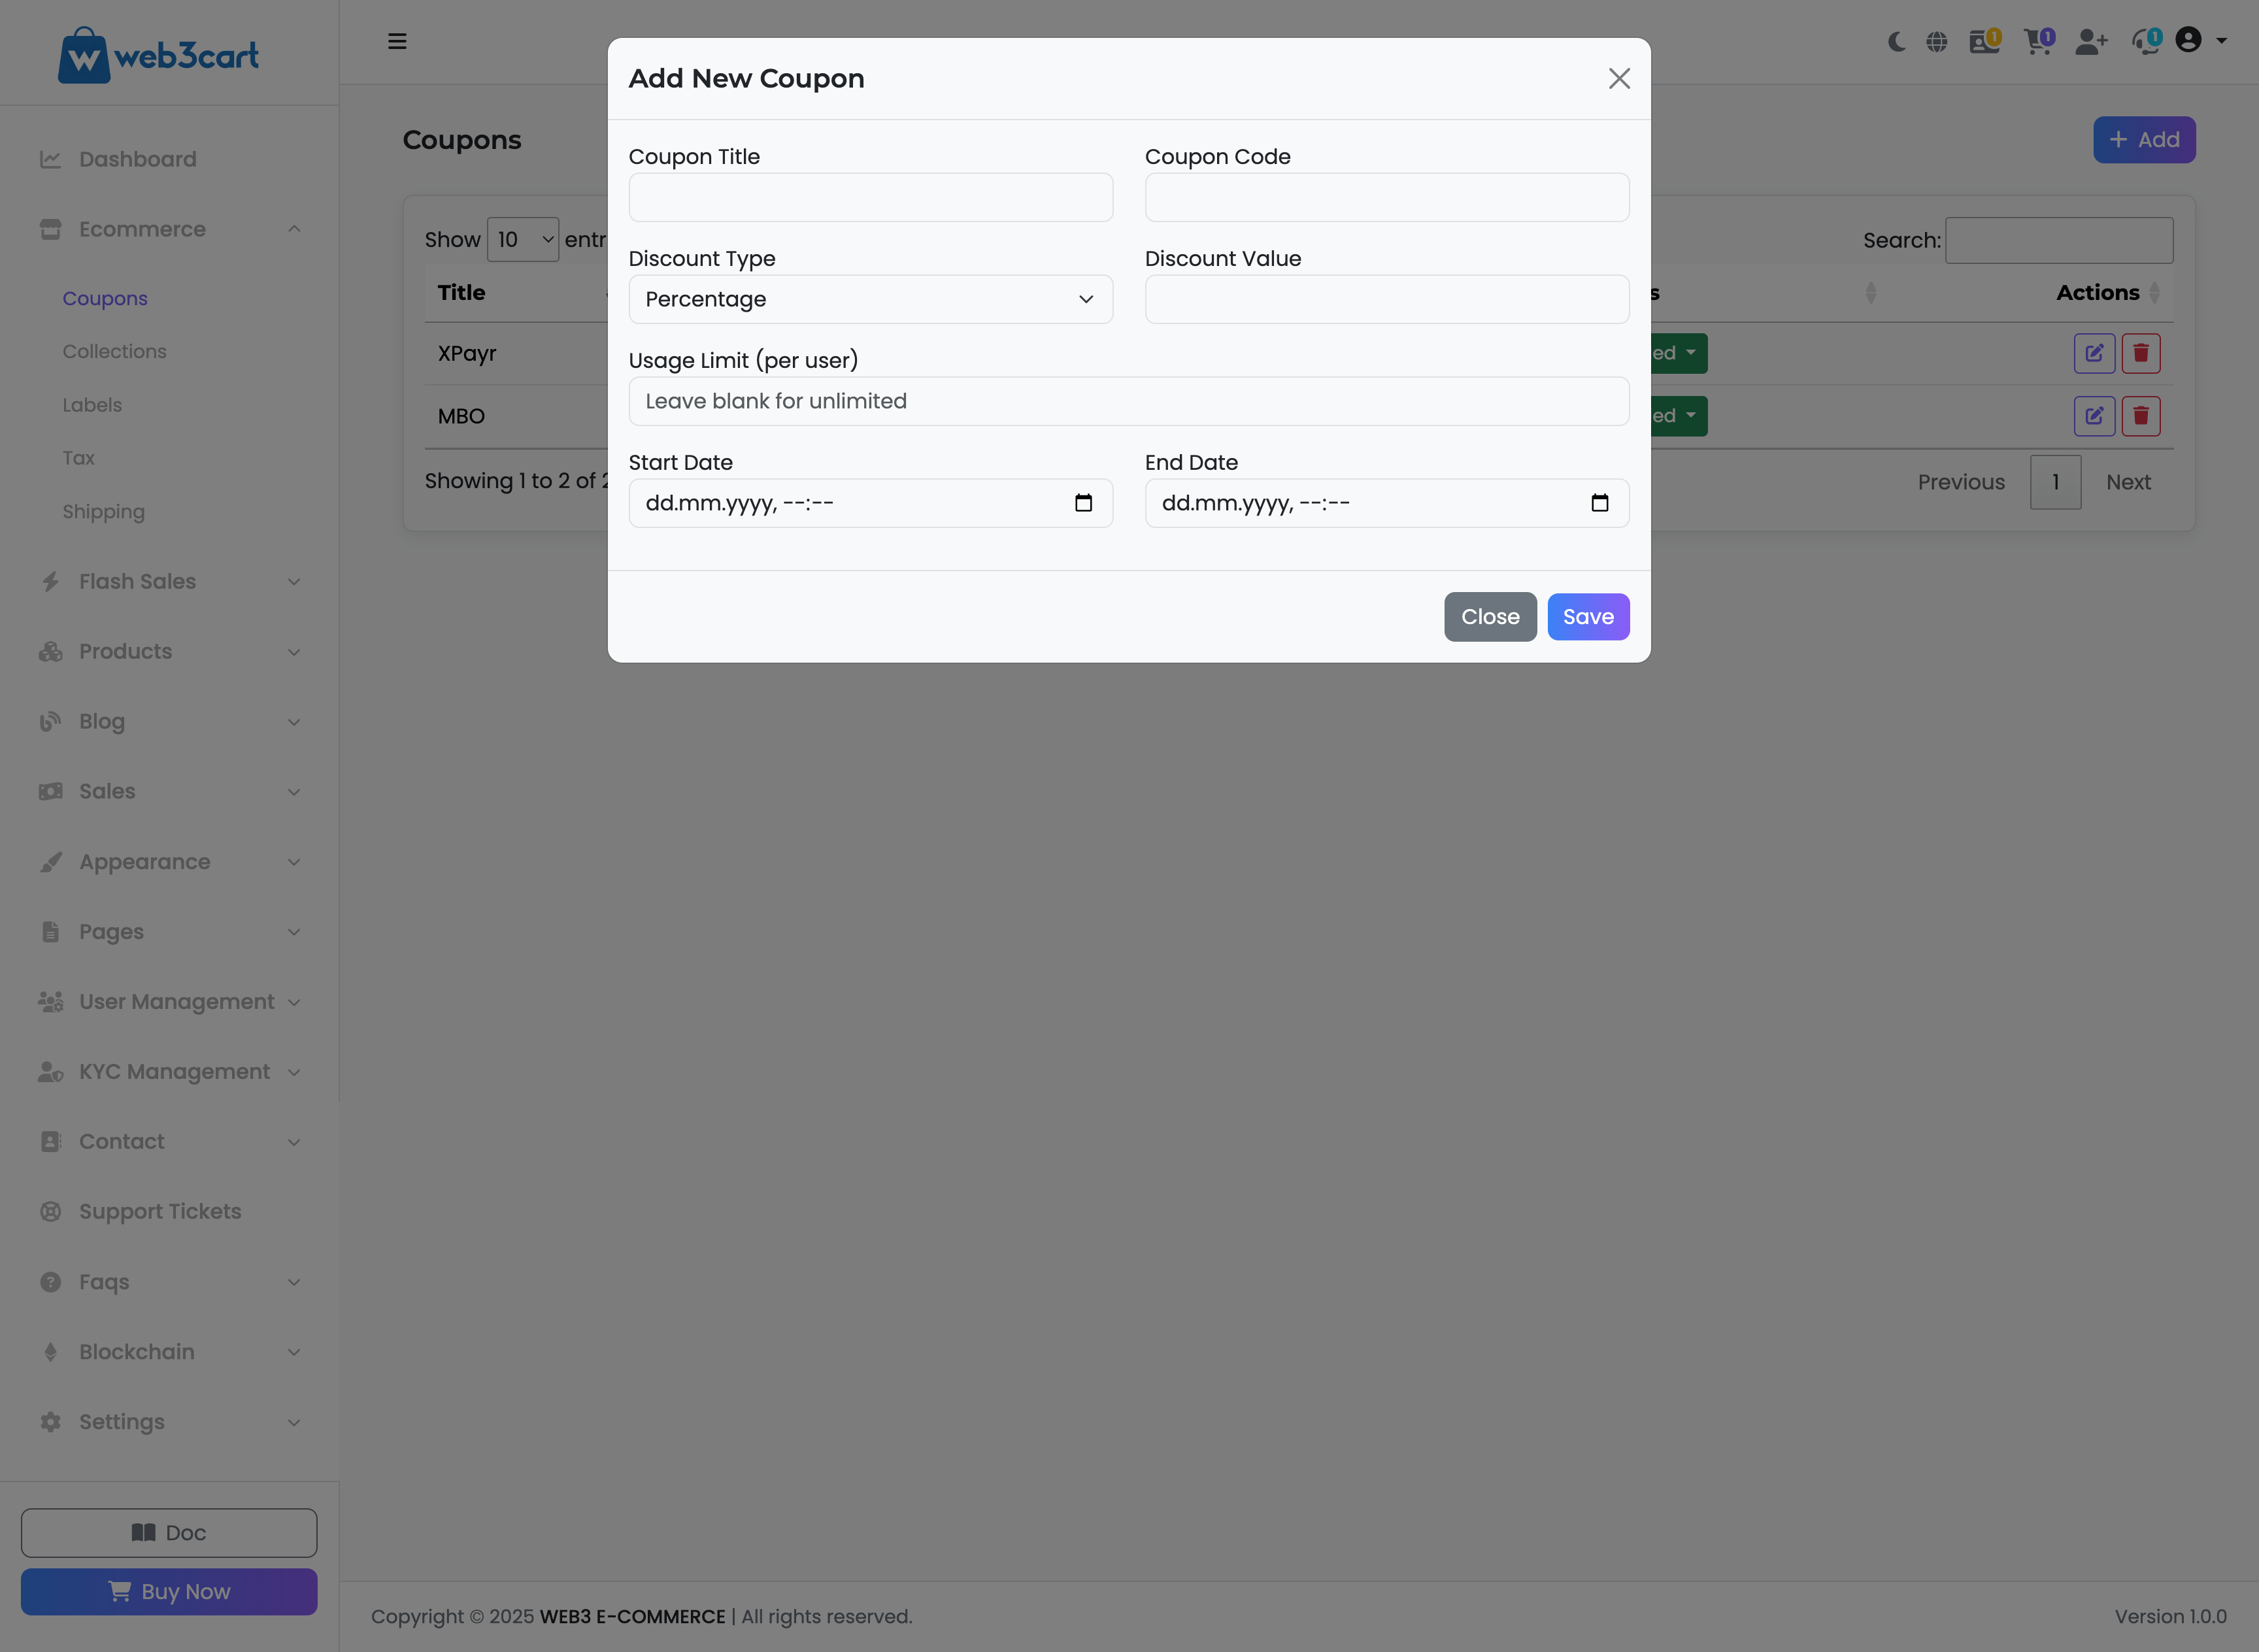
rn
Step 2: Managing Existing Coupons
rnThe main page displays a list of all the coupons you have created. Here
Managing Shipping Rules
rnThis section allows you to configure the shipping methods and costs that will be offered to your customers during checkout. You can define different methods (like "Flat Rate" or "Express") and set their prices for each cryptocurrency you accept.
rnrn
Understanding the Shipping Rules List
rnThe main page provides an overview of all available shipping methods.
rn- rn
- Title: The name of the shipping method that customers will see (e.g., "Flat Rate"). rn
- Defined Prices: This column lists the shipping costs you have set for each specific cryptocurrency. rn
- Default: One method must be set as the default. This will be the pre-selected option in the customer
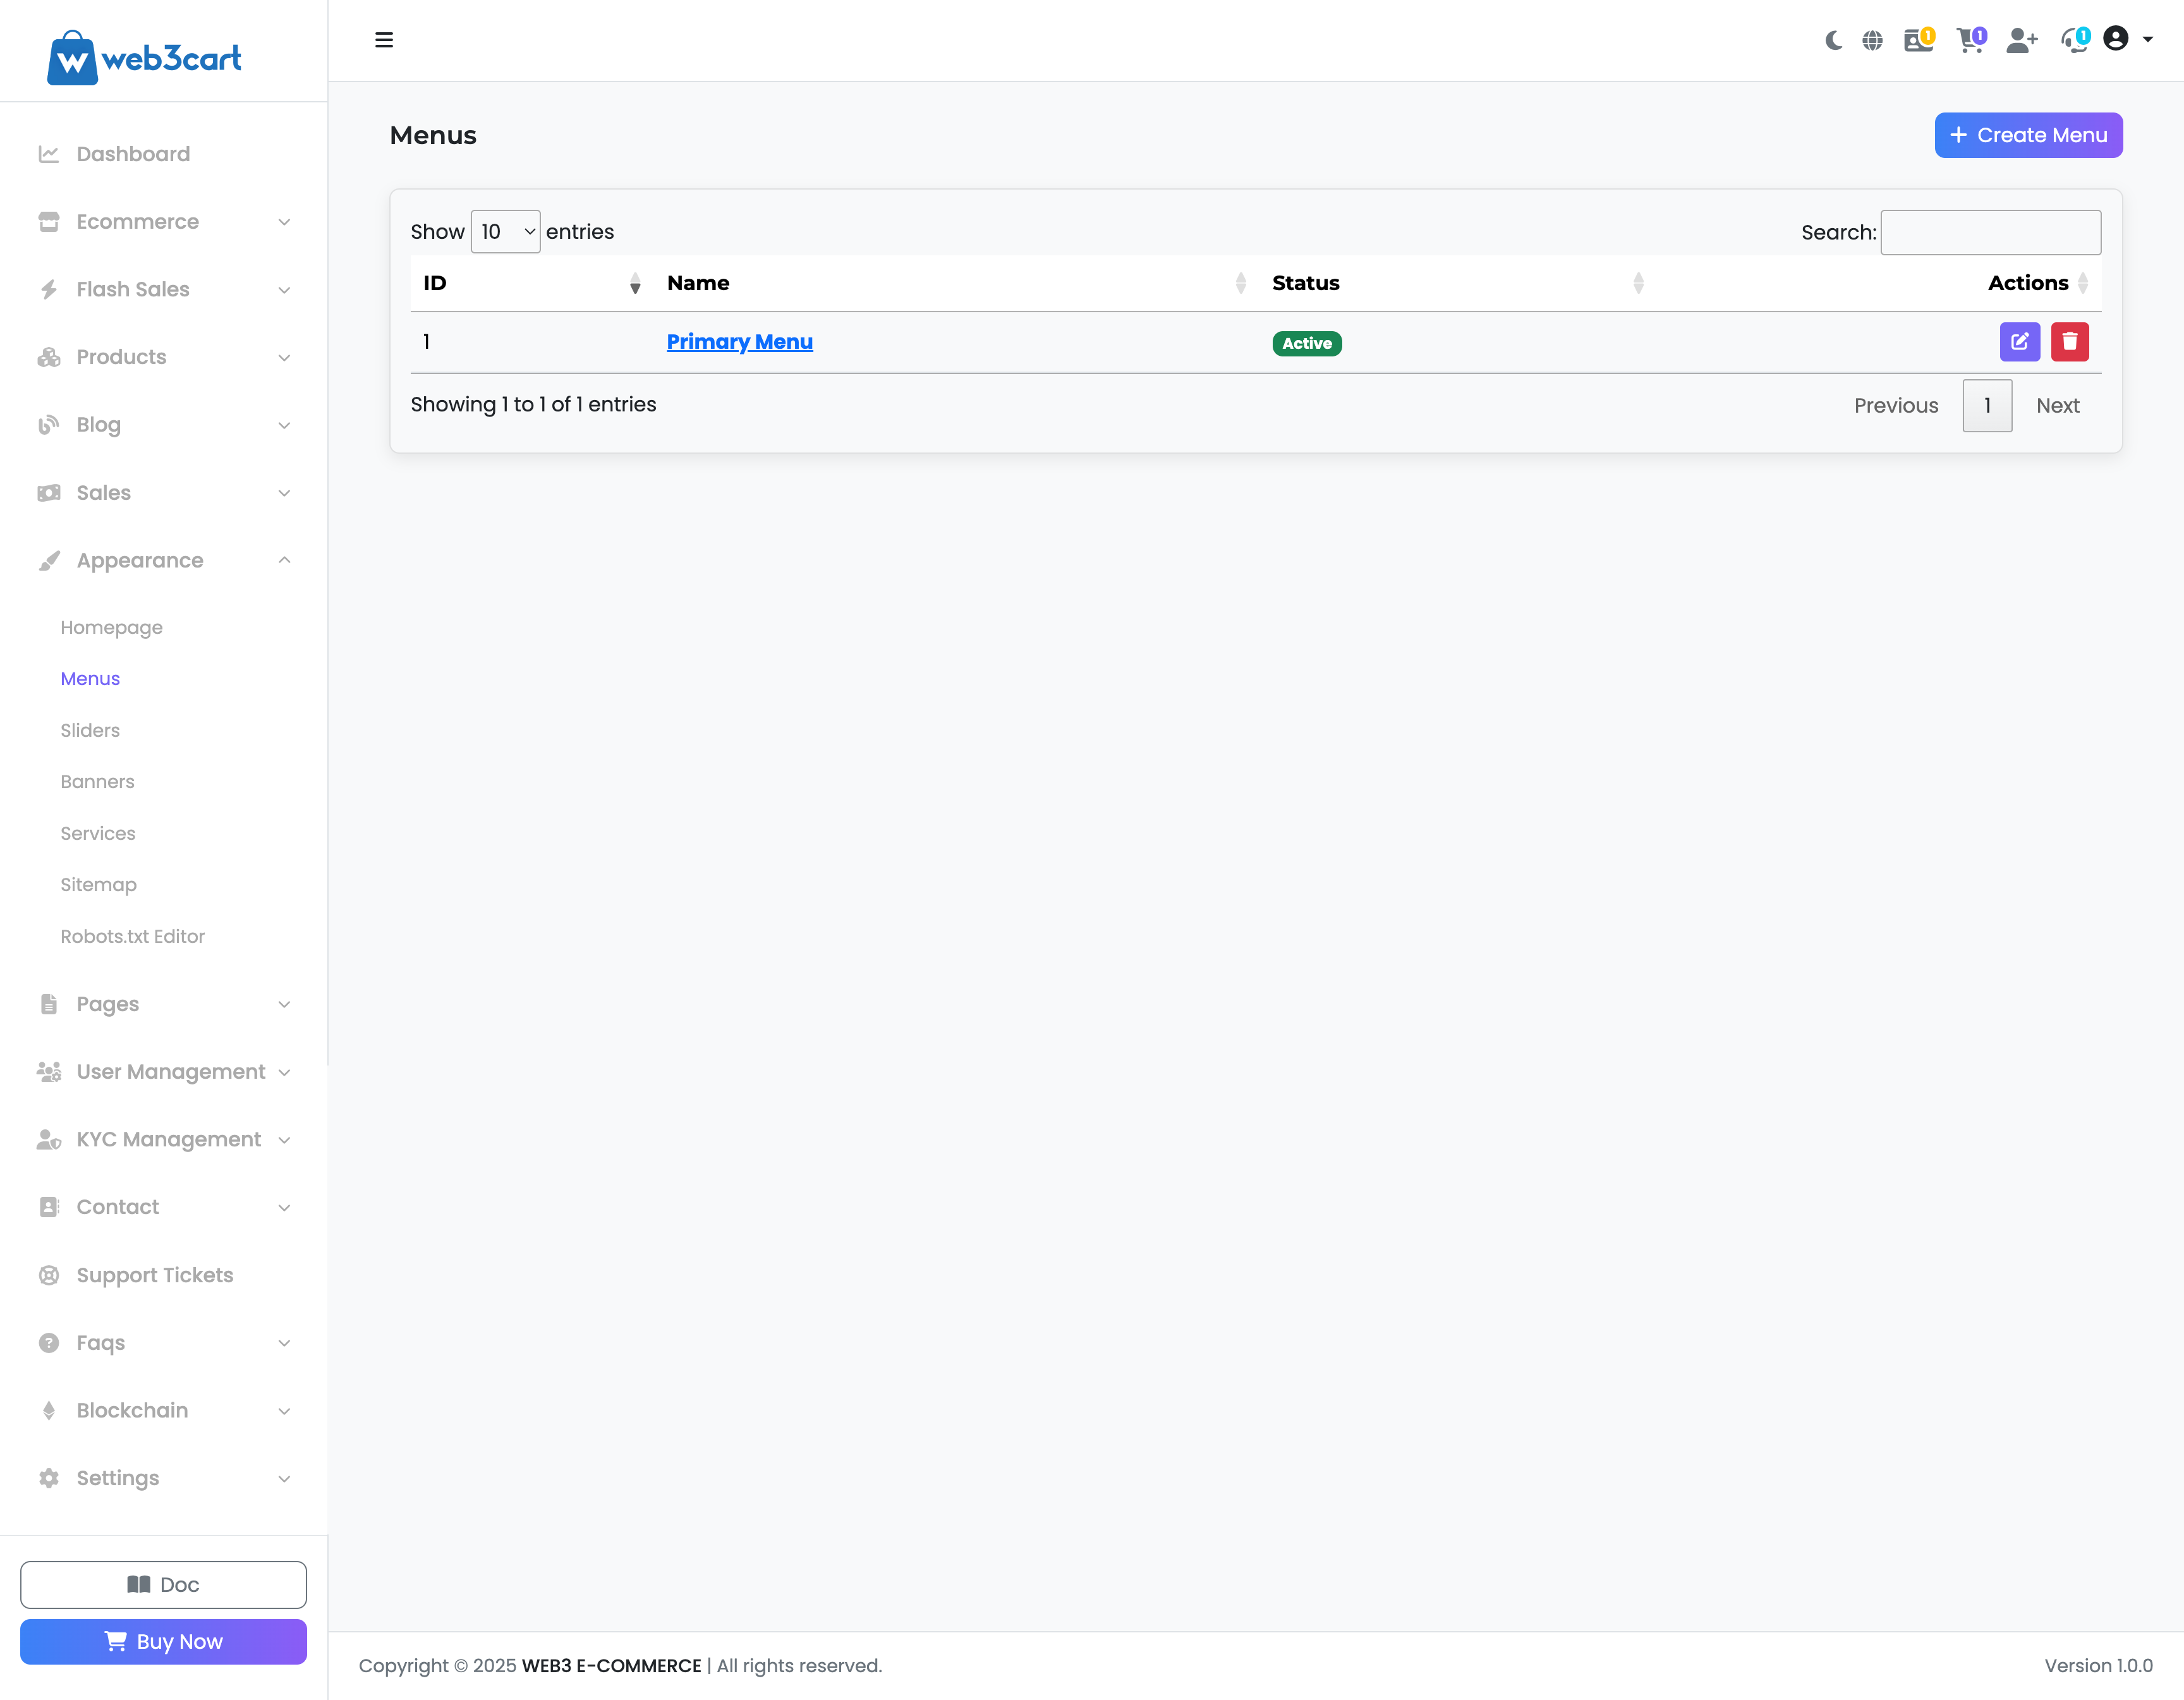
Managing Navigation Menus
rnThe Menus section allows you to create, edit, and manage all navigation menus on your website, such as the main header menu or a footer menu. The system is structured in three levels: Menus List, the Menu Builder, and the Menu Item Editor.
rnrn
Step 1: The Menus List
rnThis is the main page where you manage your menu "containers". For example, you might have a "Primary Menu" for your header and a "Footer Links" menu for your footer.
rn- rn
- Create Menu: Click this to create a new, empty menu container. rn
- Actions:rn
- rn
- Edit (Pencil Icon): Click this to open the Menu Builder for that specific menu, where you will add and arrange the links. rn
- Delete (Trash Icon): Permanently removes a menu and all its items. rn
rn
rn
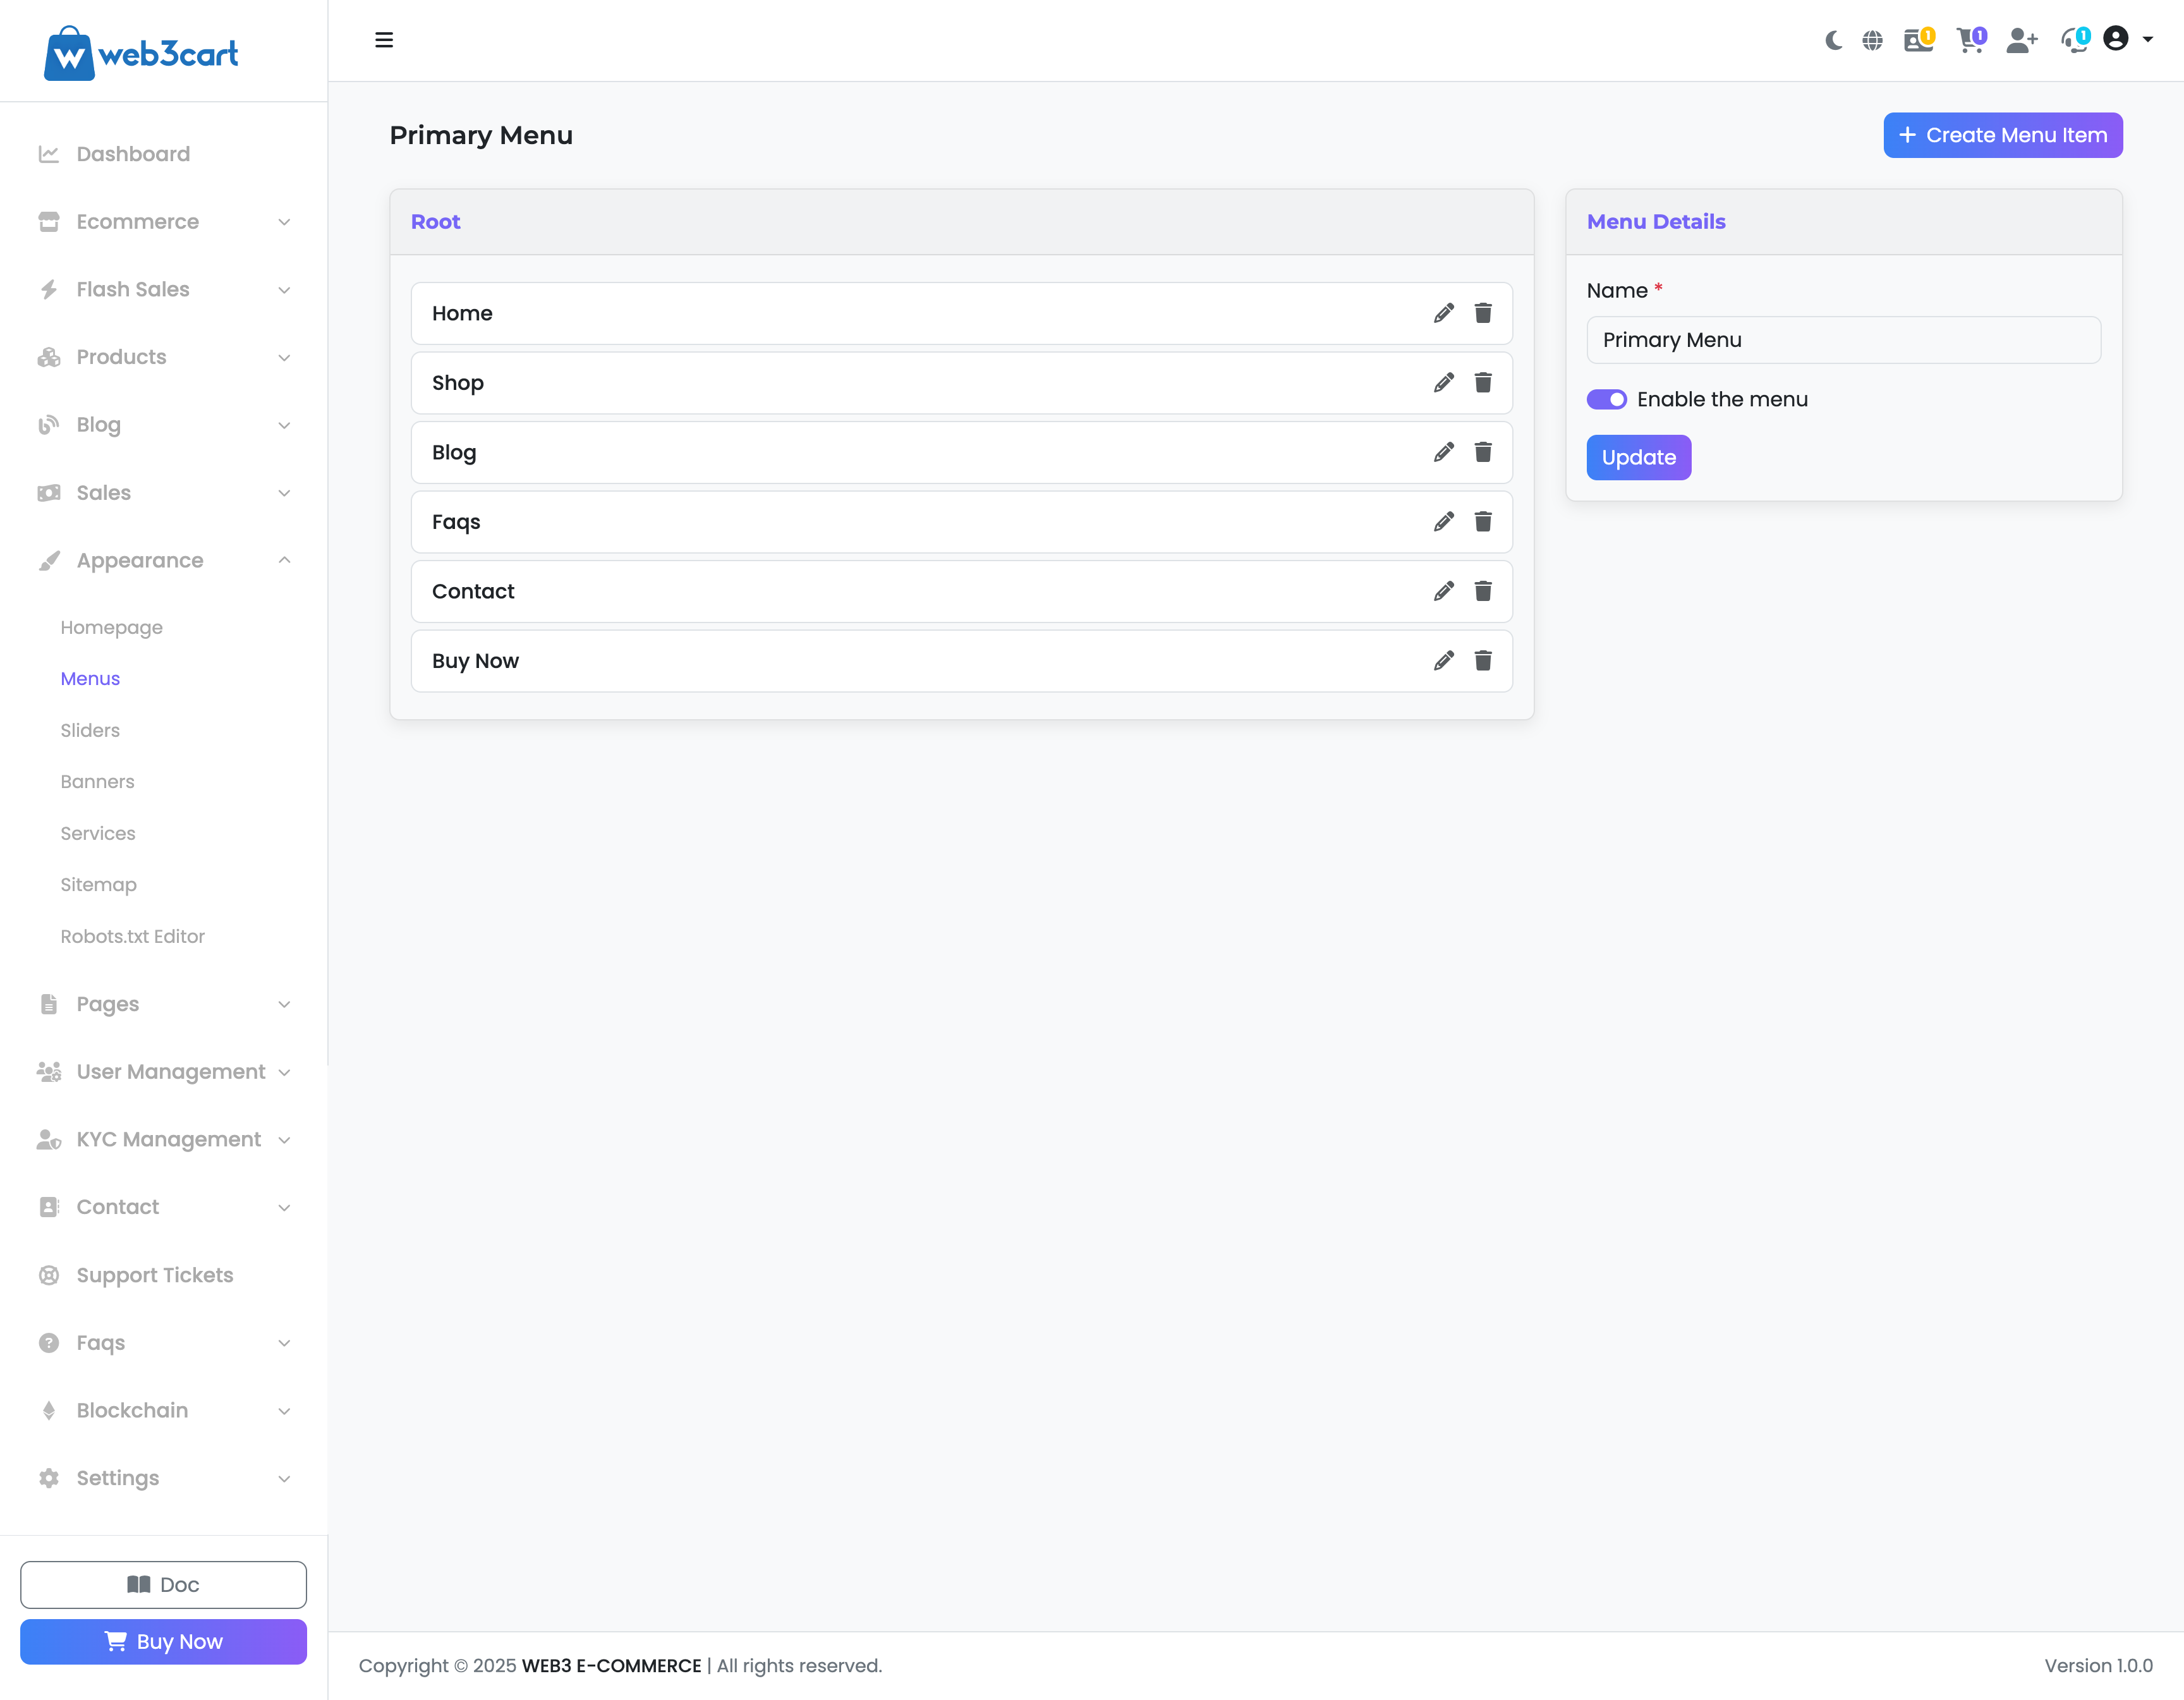
Step 2: The Menu Builder (e.g., Primary Menu)
rnAfter clicking "Edit" on a menu, you are taken to the Menu Builder. This is where you construct the structure of your menu.
rn- rn
- Create Menu Item: Click this to add a new link (item) to the menu. This will take you to the "Edit Menu Item" screen. rn
- Menu Item List: This area shows all the links currently in your menu.rn
- rn
- Re-ordering: You can change the order of menu items by simply clicking and dragging an item to a new position. rn
- Creating Sub-menus: To create a sub-menu (dropdown), drag an item slightly to the right underneath another item. It will become a "child" of the item above it. rn
- Actions: Click the "Edit" icon to modify a specific menu item, or the "Delete" icon to remove it from the menu. rn
rn - Menu Details: On the right, you can update the internal name of the menu and enable or disable it globally. rn
rn
Step 3: The Menu Item Editor
rnThis is where you define the details for a single link in your menu.
rn- rn
- Name: The text that will be visible to users on the website (e.g., "Home", "Contact Us"). rn
- Type: The kind of link you are creating. Common options include:rn
- rn
- URL: A link to any internal or external web address. rn
- Page: A direct link to one of the pages you created under the "Pages" section. rn
- Category: A link to a specific product category page. rn
rn - URL: The destination link. Use a relative path like
/aboutfor internal pages or a full URL likehttps://example.comfor external sites. rn - Icon: You can add an icon next to the menu name (e.g., Font Awesome classes like
fas fa-home). rn - Target: Choose whether the link opens in the "Same Tab" or a "New Tab" (
_blank). rn - Parent Menu Item: Use this to manually assign a parent for creating sub-menus. "Root" means it is a top-level item. rn
- Enable the menu item: A switch to show or hide this specific link without deleting it. rn
Click "Save" to apply your changes to the menu item.
rn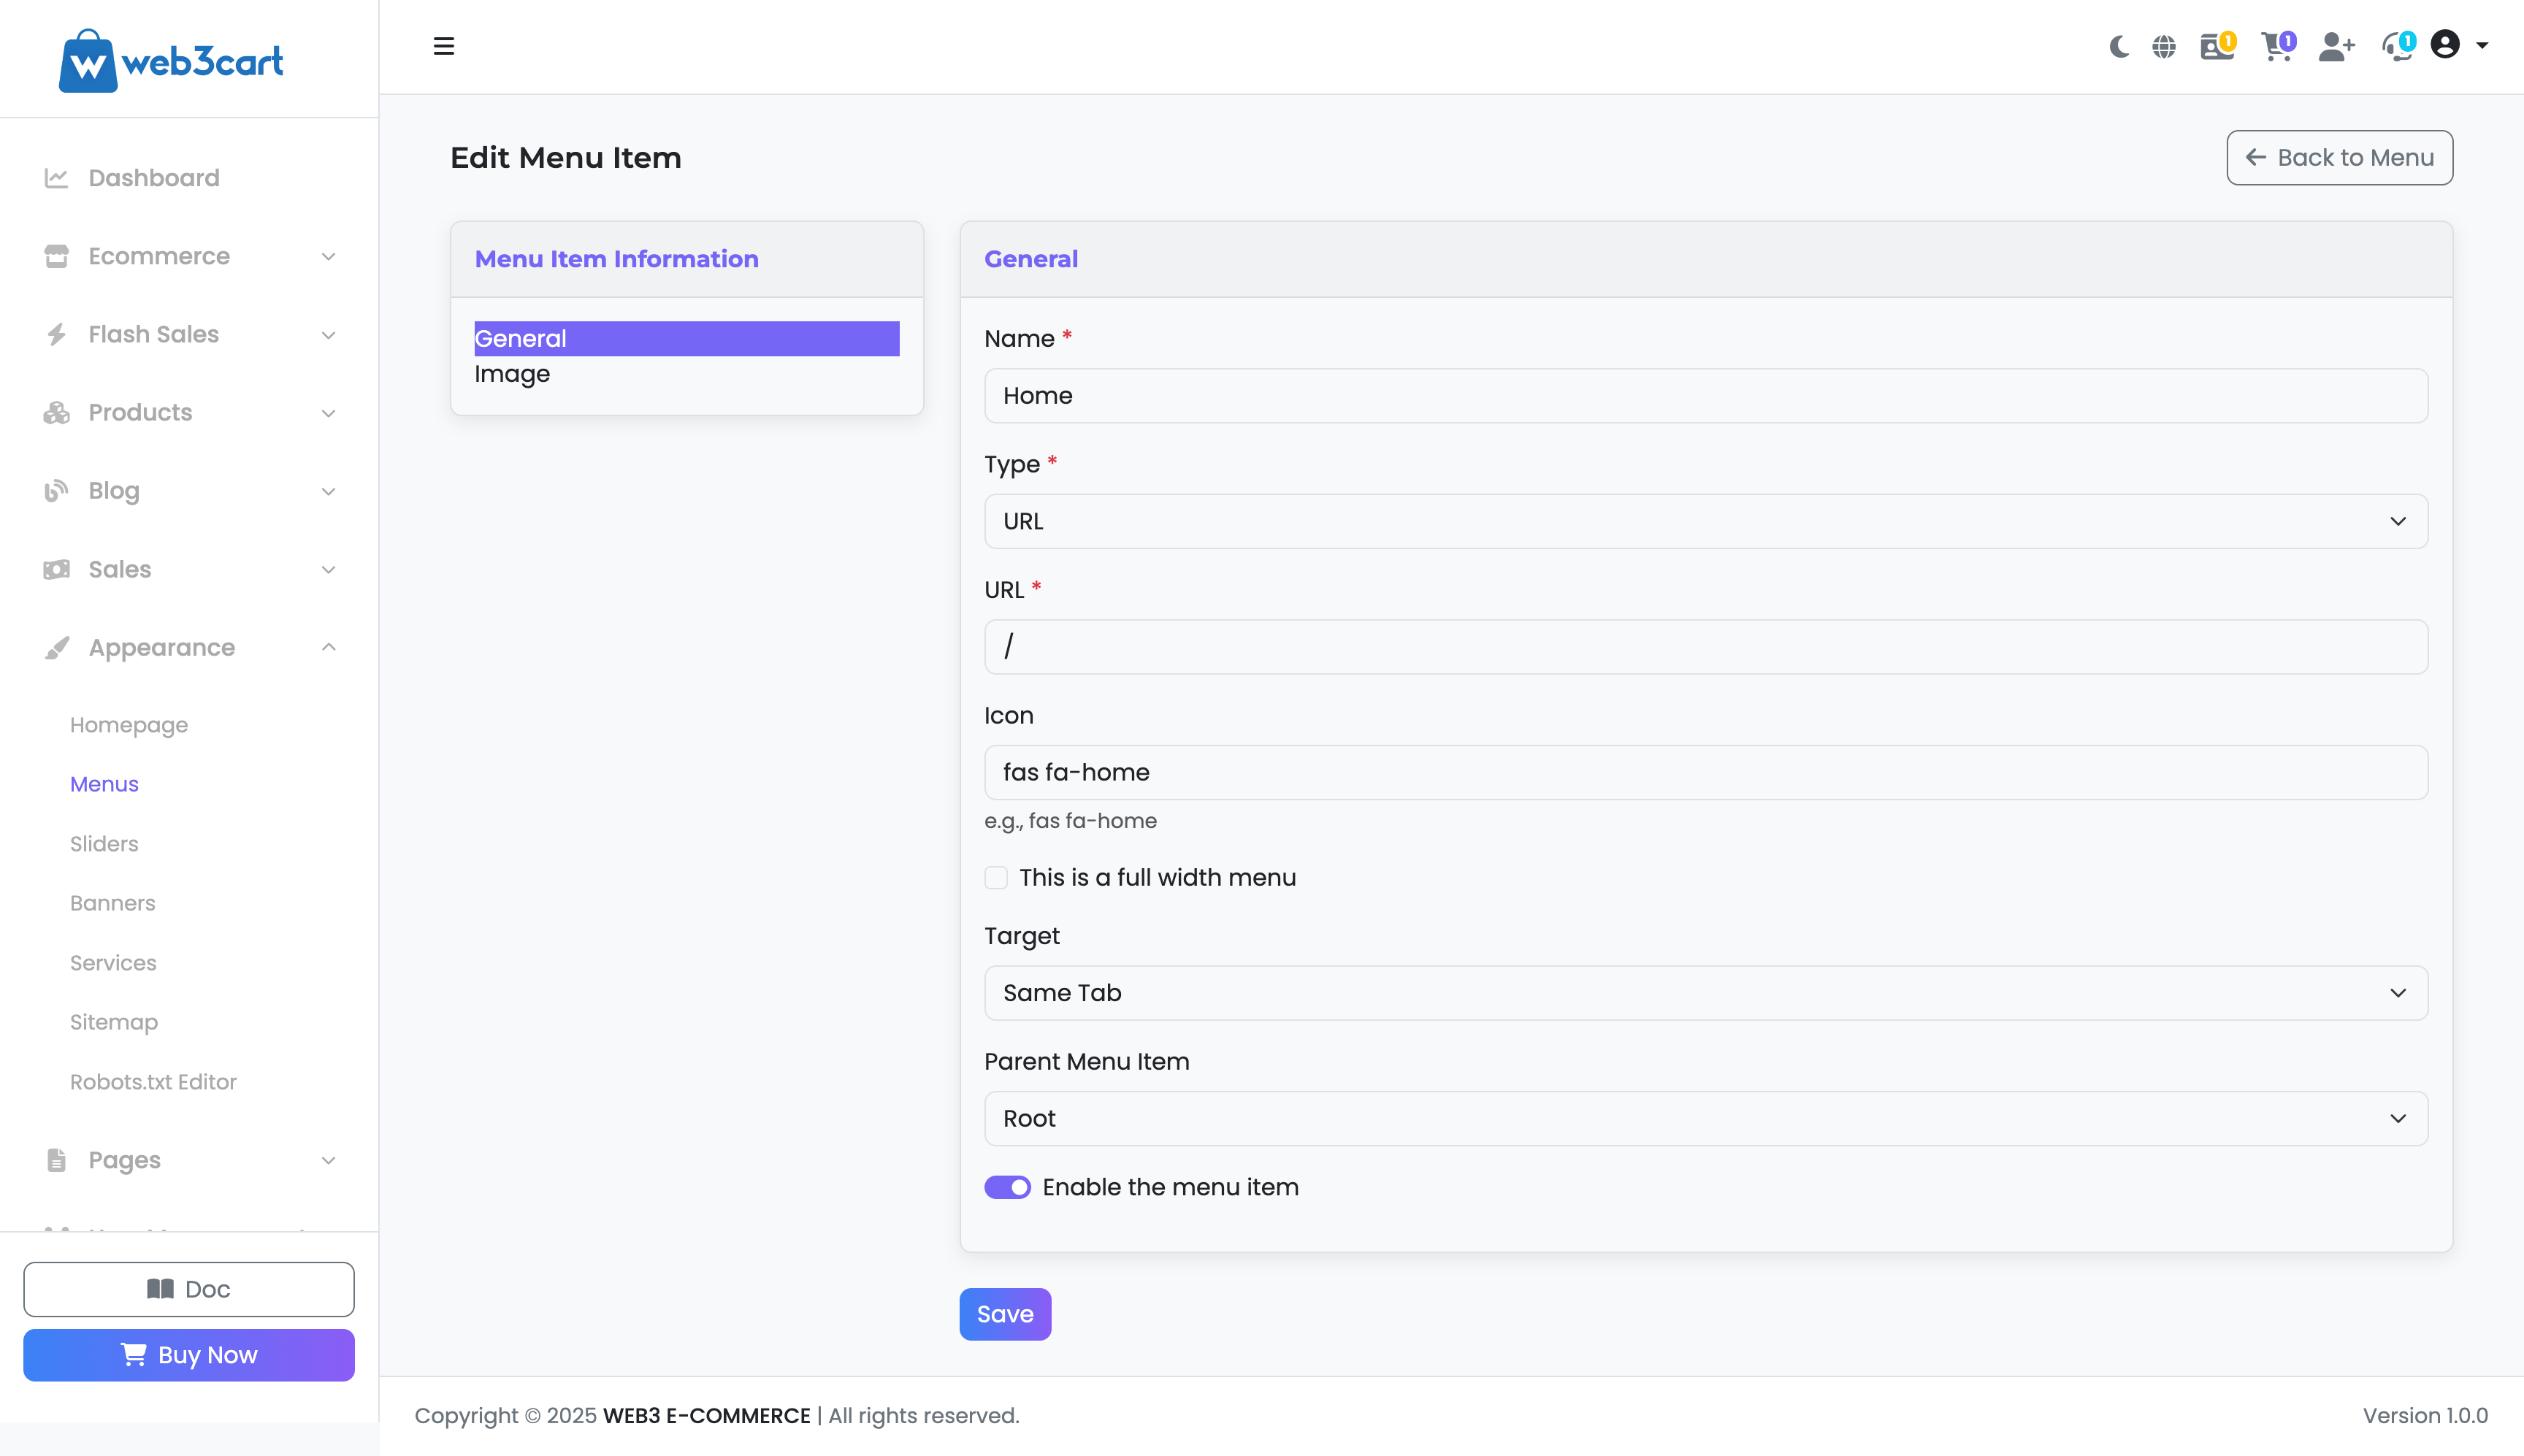
BSC Installation Video Guide
rnFollow the steps in the video below to complete the installation process on the Binance Smart Chain (BSC).
rnThe Faucet is a tool that allows you to claim free test tokens to experiment with the platform on various test networks. These tokens have no real-world value and are used only for testing purposes.
rnrn
Understanding the Faucet Page
rnThe main Faucet page provides a simple, step-by-step interface to receive test funds.
rn- rn
- Select a Test Network: This dropdown menu lists all the available test networks where you can claim tokens (e.g., "BSC Testnet"). You must select a network before proceeding. rn
- Connect Wallet Button: After selecting a network, this button becomes your primary action. Clicking it will open a wallet selection modal. rn
- Connected Wallet Address: Once your wallet is successfully connected, this field will appear, displaying your public wallet address. rn
- Action Buttons: After connecting, two new buttons will become available:rn
- rn
- Add Token to Wallet: An optional but helpful step that adds the token
Follow the steps in the video below to complete the token request process for Testnet USDT on the Binance Smart Chain (BSC).
rnWeb3cart PHP Script with Crypto Payments & Smart Contracts
rnWeb3cart is a revolutionary, feature-packed PHP script that empowers you to build a cutting-edge, decentralized online store. Go beyond traditional e-commerce and step into the future by accepting direct cryptocurrency payments for both physical and digital products. Built on a secure and modern technology stack, this platform combines the familiarity of a professional e-commerce experience with the power and trustlessness of blockchain technology.
rnAre you tired of paying high fees to middlemen, waiting for payouts, and dealing with fraudulent chargebacks? Web3cart solves all of this. By leveraging the power of blockchain, we put you back in control. This isn
Our platform is engineered with a comprehensive suite of professional tools designed for a true Web3 environment.
rn- rn
- Direct Crypto Payments: Accept wallet-to-wallet payments with no intermediaries. Supports native coins (ETH, BNB) and tokens (USDT, USDC, etc.) across multiple chains. rn
- Sell Physical & Digital Products: The ultimate flexibility. Manage shippable goods with advanced shipping rules and sell digital products with instant, secure delivery from a single platform. rn
- Multi-Chain Architecture: Don
Why Choose Web3cart for Your Online Business?
rn- rn
- Slash Your Costs, Boost Your Profits: Stop paying the exorbitant 3-5% fees charged by traditional payment gateways. With our platform, you receive payments with commissions as low as 1% or less per transaction, plus the blockchain
Initial Release.
Joining the web3cart marketplace as a vendor allows you to build your brand and sell your products to a wider audience. The registration process is simple and begins on our main registration page.
rnStep-by-Step Registration Guide:
rn- rn
- rn
Navigate to the main Register page on web3cart.
rn rn - rn
You will see a section titled "Register as".
rn rn - rn
By default, "I am a customer" may be selected. You must select the "I am a vendor" option.
rn rn - rn
Selecting this option will typically expand the form to include fields relevant to your business or store (e.g., Store Name, Store link).
rn rn - rn
Complete all required fields in the registration form.
rn rn - rn
Read and accept the Terms of Service.
rn rn - rn
Click the "Register" (veya "Submit Application") button to complete your submission.
rn rn
What Happens Next?
rnAfter you submit your application, your account will be placed in a pending status. Our administrative team will review your submission to ensure it meets our marketplace guidelines. This review process is detailed in our "Understanding Your Account Status" article.
After you apply to become a vendor, your account will be assigned a status based on the review process. This status determines your access to the vendor dashboard and marketplace features.
rnHere are the primary statuses you may encounter:
rn1. Unverified Vendor (Pending Approval)
rn- rn
- rn
What it means: This is the default status for all new vendor applications. It indicates that you have successfully submitted your registration form, and it is now in the queue for review by our admin team.
rn rn - rn
Your access: During this time, you will not have access to the vendor dashboard or be able to list products.
rn rn - rn
Action required: No action is needed from you unless our team contacts you for additional information.
rn rn
2. Vendor (Approved)
rn- rn
- rn
What it means: Congratulations! Your application has been reviewed and approved. You are now an official vendor on the web3cart marketplace.
rn rn - rn
Your access: You have full access to your vendor dashboard, where you can manage your store profile, add products, view orders, and manage payouts.
rn rn - rn
Action required: You can now log in and begin setting up your store.
rn rn
3. Suspended Vendor
rn- rn
- rn
What it means: This status indicates that your account access has been temporarily or permanently restricted. This action is typically taken if an account is found to be in violation of our Terms of Service or marketplace policies.
rn rn - rn
Your access: You will be unable to log in to your vendor dashboard, your products will be hidden from the marketplace, and your selling privileges will be revoked.
rn rn - rn
Action required: Please check the email associated with your account for a formal notification from our compliance team. This email will contain details about the suspension and any potential steps for resolution or appeal.
rn rn
The "Manage Stores" page gives you a top-level view of all storefronts on your web3cart marketplace. From here, you can quickly find, edit, and monitor vendor activity.
rnThis screen is located under Marketplace > Stores.
rnNavigating the Stores List
rn- rn
- rn
Show Entries: Use the dropdown menu (defaulting to "10") to change how many stores are displayed per page.
rn rn - rn
Search: Use the "Search" bar on the right to instantly find a store by its Store Name or Owner.
rn rn - rn
Pagination: Use the "Previous" and "Next" buttons at the bottom to navigate through multiple pages of stores.
rn rn
Understanding the Stores Table
rnThe main table provides key information at a glance:
rn- rn
- rn
Store Name: The public name of the vendor
This page, located at Marketplace > Vendor Subscription Plans, lists all the subscription tiers available for vendors on your platform. These plans define the costs, features, and commissions associated with selling on web3cart.
rnUnderstanding the Plans Table
rn- rn
- rn
Plan Name: The commercial name of the plan (e.g., "Starter," "Advanced," "Premium").
rn rn - rn
Price: The cost for a vendor to subscribe to this plan.
rn rn - rn
Duration (Days): The number of days the subscription is valid before requiring renewal.
rn rn - rn
Product Allowed: The maximum number of products a vendor can list on this plan ("Unlimited" for no restrictions).
rn rn - rn
Commission (%): The percentage of each sale that the marketplace takes as a fee. Note that on higher-tier plans, this commission rate typically decreases.
rn rn - rn
Status: "Active" indicates the plan is available for vendors to subscribe to.
rn rn
Important System Constraint: Smart Contract Integration
rn!! CRITICAL NOTE !!
rnDue to integration with a smart contract on the blockchain, the core parameters of existing subscription plans (Price, Duration, Commission, etc.) CANNOT BE EDITED OR DELETED after they are deployed.
rn- rn
- rn
Edit Button: This action is disabled for any plan tied to the smart contract. It cannot be used to change the price or core features of a deployed plan.
rn rn - rn
Delete Button: This action is disabled for any plan tied to the smart contract. Deleting a plan would disrupt existing subscriptions and financial records.
rn rn - rn
+ Add New Button: This action is disabled for any plan tied to the smart contract.
rn rn
Please ensure all plan details are final before adding them to the system.
The Plan Features page (Marketplace > Plan Features) is a library of specific capabilities or "perks" that you can assign to your various subscription plans. This allows you to differentiate your tiers, such as offering "Advanced Analytics" only to your "Pro" subscribers.
rnUnderstanding the Features Table
rn- rn
- rn
ID: A unique system identifier for the feature.
rn rn - rn
Feature Name (Translated): The human-readable name for the feature (e.g., "AI Support").
rn rn - rn
Feature Key: The unique, internal system key (e.g.,
rnai_support). This key is used by the system to programmatically check if a vendor has access to a specific function. rn - rn
Description (Translated): An explanation of what the feature does or allows.
rn rn - rn
Status: "Active" or "Inactive." Setting a feature to "Inactive" will hide it from the plan configuration screen and disable it for any vendors who previously had it.
rn rn
How to Use Plan Features
rn- rn
- rn
Create the Feature: Click the "+ Add New" button. Define the Name, Key, and Description.
rn rn - rn
Assign the Feature: After creating the features here, you must navigate back to the "Vendor Subscription Plans" "Add New" or "Edit" page. There, you will be able to select which of these features (e.g.,
rnadvanced_analytics,ai_support) are included in a specific plan. rn
This two-step process provides flexibility. You can create a feature once (like "24/7 Support") and assign it to multiple different subscription plans.
The View Completed Subscriptions page (Marketplace > Completed Subscriptions) provides a historical log and financial record of all subscription purchases made by vendors. This is your primary tool for tracking subscription revenue and vendor activation dates.
rnUnderstanding the Subscriptions Table
rn- rn
- rn
Vendor: The name of the vendor (or their store) who purchased the plan.
rn rn - rn
Plan Name: The specific subscription plan they purchased (e.g., "Starter," "Advanced").
rn rn - rn
Start Date: The exact date and time the subscription became active.
rn rn - rn
End Date: The date and time the subscription is set to expire.
rn rn - rn
Transaction: A unique transaction ID (hash) that serves as proof of payment, often linking directly to a transaction on the blockchain. Clicking this link will typically open a block explorer to verify the transaction details.
rn rn - rn
Status:
rn- rn
- rn
Active: The subscription is currently valid and in good standing.
rn rn - rn
Cancelled: The subscription was terminated either by the user or an administrator.
rn rn - rn
(Other statuses like "Expired" may appear here after the End Date has passed).
rn rn
rn - rn
This page is for viewing and auditing purposes. You cannot edit these records, as they represent a historical log of completed financial transactions.
Welcome to your Vendor Dashboard! This is your central hub for managing every aspect of your store on the web3cart marketplace. From here, you can track your sales, add products, and manage customer interactions.
rnMain Navigation Menu (Left Side)
rnYour primary navigation menu on the left side organizes all management tasks into categories:
rn- rn
- rn
Vendor Dashboard: (This page) Returns you to the main overview screen.
rn rn - rn
E-commerce: This section contains tools for managing your products and sales.
rn rn - rn
Products: Add new products, edit existing ones, and manage your inventory.
rn rn - rn
Sales: View your order history, manage fulfillments, and track revenue.
rn rn - rn
Customer Support: Manage support tickets submitted by your customers.
rn rn - rn
Settings: Configure your store profile, payment information, and shipping options.
rn rn
Dashboard Statistics (Top Section)
rnThe top of your dashboard features "at-a-glance" statistics to give you a real-time snapshot of your store
The "Coupons" page, located under the E-commerce > Coupons menu, allows you to create and manage promotional discount codes for your customers. Offering coupons is a powerful way to increase sales, reward loyal customers, and attract new buyers.
rnThis main page shows a list of all the coupons you have created.
rnUnderstanding the Coupons Table
rn- rn
- rn
Title: A private name for your reference to help you identify the promotion (e.g., "Winter Sale").
rn rn - rn
Code: This is the actual code your customers will enter at checkout to receive their discount (e.g., "WINTER25").
rn rn - rn
Discount: The value of the discount. This can be a percentage (e.g., "10.00%") or a fixed monetary amount.
rn rn - rn
Status: Shows whether the coupon is currently available for customers to use.
rn- rn
- rn
Active: The coupon is live and can be applied by customers.
rn rn - rn
Inactive/Expired: The coupon is not available.
rn rn
rn - rn
- rn
Expires: The date the coupon code will automatically stop working.
rn rn - rn
Usage: Shows how many times the coupon has been used out of its total limit (e.g., "0 / ∞" means it has been used 0 times out of an unlimited number of uses).
rn rn
Managing Existing Coupons
rnOn the far right of each coupon row, you have two Actions:
rn- rn
- rn
Edit (Pencil Icon): Click this to modify the settings of an existing coupon. You can change its title, expiration date, or usage limits. (Note: Some parameters, like the code itself, may not be editable after creation).
rn rn - rn
Delete (Trash Icon): Click this to permanently delete the coupon. This action cannot be undone, and the code will no longer be valid for any customers.
rn rn
To create a new discount code for your store, follow these steps:
rn- rn
- rn
Navigate to the E-commerce > Coupons page from your vendor dashboard.
rn rn - rn
Click the "+ Add New Coupon" button located at the top right of the screen.
rn rn - rn
This will open a new form where you will define the rules for your coupon.
rn rn
Key fields you will likely need to fill out include:
rn- rn
- rn
Coupon Title: A name for your own records (e.g., "New Customer Offer").
rn rn - rn
Coupon Code: The code the customer will type in (e.g., "WELCOME10").
rn rn - rn
Discount Type: Choose between a percentage discount (e.g., 10%) or a fixed amount discount (e.g., $5 off).
rn rn - rn
Discount Amount: The value of the discount.
rn rn - rn
Expiration Date: The last day the coupon will be valid.
rn rn - rn
Usage Limit: You can set a limit on how many times the coupon can be used in total, or per customer.
rn rn
After filling in the details, save the coupon. It will then appear in your main "Coupons" list and, if set to "Active," will be ready for customers to use.
The Shipping page, located under the E-commerce > Shipping menu, is where you define the shipping costs for your physical products. You can create multiple shipping methods (e.g., "Standard," "Express") and set different prices for each.
rnA key feature of the web3cart platform is the ability to set your shipping prices in various cryptocurrencies, which are then presented to the customer during checkout.
rnUnderstanding the Shipping Table
rn- rn
- rn
Title: The public name of your shipping method (e.g., "Flat rate," "Express Shipping").
rn rn - rn
Defined Prices: This column provides a summary of all the different prices you have set for this shipping method across various cryptocurrencies (e.g., BNB, XPAYR, USDC, USDT). This allows customers to pay for shipping using the coin of their choice.
rn rn - rn
Default: If "Yes," this shipping method will be automatically selected for customers at checkout. It
You can easily add a new shipping option (like "Express Delivery") and define its costs by following these steps.
rnStep 1: Create the Shipping Method
rn- rn
- rn
Navigate to E-commerce > Shipping.
rn rn - rn
Click the "+ Add New Shipping Method" button at the top right.
rn rn - rn
A form will appear. At a minimum, you will need to provide:
rn- rn
- rn
Title: The name of the method (e.g., "International Shipping").
rn rn - rn
Status: Set it to Active to make it available.
rn rn
rn - rn
- rn
Save the new method. It will now appear in your shipping list, but with no prices defined.
rn rn
Step 2: Set Prices for the Method
rn- rn
- rn
Find your newly created shipping method in the list.
rn rn - rn
In its "Actions" column, click the "Set Prices" (Dollar
Before you can add your first product, you must register your seller wallet on the blockchain. This is a one-time action per network (e.g., one time for BSC, one time for Ethereum) that links your personal wallet to the web3cart marketplace smart contract.
rnThis registration is what allows you to securely and directly receive payments for your sales.
rnYou will be prompted to do this when you click Products > Create Product for the first time on a new network.
rnStep-by-Step Activation
rnFollow these steps on the "Seller Registration & Product Creation" page:
rnStep 1: Select Your Network From the dropdown menu, select the blockchain network on which you want to sell your products and receive payments (e.g., "BSC Testnet," "Ethereum Mainnet," etc.).
rnStep 2: Connect Your Wallet Click the "Connect Wallet" button. This will open a "Select Wallet" pop-up.
rnChoose your wallet provider (such as MetaMask, Ronin Wallet, Keplr, etc.) from the list. Your wallet extension (in your browser) will open and ask you to approve the connection to web3cart.
rnStep 3: Register on the Smart Contract Once your wallet is successfully connected, the button on the screen will change to "Register" or "Register on Contract."
rnClick this button. Your wallet will open one last time and ask you to approve a transaction. This transaction officially registers your wallet address with the marketplace smart contract, authorizing it to receive funds from sales.
rnAfter the transaction is confirmed on the blockchain, you will be automatically redirected to the "Add New Product" form, where you can now list your items.
rnImportant: Understanding the One-Time Wallet Registration Fee
rnWhen you complete the "Seller Registration" (Step 3 in the previous guide), you are required to approve a transaction from your wallet. This transaction incurs a small fee, known as a "gas fee."
rnWe want to be completely transparent about this cost:
rnrnThis fee is a network cost, NOT an web3cart platform fee.
rnThis gas fee is paid directly to the blockchain
After you have successfully registered your wallet on the blockchain (as covered in "How to Activate Your Seller Wallet"), you are ready to create your first product.
rnYou will see a confirmation message, "You are Registered!" Your connected wallet address is now visible in the top-right corner (e.g., 0XE600...D37B).
The system now prompts you to select the type of product you want to add:
rn1. Physical Product
rn- rn
- rn
Use this for: Any tangible item that must be physically shipped to the customer (e.g., clothing, electronics, merchandise).
rn rn - rn
This form will include: Sections for inventory management (stock) and shipping options.
rn rn
2. Digital Product
rn- rn
- rn
Use this for: Any item that is delivered electronically (e.g., software, e-books, digital art, downloadable files, access keys).
rn rn - rn
This form will include: A section to upload your file or provide a download link.
rn rn
Click on the appropriate option to be taken to the detailed product creation form.
This form appears after you select "Physical Product." Fill in these details to list your item for sale. The form is divided into a main section on the left and a configuration column on the right.
rnMain Product Details (Left Side)
rn- rn
- rn
Product Name: The public title of your product.
rn rn - rn
Permalink: The URL (web address) for your product. This is often auto-generated from the name, but you can edit it.
rn rn - rn
Media:
rn- rn
- rn
Featured Image: The main image shown in product listings.
rn rn - rn
Gallery Images: Upload additional photos for the product gallery.
rn rn - rn
Videos URL (Optional): Add links to product videos (e.g., YouTube).
rn rn
rn - rn
- rn
Description:
rn- rn
- rn
Short Description: A brief summary that appears near the top of the product page.
rn rn - rn
Full Description: A detailed description using the rich-text editor to format text, add lists, or embed media.
rn rn
rn - rn
- rn
Specifications:
rn- rn
- rn
Click "+ Add Specification" to add technical details (e.g., "Color: Red," "Material: Cotton").
rn rn
rn - rn
- rn
Tags: Add keywords to help customers find your product via search (e.g., "gaming," "headset," "pc").
rn rn - rn
SEO Meta Tags:
rn- rn
- rn
SEO Title & Description: Set custom text that will appear in Google search results.
rn rn
rn - rn
Configuration & Pricing (Right Side)
rn- rn
- rn
Pricing:
rn- rn
- rn
Price: The main selling price for the item.
rn rn - rn
Currency: (Critical) Select the specific cryptocurrency you want to receive for this product
- rn
This form appears after you select "Digital Product." The process is nearly identical to adding a physical product, with one critical difference: Downloadable Product settings.
rnYou will fill out the Product Name, Media, Description, Pricing, Organization, and SEO sections exactly as you would for a physical product.
Key Difference: Downloadable Product Section
rnInstead of "Stock & Shipping," you will see a "Downloadable Product" section on the left side:
rn- rn
- rn
Download Type:
rn- rn
- rn
File upload: Choose this if you want to upload the file (e.g., a
rn.zip,.pdf,.jpg) directly to web3cart. rn - rn
File link: Choose this if your file is hosted on an external service (like Google Drive, Dropbox, or your own server).
rn rn
rn - rn
- rn
Upload File: (Appears if "File upload" is selected) Click to upload your file.
rn rn - rn
Download File: (Appears if "File link" is selected) Paste the direct download URL here.
rn rn - rn
Download Limit: (Optional) Set a number to limit how many times a single customer can download the file after purchase. Leave blank for unlimited.
rn rn
After configuring the downloadable file and filling in all other product details (price, categories, etc.), click "Save Product" to make your item live.
The Store Settings page, located under the Settings > Store Settings menu, is where you control the identity and branding of your public storefront. This is where you set your store
BSC Testnet Admin Package Purchase Guide
rnThese packages are designed for users who want to set up their store and complete the initial setup on the Binance Smart Chain (BSC) Testnet. Follow the steps below to purchase and access your package:
rn- rn
- Go to https://web3cart.site/#pricing. rn
- Select a package, register, and complete the payment. rn
- After payment, you will see your license and download link. rn
rnrn
rnBSC Testnet Vendor Package Guide
rnThese packages are intended for regular users who want to purchase vendor packages and manage their store setup on the Binance Smart Chain (BSC) Testnet. Follow the steps below:
rn- rn
- Go to your subscription page: /account/subscriptions. rn
- Select the package and click "Subscribe Now". rn
- Complete the transaction in the wallet popup. rn
rnrn
rnBSC Testnet Admin Package Upgrade Guide
rnFor admins who want to upgrade their package on the Binance Smart Chain (BSC) Testnet, follow these steps:
rn- rn
- Click the package information in your profile link or use the "Upgrade" button at the bottom of the left menu to move to a higher package. rn
- Then, on the profile page, click the "Sync" button next to the package information to update your package details. rn
rnrn
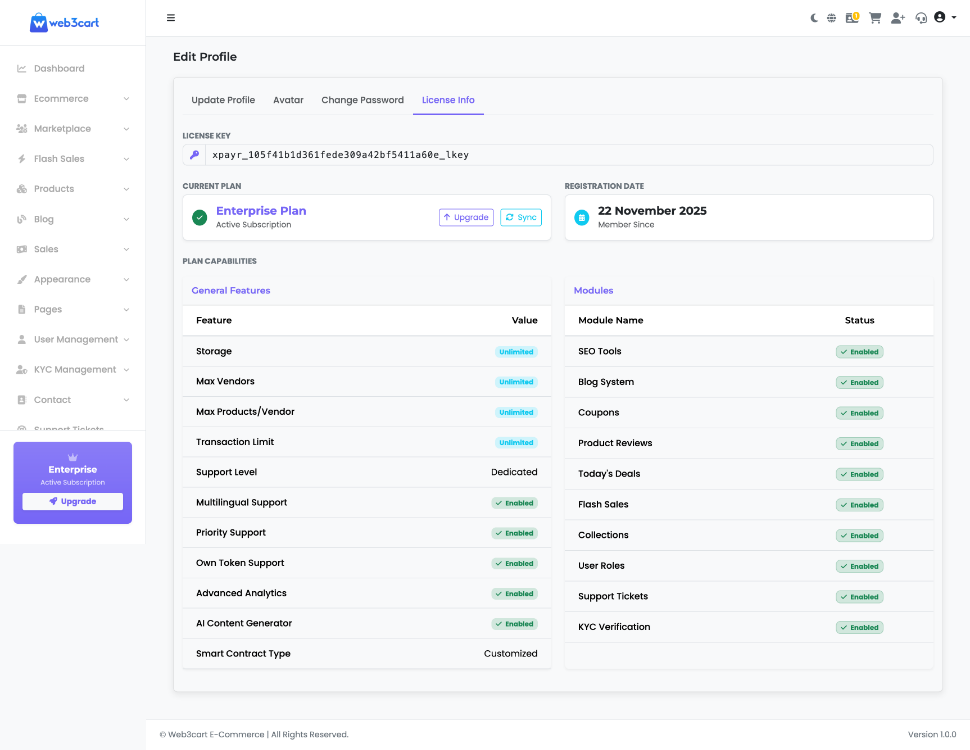
rnAccess: https://web3cart.store/admin/profile (Tab: License Info)
This section provides store administrators with a comprehensive view of their current subscription status, package limits, and enabled modules.
Key Features:
License Key: Displays the unique license string associated with your installation.
Current Plan: Shows your active subscription tier (e.g., Enterprise Plan) and registration date.
Plan Capabilities & Modules: detailed list of available features, limits (Storage, Vendors, Products), and active system modules for your current plan.
Sync Subscription: If you have recently upgraded your plan, click the Sync button (located next to the "Upgrade" button) to refresh the system. This ensures your dashboard immediately reflects the latest package information and increased limits.
1. Go to your Admin Panel > Blockchain > Currencies.
2. Find 'USDT' in the list (available on BSC, Ethereum, Polygon, etc.).
3. Click 'Edit' and ensure the status is 'Active'.
4. Verify the Token Address matches the official USDT contract for that network.
5. That's it! Customers can now select USDT at checkout, and funds go directly to your wallet.
**Web3Cart** is built specifically for the decentralized web.
- **Pros:** Native crypto payments (no plugins needed), no transaction fees to middlemen, direct wallet-to-wallet transfers, supports smart contracts, higher security for digital assets.
- **Best for:** Crypto-native businesses, selling NFTs or digital keys, high-risk industries where chargebacks are a problem.
**WooCommerce** is a traditional e-commerce plugin for WordPress.
- **Pros:** Huge ecosystem of plugins, familiar interface.
- **Cons:** Requires third-party gateways for crypto (often with high fees), reliant on banking systems, prone to chargebacks.
- **Best for:** Traditional retail stores selling in fiat currency (USD, EUR).
1. **Non-Custodial:** We do not hold your funds. Payments go directly from the customer's wallet to your wallet.
2. **Smart Contracts:** Core logic is handled by audited smart contracts on the blockchain.
3. **No Database Risks for Payments:** Since payments are on-chain, there is no credit card database to be hacked.
4. **Self-Hosted:** You have full control over your data and server.
- Ethereum (ETH)
- Binance Smart Chain (BSC)
- Polygon (MATIC)
- Avalanche (AVAX)
- Base
- Arbitrum
- Optimism
You can easily enable or disable networks from the Admin Panel.
**Türkçe:** Hayır, Web3Cart **Kimlik Doğrulamasız (No KYC)** bir kripto ödeme ağ geçididir. Gizliliğe ve merkeziyetsizliğe önem veriyoruz. Kripto ödeme almaya başlamak için kimlik belgesi göndermenize gerek yoktur.
**العربية:** لا، Web3Cart هي **بوابة دفع مشفرة بدون KYC**. نحن نقدر الخصوصية واللامركزية. لا تحتاج إلى تقديم مستندات الهوية للبدء في قبول المدفوعات المشفرة.
**Türkçe:** Web3Cart **cüzdandan cüzdana doğrudan ödeme** sağlar. Müşteri ödeme yaptığında, fonlar akıllı sözleşme aracılığıyla doğrudan müşterinin cüzdanından sizin satıcı cüzdanınıza geçer. Fonlarınızı asla tutmayız.
**العربية:** يسهل Web3Cart **المدفوعات المباشرة من محفظة إلى محفظة**. عندما يدفع العميل، تذهب الأموال مباشرة من محفظته إلى محفظة التاجر الخاصة بك عبر العقد الذكي. نحن لا نحتفظ بأموالك أبدًا.
**Türkçe:** Evet! Web3Cart bir **NFT Pazar Yeri Scripti** içerir. Dijital varlıkları, sanatı veya oyun öğelerini mağazanızda doğrudan NFT olarak satabilirsiniz.
**العربية:** نعم! يتضمن Web3Cart **سكربt سوق NFT**. يمكنك بيع الأصول الرقمية أو الفن أو عناصر اللعبة كـ NFTs مباشرة في متجرك.
**English:** **Web3 Ecommerce** is the next generation of commerce using blockchain technology. It is a system where there are no intermediaries (banks, payment processors), payments are made with cryptocurrencies, and ownership belongs to the users.
Last updated: November 30, 2025
Follow this guide to set up your Web3Cart account, complete your payment, and install the software based on your selected plan.
1. Account Creation & Security
Navigate to the pricing page at https://web3cart.site/#pricing.
Select your preferred package and click "Get Started".
Fill out the registration form and click "Create Account & Pay".
⚠️ Important: Recovery Key
Upon submitting the form, the system will generate a unique Recovery Key.
XPAYR-XXXX-XXXX-XXXX
We cannot recover this key for you. Please store it safely! You will need this to reset your password if you forget it. Once saved, click "I have saved my key, Continue".
2. Payment & Activation
After logging into the panel, you will be prompted to complete your purchase:
Connect Wallet: Select your preferred network (BSC, Ethereum, etc.).
Network Selection: While Testnets (e.g., BSC Testnet, Sepolia) are available for testing connectivity, payment must be completed on a Mainnet to generate a valid license.
Once the transaction is confirmed on the blockchain, your License Key and the Download button will become active immediately.
3. Hosting & Installation Options
The installation procedure varies depending on your subscription plan:
Starter Plan: Self-hosted. You are responsible for hosting and installing the software on your own server.
Growth & Scale Plans: Includes 1 Year of Free Hosting. We handle the installation and deliver a turnkey solution.
Enterprise Plan: Includes 3 Years of Free Hosting. We handle the installation and deliver a turnkey solution.
4. Self-Hosting Installation Guide (Starter Plan)
If you are using the Starter Plan or prefer to use your own server:
Requirements: Any server environment compatible with standard control panels (cPanel, FastPanel, etc.).
Steps:
Download the software .zip file from your dashboard.
Upload and extract the file to your server's public directory. No manual database configuration is required.
Open your browser and navigate to: yoursite.com/install
Follow the Setup Wizard to complete the installation using your License Key.
Web3Cart includes a powerful real-time notification system that sends instant alerts to your Telegram whenever important events occur on your marketplace. Stay informed about new orders, user registrations, and payment confirmations — all delivered directly to your phone or desktop.
Why Telegram?
Telegram is fast, secure, and available on all devices. Unlike email notifications that can get lost in spam folders, Telegram messages are delivered instantly with push notifications. You'll never miss an important sale again.
Step-by-Step Setup Guide
Step 1: Create a Telegram Bot
Open Telegram and search for @BotFather
Start a conversation and send the command: /newbot
Choose a name for your bot (e.g., "My Store Notifications")
Choose a username for your bot (must end with "bot", e.g., "mystorenotify_bot")
BotFather will give you an API Token — save this securely!
Important: Never share your bot token publicly. Treat it like a password.
Step 2: Create a Private Channel & Get Channel ID
Create a new private channel in Telegram for Admin notifications
Add your bot as an Administrator to that channel
Send a test message to the channel
Forward that message to @userinfobot
The bot will reply with the Channel ID (usually starts with -100)
Step 3: Configure in Admin Panel
Web3Cart provides an easy-to-use interface in the Admin Panel to configure your Telegram notifications. No need to edit any files — everything is managed through the dashboard.
Navigate to Admin Panel → General Site Settings → Notifications tab and enter:
Telegram Bot Token: The API token you received from @BotFather
Bot Username: Your bot's username without the @ symbol
Admin Channel ID: The channel ID where admin notifications will be sent
You can also customize which notifications you want to receive:
New Vendor Registration
New Plan Subscription
New Product Review
New Order (Global)
New Support Ticket
Telegram Integration Settings in Admin Panel
Step 4: Test Your Configuration
Click Save Settings and make a test action (e.g., create a test ticket or register a vendor). If configured correctly, you'll receive an instant Telegram message in your channel!
Notification Types
Web3Cart sends notifications for the following events:
Event Description Information Included
New Order When a customer places an order Order ID, Product Name, Amount
Payment Confirmed When blockchain confirms payment Customer Name, Plan, Amount, TX Hash, Network
New User When someone registers an account User Name, Email
Support Ticket When a customer opens a ticket Ticket Subject, Priority
Vendor Activity When vendors add products or make sales Vendor Name, Action Type
Advanced: Group Notifications
You can also receive notifications in a Telegram group instead of a channel:
Create a new Telegram group
Add your bot to the group as a member
Make the bot an administrator (required to send messages)
Get the group Chat ID using @userinfobot (group IDs are negative numbers)
Enter the group ID in the Admin Channel ID field
Pro Tip: Team Notifications
Using a group allows your entire team to see notifications in real-time. Add your support staff, fulfillment team, and management to stay synchronized.
Troubleshooting
Not receiving notifications?
Check your bot token: Make sure there are no extra spaces or characters
Verify Channel ID: Ensure it starts with -100 for channels
Bot permissions: The bot must be an administrator in the channel/group
Check server logs: Look for any Telegram API errors in your error logs
Messages delayed?
Telegram API has a rate limit of 30 messages per second
If you have high volume, messages may queue up briefly
Check your server's internet connection
Core Smart Contract Addresses & Payment Logic
This page lists the core smart contract addresses that are integral to the payment processing logic of the platform. These addresses belong to the web3cart crypto payment platform and are essential for the system to function correctly.
CRITICAL WARNING: DO NOT MODIFY
The contract addresses listed below are fundamental to the operation of your marketplace. They handle payment routing and transaction verification.
Altering, editing, or deleting these addresses will cause an immediate and total failure of the payment system. Customers will not be able to make purchases, and you will not receive any funds. These values should only ever be changed if you are explicitly instructed to do so in an official script update.
Mainnet Contract Addresses
Ethereum Mainnet:
0x856386E0f4c0A2566C7E95A3D19861f55A339611
View on Etherscan
BSC Mainnet:
0x384cD2f5Ce9Aa55d71D60fFb3d4cab33642eBb21
View on BscScan
Polygon Mainnet:
0x5Af2477eEcCdb029bD438dc8AdDfA25C8ffD0750
View on PolygonScan
Arbitrum One:
0x5Af2477eEcCdb029bD438dc8AdDfA25C8ffD0750
View on Arbiscan
Base Mainnet:
0x5Af2477eEcCdb029bD438dc8AdDfA25C8ffD0750
View on BaseScan
Optimism Mainnet:
0x5Af2477eEcCdb029bD438dc8AdDfA25C8ffD0750
View on Optimism Etherscan
Avalanche C-Chain:
0x5Af2477eEcCdb029bD438dc8AdDfA25C8ffD0750
View on Snowtrace
Testnet Contract Addresses
Sepolia (Ethereum Testnet):
0x2b2d9e2F7bD23BE1d62D8C3aaEe3D1cbDEFA37aB
View on Sepolia Etherscan
BSC Testnet:
0xA1C35F2Da8531ec051B91542a01C0166275b8036
View on BSC Testnet Scan
Polygon Amoy:
0xA23F58225ed2F86dC075Dd1049e7e85c4Cf0278f
View on Polygon Amoy Scan
Arbitrum Sepolia:
0x5Af2477eEcCdb029bD438dc8AdDfA25C8ffD0750
View on Arbitrum Sepolia Scan
Base Sepolia:
0xA23F58225ed2F86dC075Dd1049e7e85c4Cf0278f
View on Base Sepolia Scan
Optimism Sepolia:
0xA23F58225ed2F86dC075Dd1049e7e85c4Cf0278f
View on Optimism Sepolia Scan
Avalanche Fuji:
0xA23F58225ed2F86dC075Dd1049e7e85c4Cf0278f
View on Fuji Snowtrace
How Payments Work with web3cart
To process cryptocurrency payments, Web3 e-Commerce uses the smart contracts of web3cart, one of the industry's most reliable crypto payment platforms.
These contracts, specially prepared for the Web3 e-Commerce project, are fully transparent, verified on the blockchain, and have been professionally audited to ensure the highest level of security and reliability.
Key Advantages
Multi-Chain Support: Accept payments on 7 different mainnet networks (Ethereum, BSC, Polygon, Arbitrum, Base, Optimism, Avalanche).
Instant Settlement: No holding periods, withdrawal requests, or waiting times. Funds are transferred directly to your wallet as soon as the blockchain transaction is confirmed.
Testnet Support: Test your payment flow on 7 different testnet networks before going live.
Stablecoin Payments: Accept USDC and USDT on all supported networks.
For more detailed information about the web3cart platform and its features, please visit their official website: web3cart.site.
Web3Cart supports an extensive range of blockchain networks, enabling your marketplace to accept cryptocurrency payments from customers worldwide. With 7 mainnet networks and 7 testnet networks, you have full flexibility to go live or test your payment flow before launch.
✨ Industry-Leading Multi-Chain Support
Accept payments in 30+ cryptocurrencies across all major blockchain ecosystems. From stablecoins like USDC and USDT to popular tokens like SHIB, ARB, and OP — your customers can pay with their preferred digital assets.
Mainnet Networks (Production)
These networks are ready for real transactions. Payments are settled instantly to your wallet.
1. Ethereum Mainnet
The world's most trusted smart contract platform.
Native: ETH
Stablecoins: USDC, USDT, DAI
Popular Tokens: WBTC, WETH, SHIB
2. BNB Smart Chain (BSC)
High-speed, low-cost transactions on Binance's network.
Native: BNB
Stablecoins: USDC, BSC-USD
Popular Tokens: WBNB, WBTC, TRX, DOGE, XPAYR
3. Polygon (MATIC)
Ethereum's leading Layer 2 scaling solution with near-zero gas fees.
Native: POL
Stablecoins: USDC, USDT
4. Arbitrum One
Fast and secure Ethereum Layer 2 with the largest TVL.
Native: ETH
Stablecoins: USDC, USDT
Popular Tokens: ARB, WBTC, WETH
5. Base
Coinbase's secure, low-cost Ethereum L2 network.
Stablecoins: USDC, USDT
Popular Tokens: WETH, SOL (Wrapped)
6. Optimism
Ultra-fast Ethereum L2 with optimistic rollups technology.
Native: ETH
Stablecoins: USDC, USDT
Popular Tokens: OP
7. Avalanche C-Chain
High-throughput, eco-friendly blockchain with sub-second finality.
Native: AVAX
Stablecoins: USDC, USDT
Popular Tokens: WAVAX, BTC.b
Testnet Networks (Development & Testing)
Test your payment integration completely free before going live. Each testnet mirrors its mainnet counterpart.
Network Testnet Name Supported Tokens
Ethereum Sepolia ETH, USDC, USDT
BSC BSC Testnet BNB, USDC, USDT, TXPAYR
Polygon Amoy POL, USDC, USDT
Arbitrum Arbitrum Sepolia ETH, USDC, USDT
Base Base Sepolia USDC, USDT
Optimism Optimism Sepolia ETH, USDC, USDT
Avalanche Fuji AVAX, USDC, USDT
Why Web3Cart's Multi-Chain Approach?
Instant Settlement
Funds are transferred directly to your wallet the moment the blockchain confirms the transaction. No holding periods, no withdrawal requests.
Global Reach
Accept payments from anyone, anywhere in the world. No bank accounts, no currency conversion hassles, no geographic restrictions.
Fully Transparent
All smart contracts are verified on-chain and professionally audited. Every transaction is publicly verifiable on blockchain explorers.
⚡ Low Gas Fees
Layer 2 networks like Arbitrum, Base, and Optimism offer transaction costs as low as $0.01, making micro-payments viable.
Token Support Summary
Stablecoins: USDC, USDT, DAI, BSC-USD
Native Tokens: ETH, BNB, POL, AVAX
Wrapped Assets: WBTC, WETH, WBNB, WAVAX, BTC.b
Ecosystem Tokens: ARB, OP, XPAYR, SOL (Wrapped)
Meme Coins: SHIB, DOGE
Legacy Tokens: TRX